Chalk to Grass Free session
Draft preview · ANA-0001 · Tactical analysis

Build-out vs a 4-4-2 two-man press.

We're building from the GK and our centre-backs in the first third. The opponent sets up in a 4-4-2 and presses with two strikers: one on the ball, one on our 6 or our other CB. The rest of the block sits in a compact 4-4 behind them, so every short pass looks covered and the easy answer is to kick it long.

Draft preview Pending coach sign-off. Boards and decision tables only: there's no download yet.

  • Us: 4-3-3, building from the GK and centre-backs
  • Them: 4-4-2, pressing with two strikers
  • Inside: 4 press pictures × 6 solutions, 28 boards, a decision table per phase
  • Level: U16 to college, with ground-only options for U10–U15 in every phase
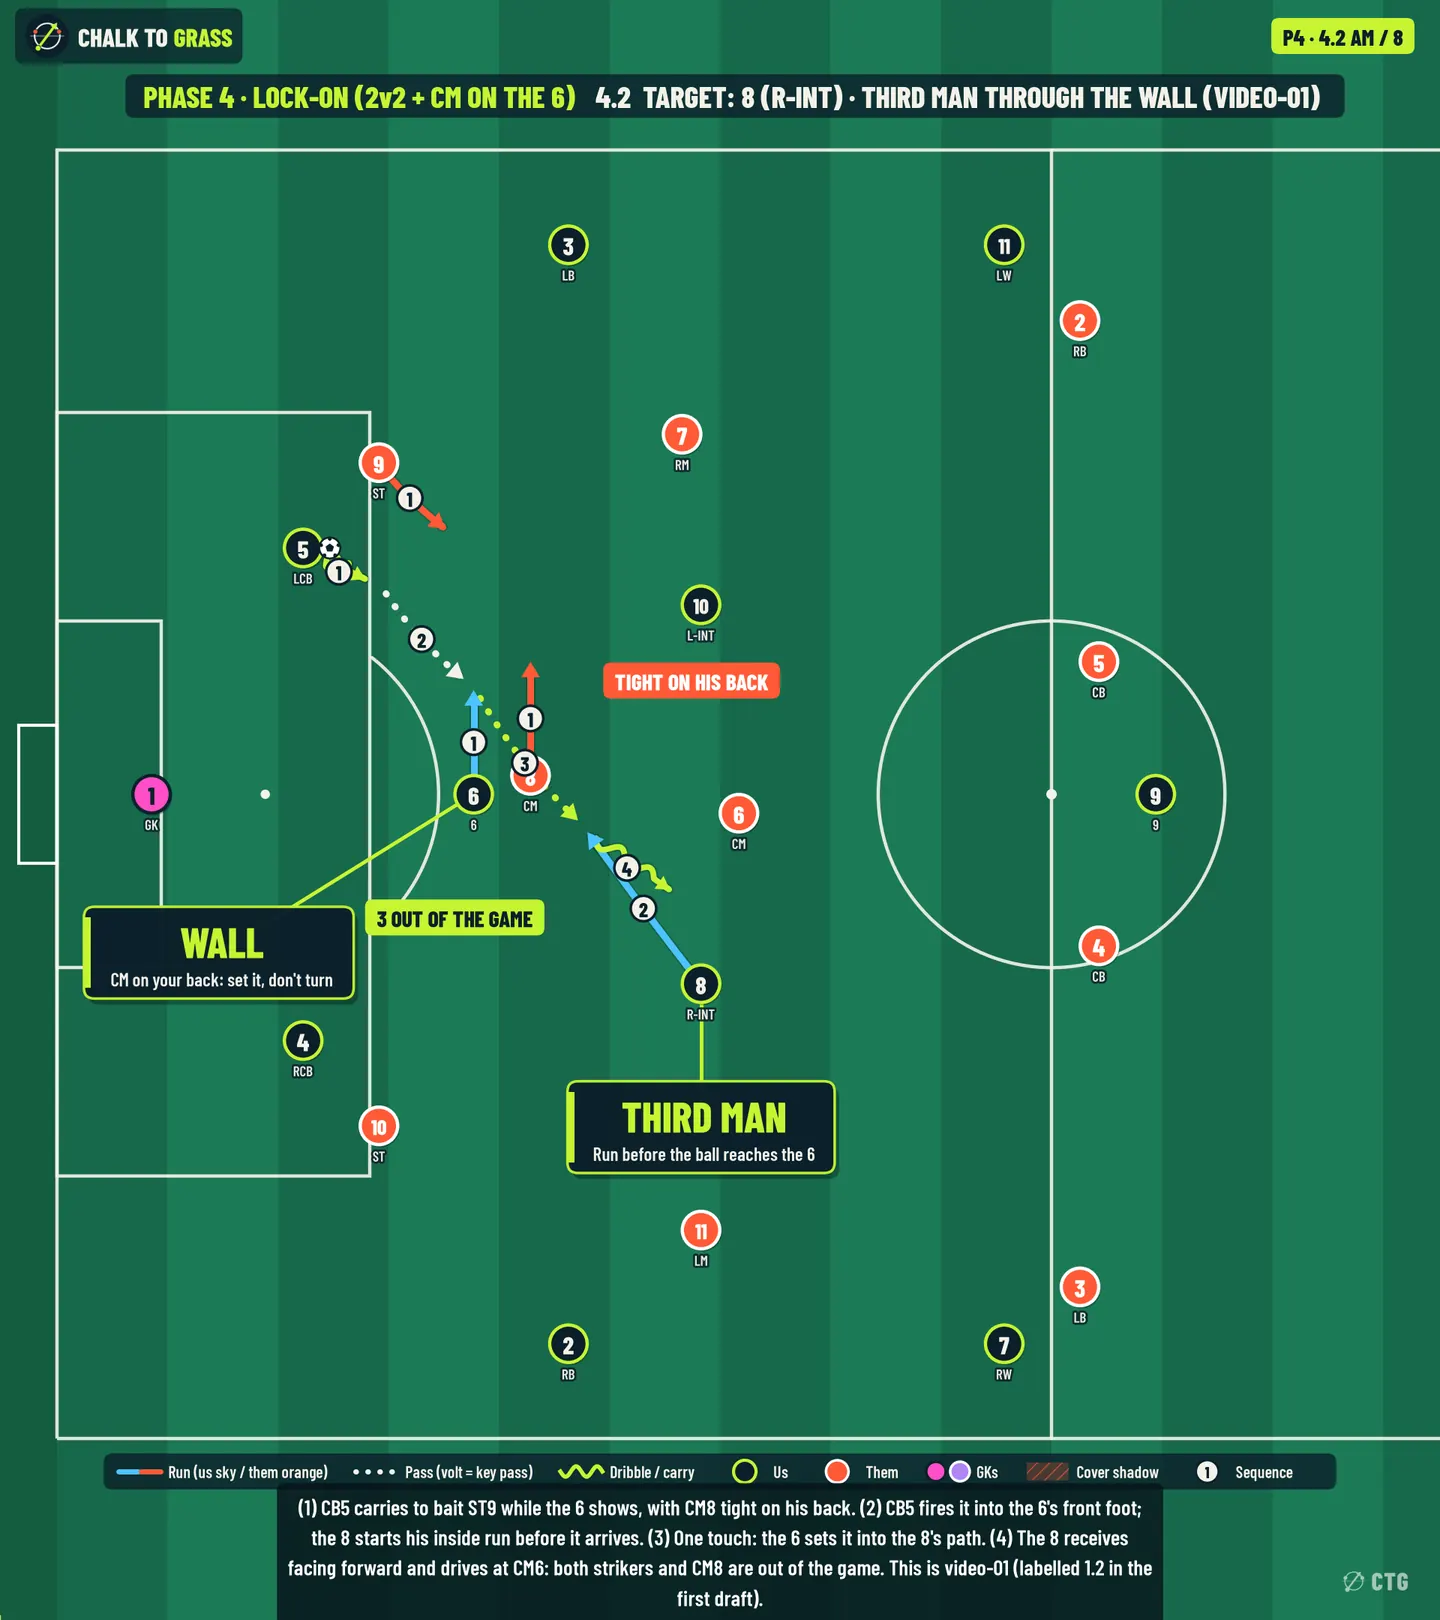
Board 4.2: AM / 8, Third man through the wall (Episode 01)
Solution 4.2, third man through the wall: the pattern from Episode 01.

The problem

Two strikers can't press three

A 4-4-2 only has two players in the first line, and we have three-plus (2 CBs + GK, or 2 CBs + 6). So they can't press us man for man. They either steer us (force inside or outside into a trap) or share jobs (screen the 6 and swap as the ball travels). Each way of solving that 2-v-3 is one phase below. The fourth answer is to go man-to-man on the CBs and push a CM onto our 6 (Episode 01's picture), which makes it 3 v 3 in the first line but leaves the GK free and CM6 alone in midfield: Phase 4.

Spot it in two seconds

watch where ST10 starts, then where CM8 is. In the 6's lane = Phase 1. On the CB's outside shoulder, CMs compact = Phase 2. Between CB and 6, inside = Phase 3. Both strikers on our CBs and CM8 tight on the 6 = Phase 4 (Lock-On), so the GK is free.

Our shape: 4-3-3

GK 1 · RB 2 · RCB 4 · LCB 5 · LB 3 · single pivot 6 · 8 = right interior · 10 = left interior · 7 = RW · 9 · 11 = LW. On the boards our players carry these numbers with a role tag underneath (R-INT / L-INT / RW / LW). We attack left to right, so our right side is the bottom touchline.

Who's who on the boards

A plain number or role is always ours ("the 8", "the 10", "the RW", "CB4"). An opponent always carries his position prefix (ST9, ST10, RM7, LM11, CM8, CM6, LB3, "their CB4/#5", "their RB2"). Opponent numbering follows their own 4-4-2; their LM11 and LB3 are on our right.

a firm ground pass travels 15–18 m/s, a sprinting player covers about 7 m/s, and a presser adjusting his curve covers about 5–6 m/s. Board geometry is in metres on a 105×68 pitch.

written for U16 to college. The demands that drop for younger groups are firm 25–30 m ground passes, 40 m driven switches, clipped balls and one-touch sets under pressure. Every phase below ends with a "Younger groups" box listing its ground-only options (U13–15, and U10–12 where the build-out line is used).

Board language: solid = run, dotted = pass (volt = key pass), wavy = dribble or carry. Our players have a volt ring with their number and role, opponents are solid orange, keepers pink (ours) and purple (theirs). Numbered badges give the order; faded "0" arrows show what just happened. Tap any board for the full-size version.

At a glance

4 phases × 6 targets

Key: 1 pivot (6) · 2 AM / 8 between the lines · 3 winger · 4 fullback · 5 the 9 · 6 GK as +1 / CB carry.

TargetPhase 1 · Screen & SwitchPhase 2 · Force InsidePhase 3 · Force OutsidePhase 4 · Lock-On
1 · Pivot (6)1.1 Slide out of the shadow: 6 steps 5–7 m right in the switch window, receives, drives2.1 Pin & turn: the 8 and the 10 stand on the CMs' backs, 6 receives with time and splits them into the 93.1 Behind the curve: 6 shows in the space behind ST10's curved run, receives from the RB, switches to the 104.1 Drop between the CBs: 3 v 2 under the strikers, CM8 won't follow 12 m deep, the 6 finds the 8 in the 2 v 1 on CM6
2 · AM / 81.2 Third man through the wall: CM8 jumps the 6, 6 sets one touch, the 8 arrives facing forward (same mechanism as 4.2)2.2 Blind-side drop: 8 drops off CM8's back into the pocket LM11 left3.2 Up-back-through: RW checks short and sets inside, 8 arrives in the gap LM11 vacated4.2 Third man through the wall (Episode 01): CB5 into the 6, one-touch set, the 8 arrives facing forward
3 · Winger1.3 Pocket: RB pins LM11 high, RW comes inside into the pocket2.3 Winger in, 8 beyond: rotation, CB4 finds the RW between the lines3.3 Check & spin: LB3 steps up, RW spins, RB clips it first time4.3 Round the jumping wide mid: LM11 jumps the RB, RW checks to the line, first-time pass round him, RW turns into the space he left
4 · Fullback1.4 Invert: RB becomes a second pivot (2 v 1 screen), then breaks a line into the 92.4 Around the corner: 8 bait, one-touch set to the RB bursting past LM113.4 Far-side switch via the GK: GK drives 40 m to the high LB4.4 Drop deep, the free GK finds you: RB drops below ST10, GK drives 33 m to him, he carries and finds the 8
5 · The 91.5 Go direct + flick: 9 peels onto the LB/CB seam, RW runs in behind, 8 on the second ball2.5 Split & bounce: 6 splits the jumping CMs into the 9, 9 sets to the 103.5 Vertical before the trap: 9 comes short into the right half-space, lays it round the corner to the RW4.5 Drop into the hole: CM8 is on the 6, so the 9 drops in front of their CBs, sets the 10, LW attacks behind
6 · GK / CB1.6 GK bounce, CB carry: GK makes it 3 v 2, free CB4 carries into midfield2.6 Drive inside the striker: CB4 carries 11 m, CM8 must step out, the 8 is free3.6 Carry, make LM11 choose: CB4 carries instead of passing, releases the RB for a 2 v 14.6 GK playmaker: the unpressed GK drives 28 m past the first line to the 8 between ST10 and CM6

Phase 1 of 4 · Draft preview

Screen & Switch

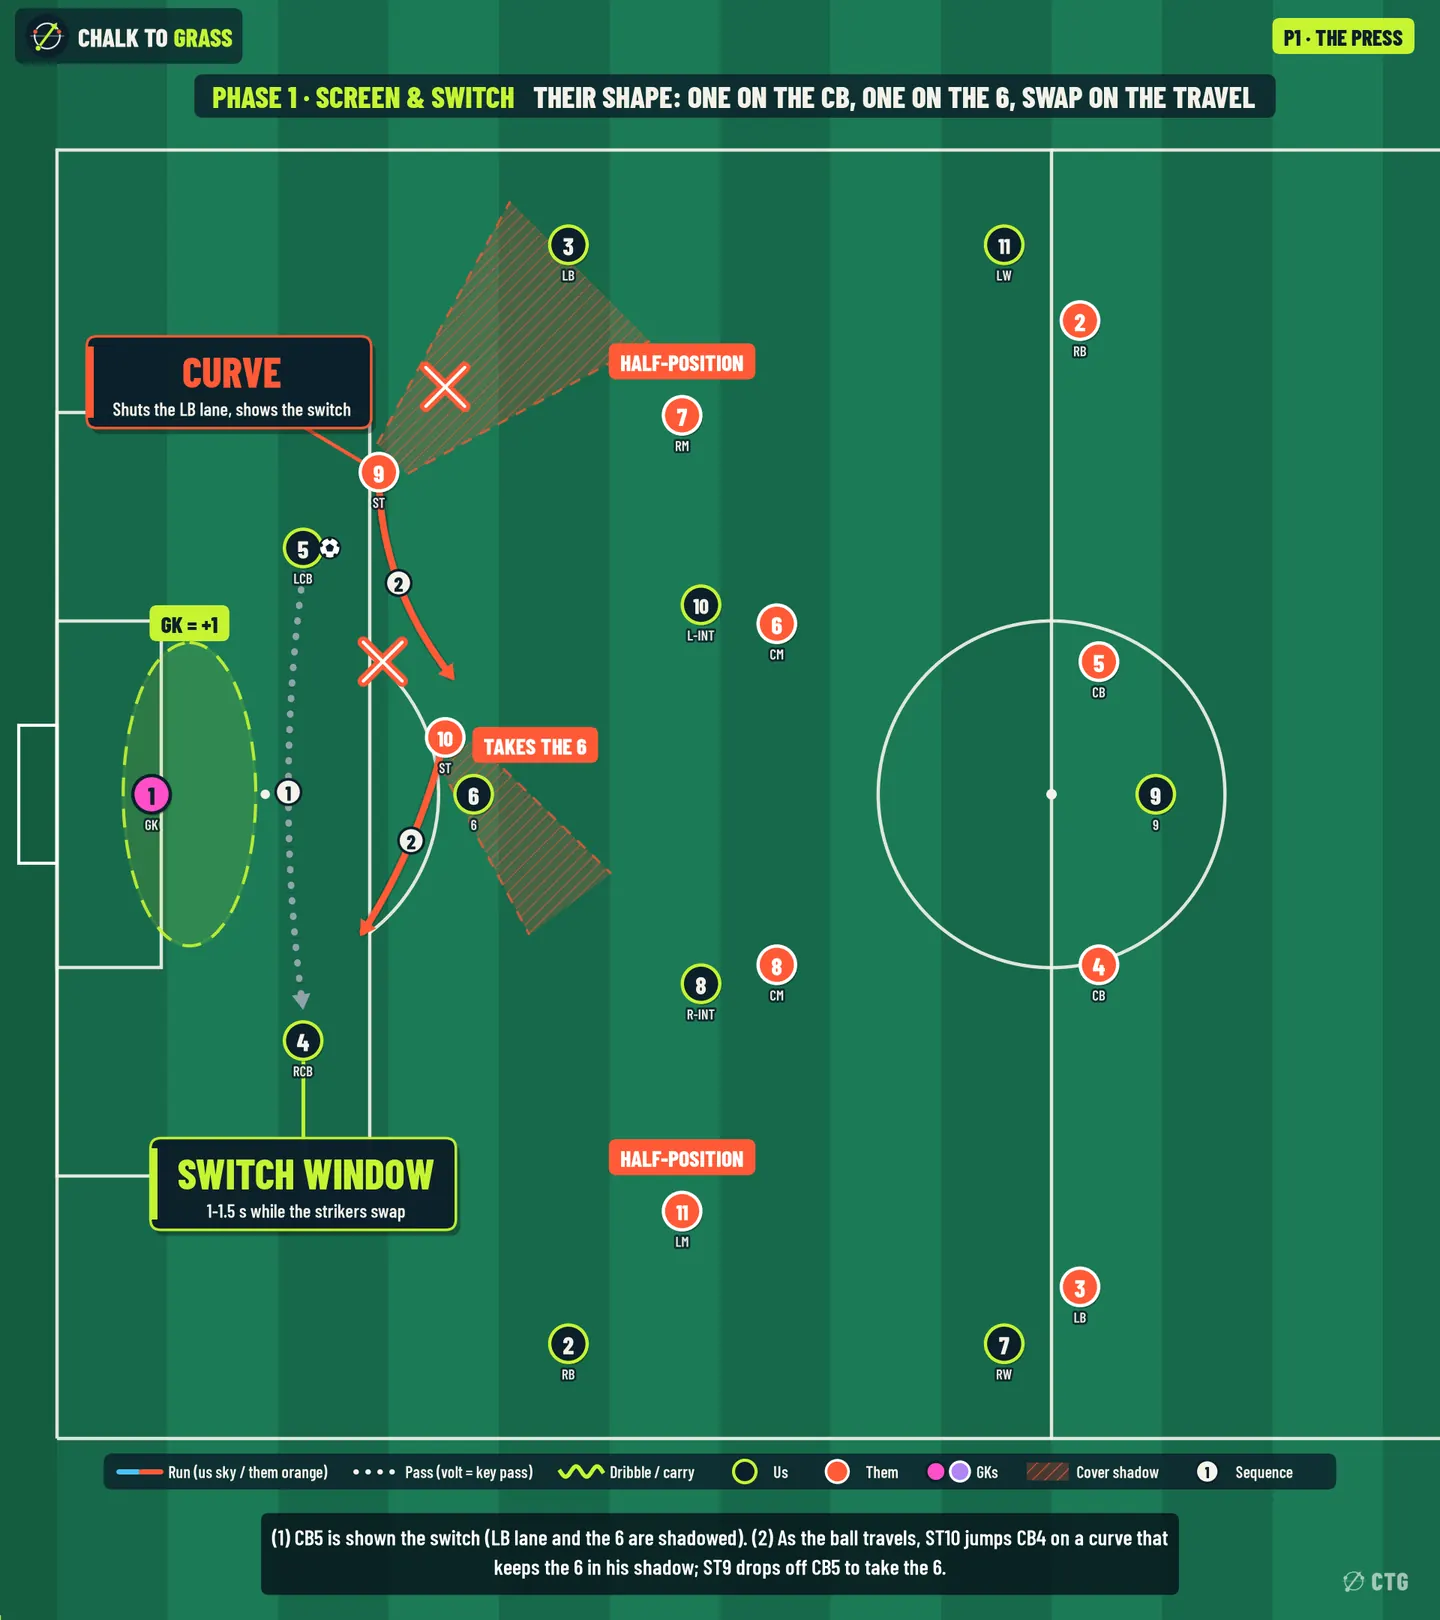
One on the CB, one on the 6, swap on the travel.

Their press

  • Shape. ST9 presses the ball-side CB (CB5) on an outside-in curve. ST10 sits in the CB5→6 lane, 3–4 m off our 6. Their wide mids (RM7, LM11) hold half-positions between our FB and our 8. The CMs (CM6, CM8) are man-oriented on our 8 and 10. Their back four is 4 v our 3 (+ the 9), with a spare CB.
  • Triggers. The CB-to-CB pass is the one they want: as it travels, ST10 jumps CB4 on a curve that keeps the 6 in his shadow, and ST9 drops off CB5 to take the 6. A back pass to the GK triggers ST9 to keep pressing onto the GK.
  • Cover shadows. From CB5: ST9's curve shadows CB5→LB3 and ST10 shadows CB5→6. After the switch, from CB4: ST10 shadows CB4→6.
  • Takes away. The central lane into the 6, the ball-side FB, and time on the ball for the receiving CB.
  • Gives.
    1. The switch window. CB5→CB4 is 26 m (≈1.6 s). ST10 needs 11 m (≈1.6–1.9 s) to get his curve on CB4, and ST9 needs 15 m (≈2.2 s) to reach the 6. So for ~0.7–1 s the 6 is nobody's.
    2. A striker marking the 6: a poor defender facing the wrong way, which makes the 6 an ideal wall.
    3. The GK as +1: 3 v 2 (GK + 2 CBs).
    4. Man-oriented CMs, who can be dragged.
    5. 4 v 4 at the back, with the press committed.
Phase 1 overview board: Screen & Switch, their 4-4-2 press shape, cover shadows and the spaces it gives
Phase overview: their press, the cover shadows (hatched), the lanes it takes away (×) and the spaces it gives (volt).

Six solutions

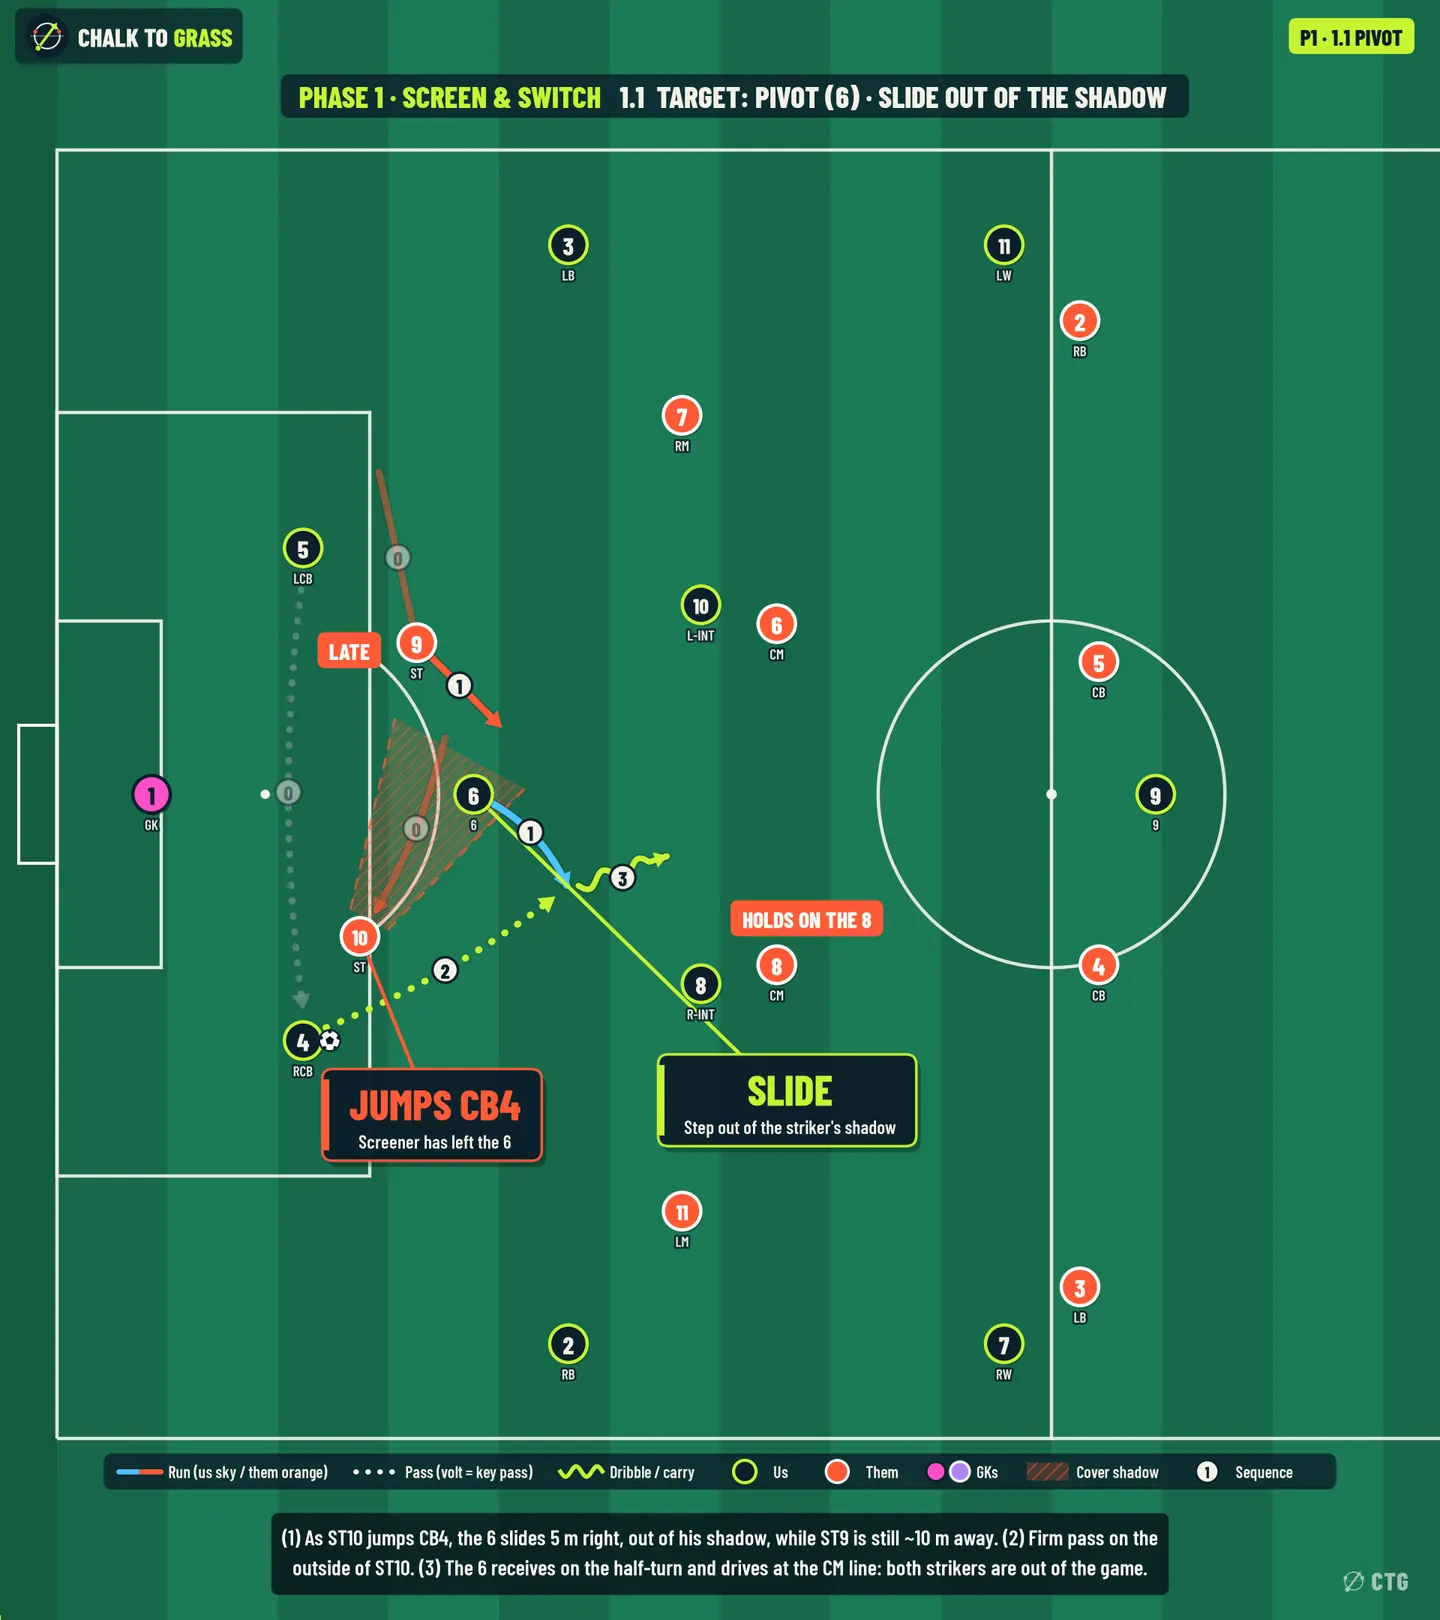
Board 1.1: Pivot, Slide out of the shadow

1.1 · Target: Pivot

Slide out of the shadow

Movement
⓪ CB5→CB4 switch; ST10 jumps CB4, ST9 starts his 15 m recovery. ① As ST10 commits, the 6 slides 5–7 m to his right (22,34 → 27,29), out of ST10's curved shadow and away from ST9's recovery line.
Ball path
② CB4 → 6 (16 m, firm, past ST10's outside shoulder). ③ The 6 receives on the half-turn and drives at the CM line.
Cue (for the 6)
ST10's hips turn toward CB4 = go. Shoulder-check for ST9: more than ~5 m away = turn; less = set back to CB5 (now free) or play 1.2.
Why it works
two strikers can't cover three players during the 1.6 s the ball is travelling. When the 6 receives, ST9 is still ~9 m away and both strikers are behind the ball.
Risk
Medium (a central loss 25 m from goal). If the touch is bad, ST9 and ST10 are both close.
Their adjustment → our answer
ST10 delays his jump until CB4's first touch (keeps the 6 shadowed) → CB4 has time to carry (1.6) or hit the RB inverted (1.4). If CM8 steps onto the 6 → 1.2.
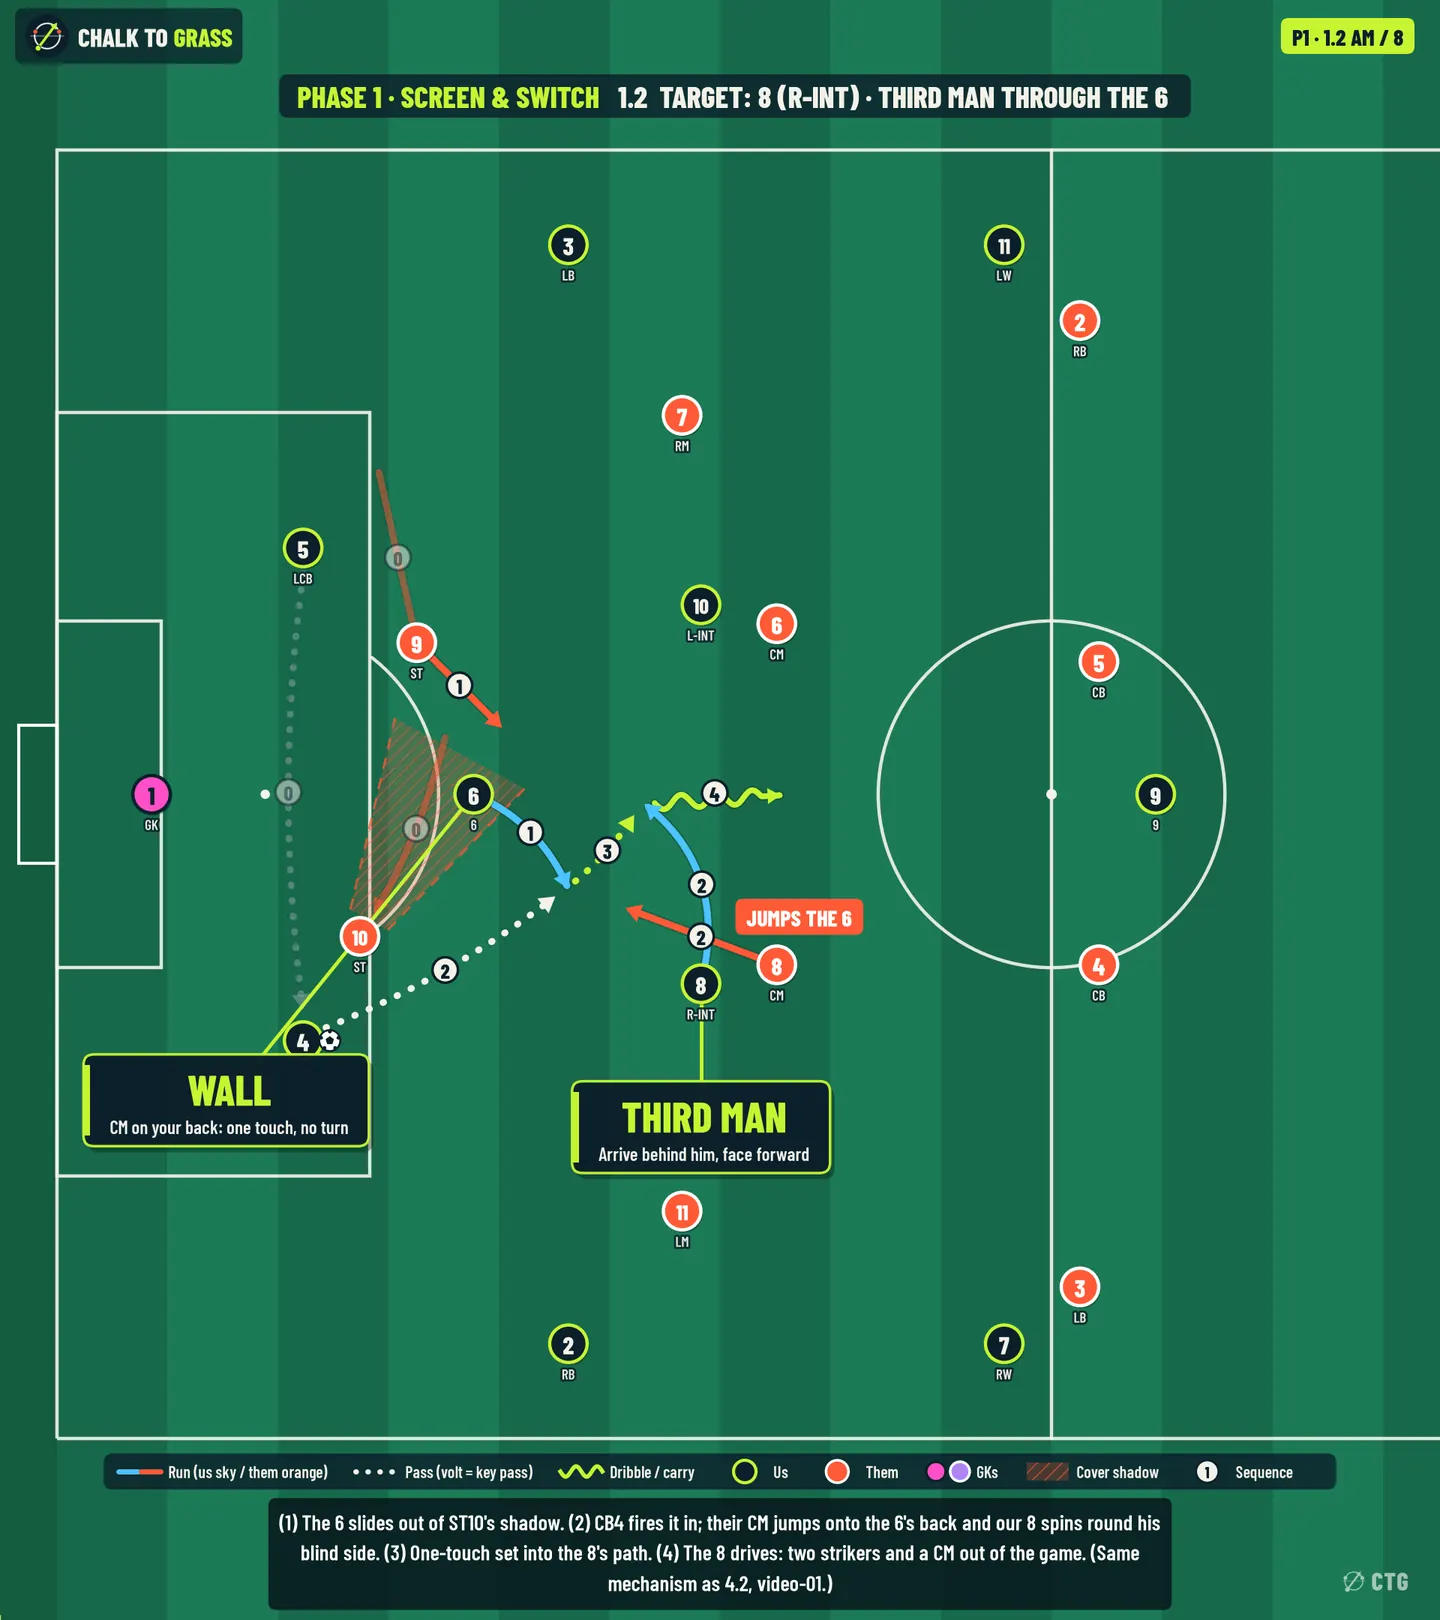
Board 1.2: AM / 8, Third man through the wall

1.2 · Target: AM / 8

Third man through the wall

Movement
① The 6 slides out of the shadow as in 1.1. ② CM8 leaves our 8 to jump onto the 6's back. As he goes, the 8 spins round his blind side (34,24 → 31,33.5).
Ball path
② CB4 fires it into the 6's front foot. ③ The 6 sets first time into the 8's path. ④ The 8 drives forward, facing forward with two strikers and a CM behind the ball.
Cue (for the 6)
pressure on your back (CM8's first step) = wall, no turn. For the 8: "my man left = go now", and run before the ball reaches the 6.
Why it works
CM8 can't mark the 6 and the 8 at once. The set is 6 m, so it takes no time. Same mechanism as 4.2, which is Episode 01 (PRO-0001).
Risk
Low–medium. The danger is a soft first pass, which stops the wall playing first time.
Their adjustment → our answer
CM8 stays on our 8 → the 6 is free (1.1). CM6 slides across to cover → our 10 is free on the far side for the switch.
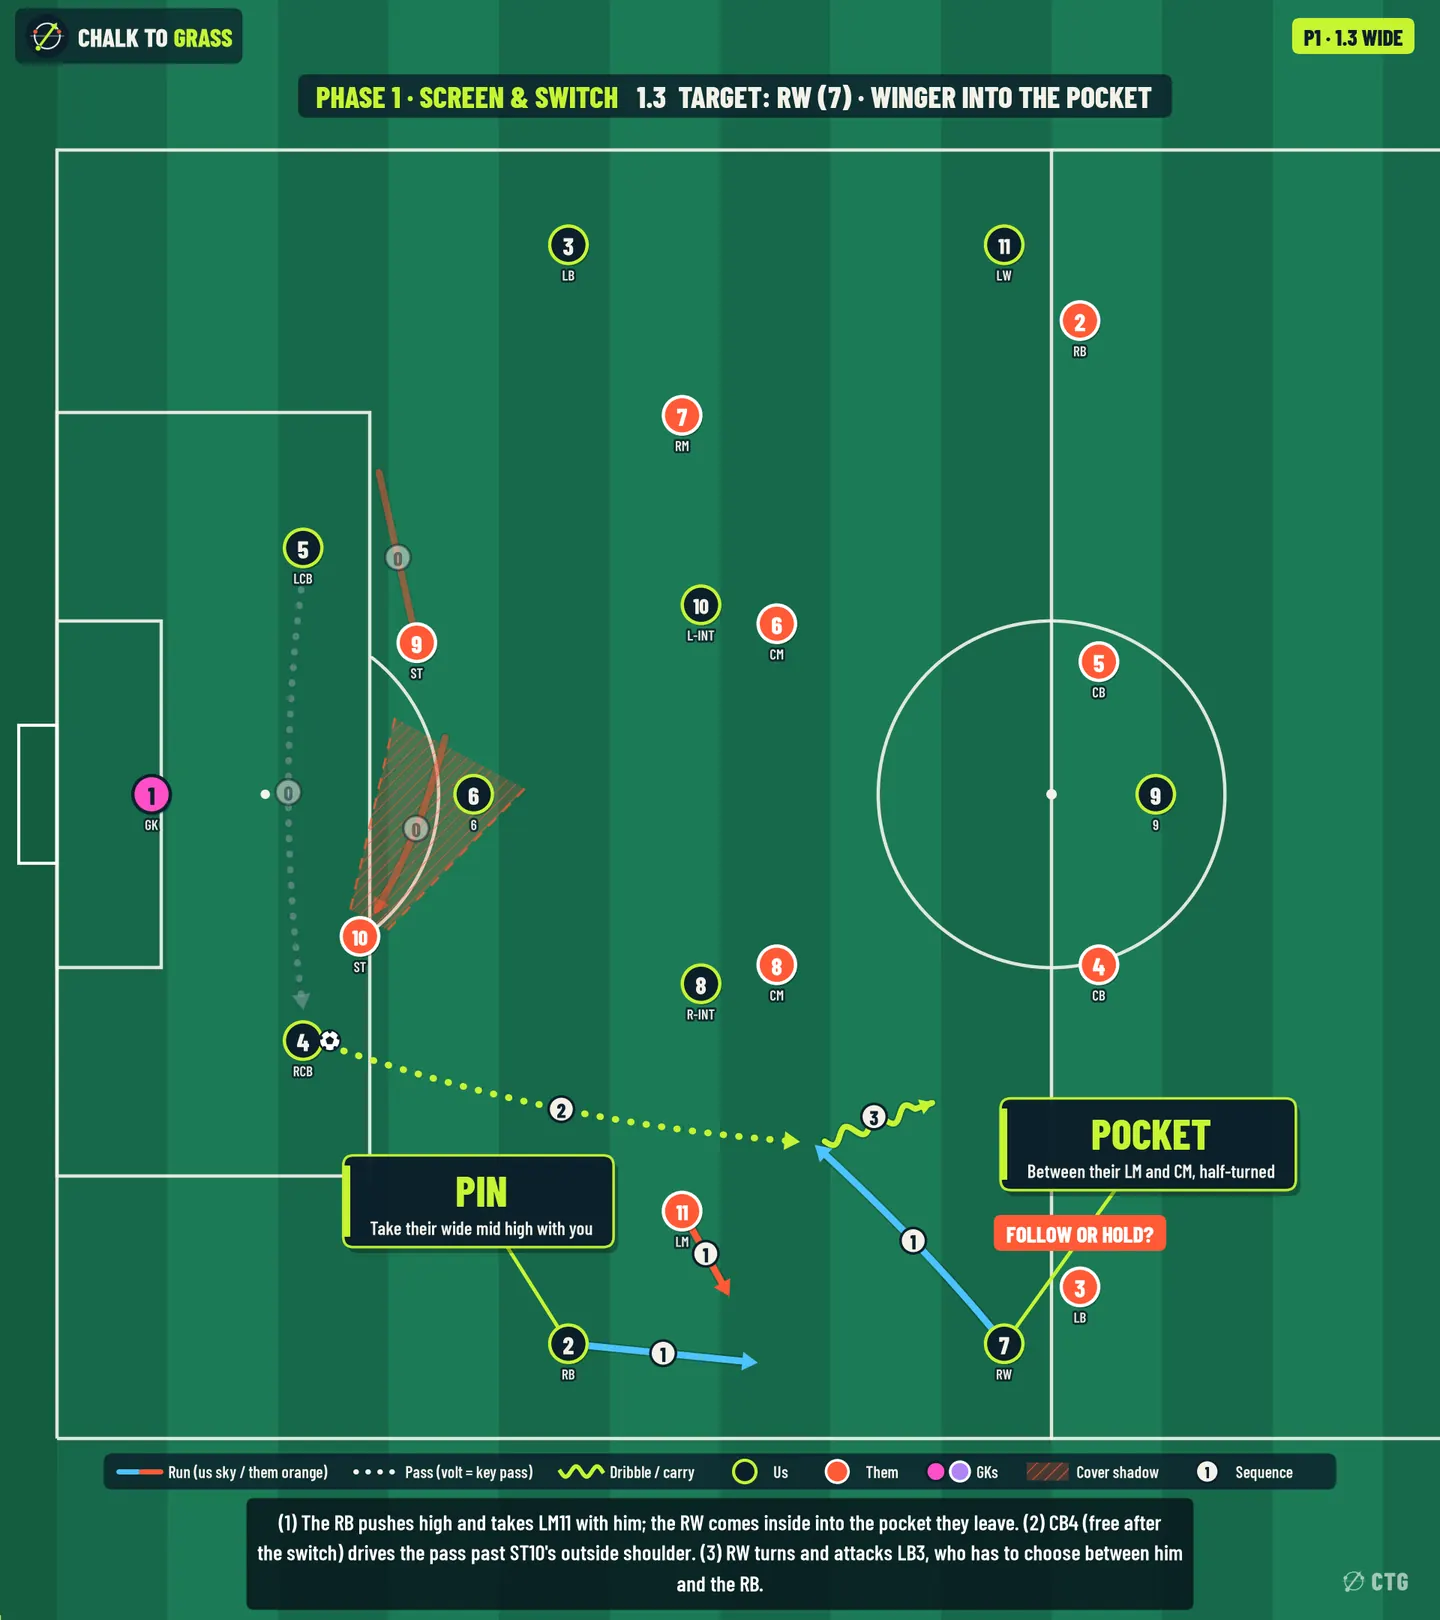
Board 1.3: Winger, Pocket (RB pins, RW comes inside)

1.3 · Target: Winger

Pocket (RB pins, RW comes inside)

Movement
① The RB pushes high and wide (27,5 → 37,4) and takes LM11 with him. The RW comes inside from the touchline (50,5 → 40,15.5) into the pocket between LM11 and CM8.
Ball path
② CB4 (free after the switch) drives a 28 m pass outside ST10's curve into the RW. ③ The RW turns and attacks LB3.
Cue (for the RW)
if LM11 follows the RB, the pocket is open. Receive half-turned with your back foot open. If LB3 follows you inside, set it back to the 8 or slip the RB down the line.
Why it works
LM11's half-position can't cover the RB high and the pocket at once. Nearest defender to the lane: 8.7 m.
Risk
Low. The RB is high, but CB4, the 6 and CB5 stay behind the ball.
Their adjustment → our answer
LM11 holds the pocket instead of following → the RB is free on the line (the same CB4 pass, now to the RB) or 1.4.
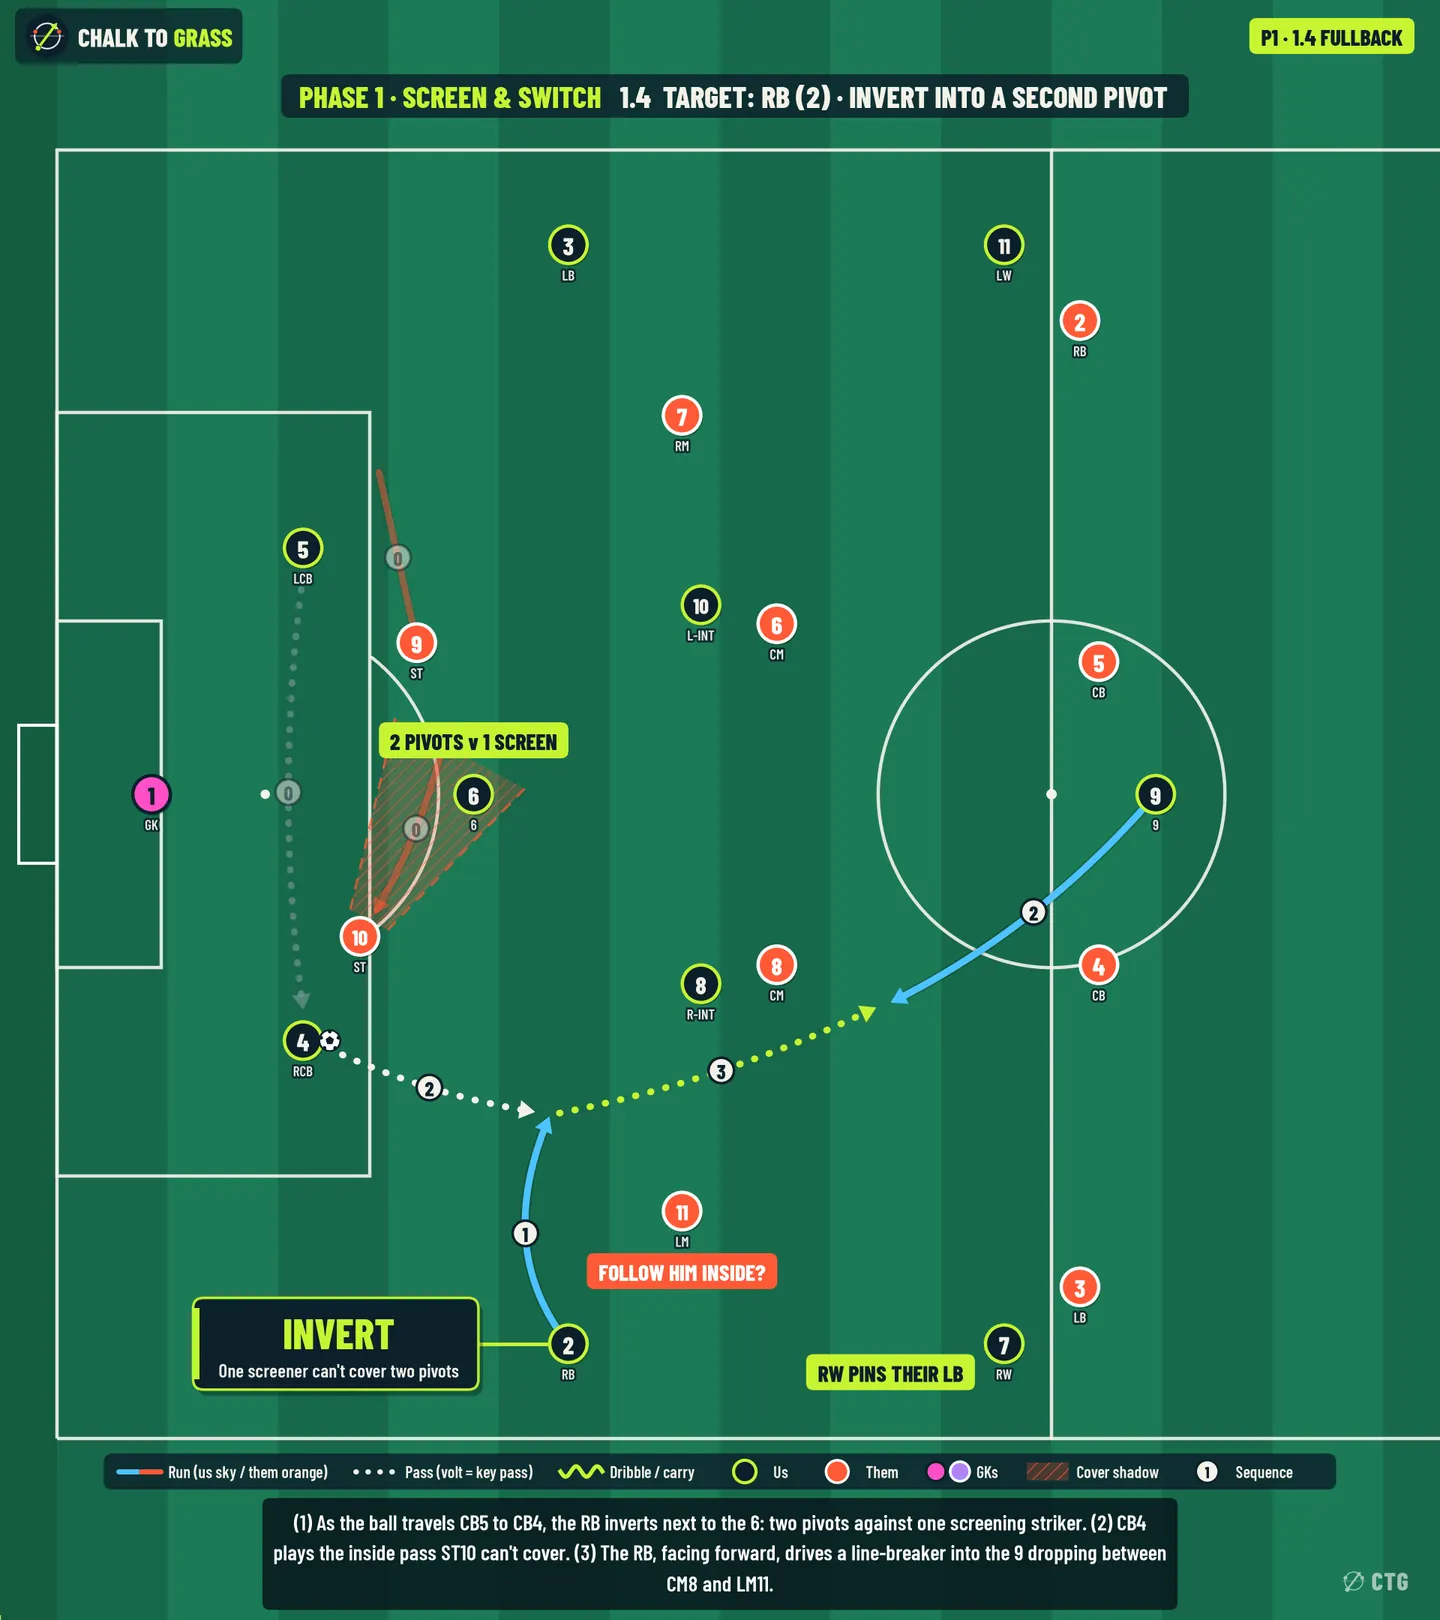
Board 1.4: Fullback, Invert into a second pivot

1.4 · Target: Fullback

Invert into a second pivot

Movement
① As the ball travels CB5→CB4, the RB inverts next to the 6 (27,5 → 26,17). That makes two pivots against one screening striker. ② The 9 drops into the gap between CM8 and LM11 (to 44,23). The RW stays wide and high to pin LB3.
Ball path
② CB4 → RB inside (14 m, 6 m clear of ST10). ③ The RB, facing forward, plays a line-breaker into the 9 (19 m, 3.8 m clear of CM8).
Cue (for the RB)
ST10 is screening the 6 = your inside pass is on. LM11 follows you inside = the RW is 1v1 out wide, so play him instead.
Why it works
one screener can't shadow two pivots, and LM11 has to choose between the inverted RB and the touchline.
Risk
Medium. If we lose it inside, our right flank is empty in transition, so the RW must track or the 6 must cover the channel.
Their adjustment → our answer
LM11 tucks in with the RB → CB4 → RW wide (1.3 lane), or the RB bounces it back for 1.6.
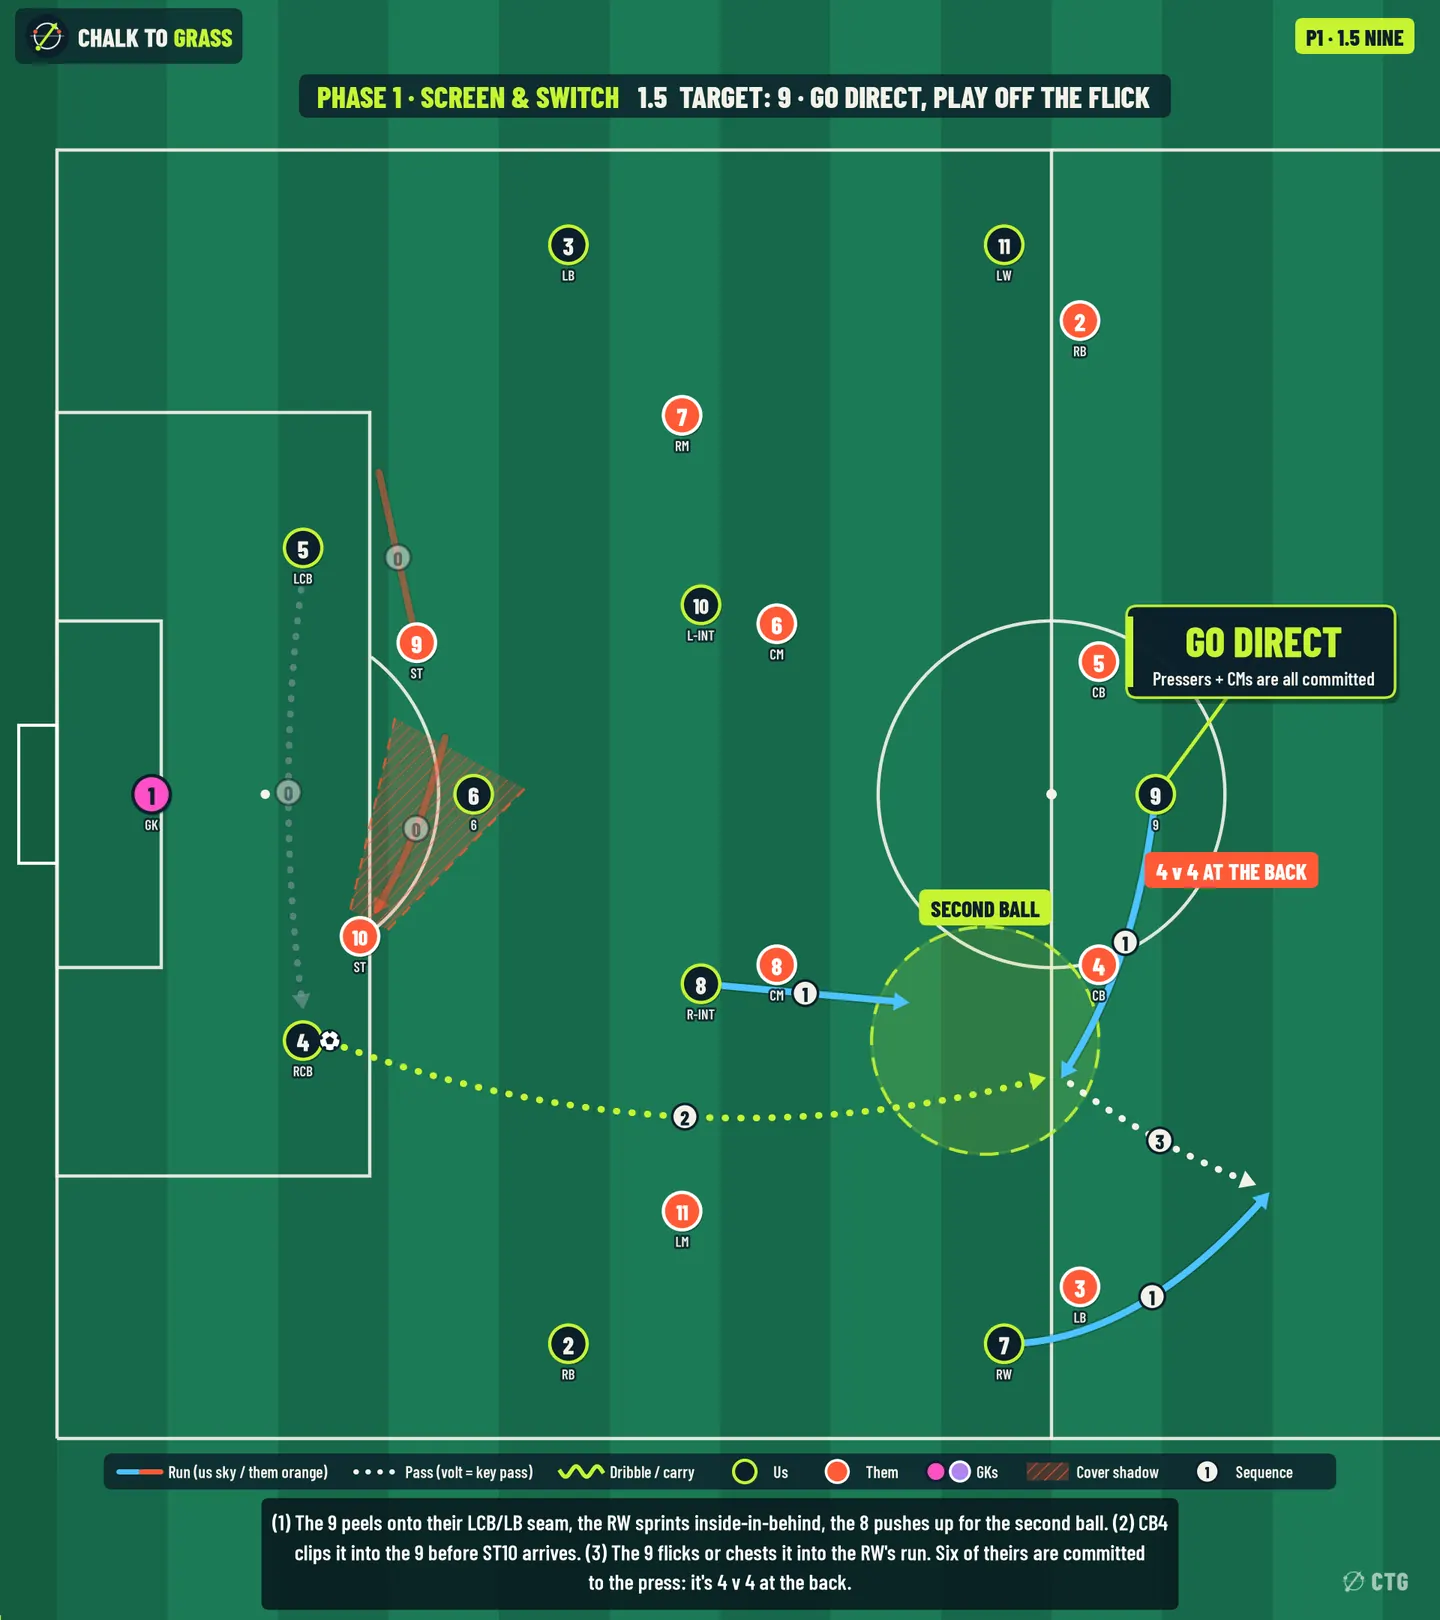
Board 1.5: The 9, Go direct, play off the flick

1.5 · Target: The 9

Go direct, play off the flick

Movement
① The 9 peels onto the seam between their CB4 and LB3 (to 53,19). The RW sprints inside-in-behind (to 64,13). The 8 pushes up for the second ball (to 45,23).
Ball path
② CB4 clips it (≈40 m, lofted) into the 9 before ST10 arrives. ③ The 9 flicks or chests it into the RW's run. The 8 and the 6 own the second-ball ring.
Cue (for CB4)
both CMs are tight on our 8 and 10 and their back four has stepped up = 4 v 4 behind the press. Play it early, on the first touch.
Why it works
in this phase six of theirs (both strikers, both CMs, both wide mids) are committed to the press. Their back four has no midfield screen and plays 4 v 4 against the 9, RW, LW and the arriving 8.
Risk
Medium (a lower-percentage action). But we lose it 50 m from our goal, with the 6 and both CBs set behind it.
Their adjustment → our answer
their back line drops 5–8 m to protect the space → the space in front of them opens for 1.3 / 1.4 (pocket and the 9 to feet).
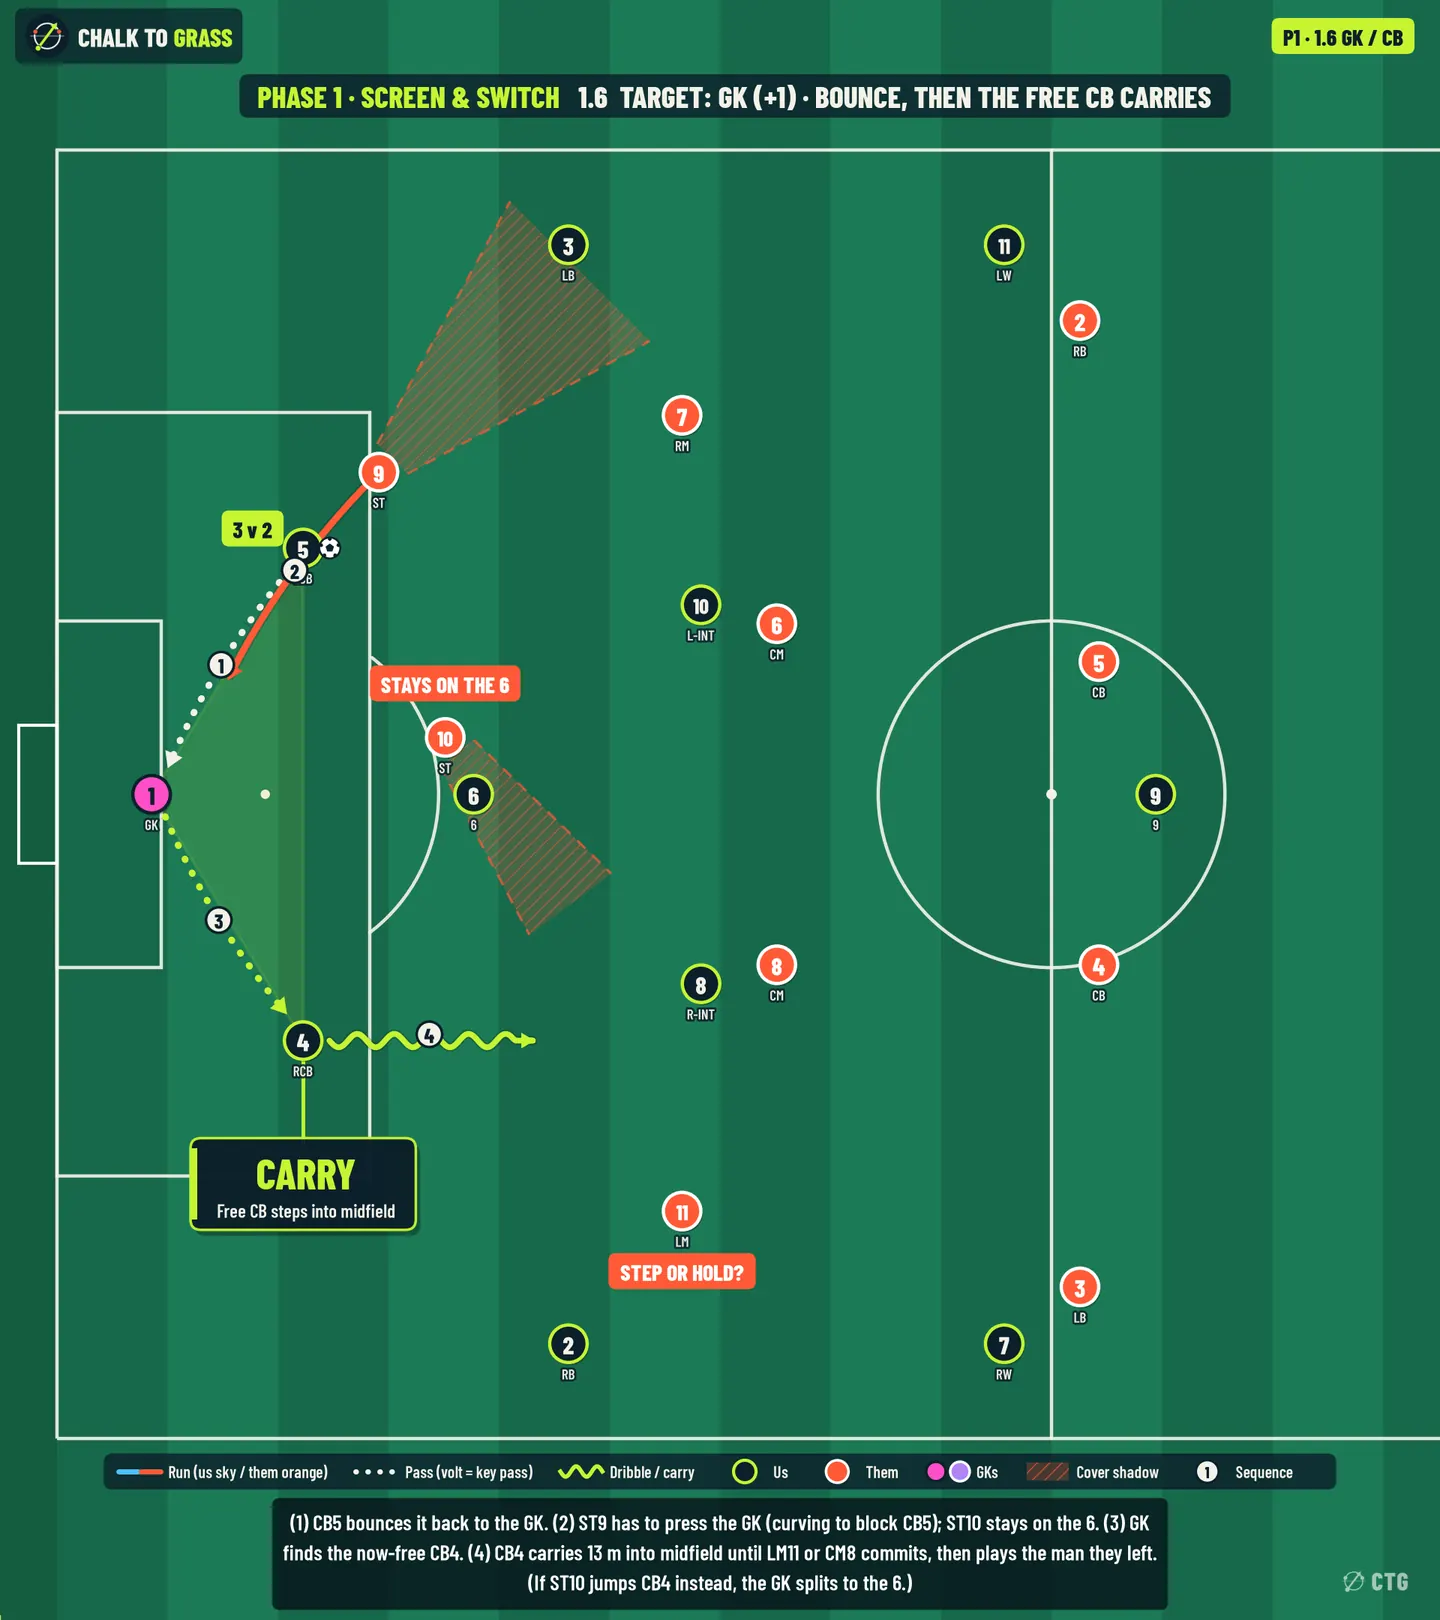
Board 1.6: GK / CB, GK bounce, then the free CB carries

1.6 · Target: GK / CB

GK bounce, then the free CB carries

Movement
① CB5 → GK (15 m, open because ST9's curve comes from the outside). ② ST9 must keep pressing onto the GK, curving to block CB5. ST10 stays on the 6.
Ball path
③ GK → CB4 (15 m clear). ④ CB4 carries 13 m into midfield until LM11 or CM8 commits, then plays the man they left (RB, 8).
Cue (for the GK)
read ST10. If he stays on the 6 → CB4. If he jumps CB4 → split to the 6 between the strikers.
Why it works
GK + 2 CBs = 3 v 2. Whatever ST10 does, someone is free, and a CB carrying forward forces a midfielder to leave his man.
Risk
Low if the GK is calm under pressure; high if he isn't (the error happens in our box).
Their adjustment → our answer
a CM steps up to make it 3 v 3 → that CM's man (our 8) is free → 1.2.

Decision table · Screen & Switch

Read the cue, pick the solution.

You see…On the ballPlaySolution
ST10 commits to CB4 on the switchCB46 slides out of the shadow; CB4 → 61.1
CM8 jumps the 6's backCB4 → 66 sets first time to the 81.2
LM11 follows the RB highCB4Drive it into the RW in the pocket1.3
ST10 screens the 6 and LM11 stays wideCB4Inverted RB inside, then into the 91.4
Both CMs tight, their back four highCB4Clip it to the 9, play off the flick1.5
ST9 presses CB5 hard, ST10 stays on the 6CB5 → GKGK → CB4, who carries1.6

Younger groups · ground-only

U13–15: 1.1, 1.2, 1.3, 1.4, 1.6 (drop the clipped ball in 1.5). U10–12: 1.1 and 1.6 only (step out of the shadow; GK bounce and carry).

Phase 2 of 4 · Draft preview

Force Inside

Funnel into a central trap.

Their press

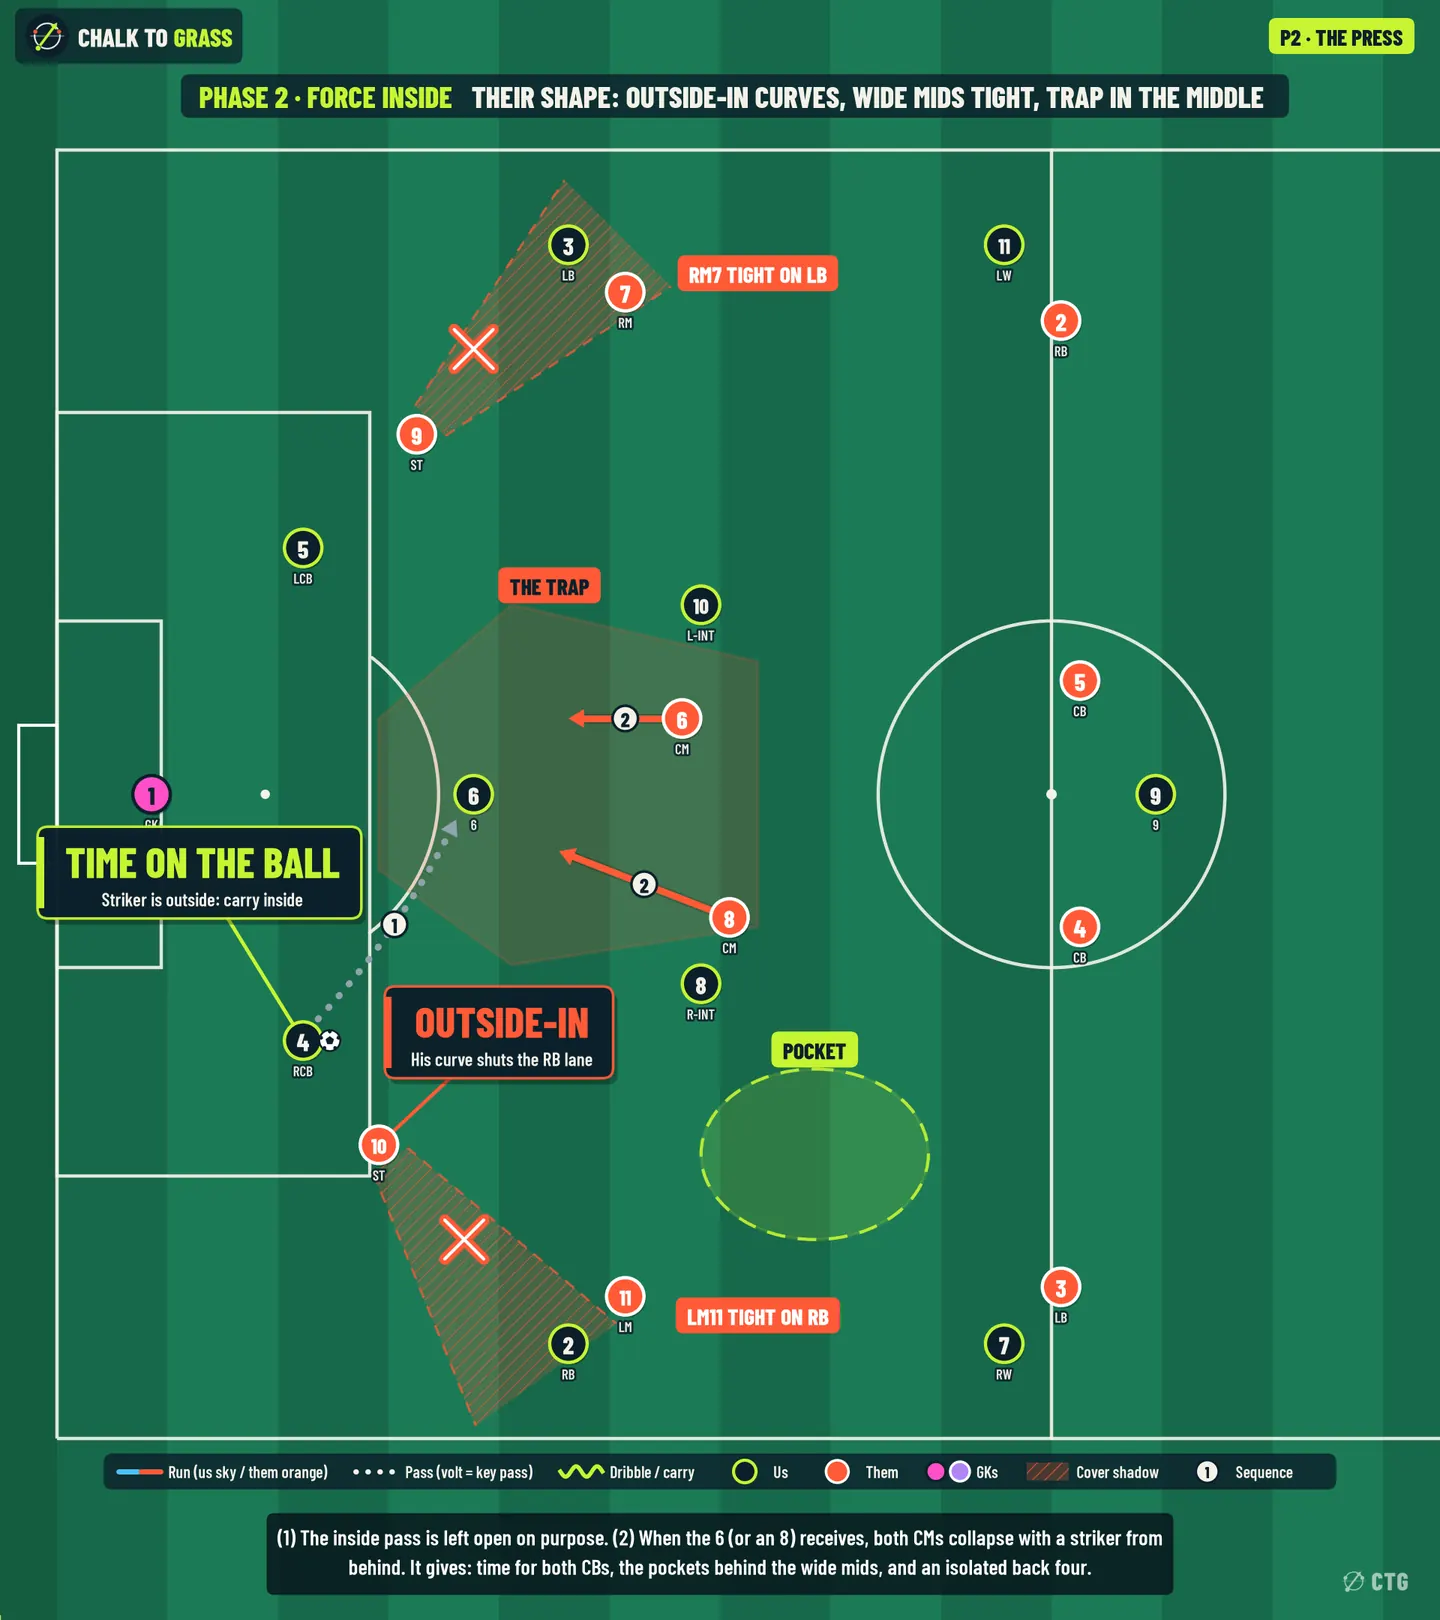
  • Shape. Both strikers start on the outside shoulder of our CBs and press outside-in. Their curves shadow CB→FB. Both wide mids go tight on our FBs. The CMs stay compact and central (≈11 m from our 6), with CM8 goal-side and inside of our 8.
  • Triggers. The ball into the 6, or into an 8 facing his own goal. Then both CMs collapse, a striker recovers from behind, and the ball-side wide mid tucks in.
  • Cover shadows. CB4→RB2 by ST10, and CB5→LB3 by ST9. CB4→6 is open on purpose.
  • Takes away. Width, the FB outlet, the touchline escape.
  • Gives.
    1. Time for both CBs: the strikers are outside them (ST10 is 19 m from our 6).
    2. The pockets behind the wide mids who've gone tight on our FBs.
    3. CMs who can't jump without leaving a man, if we pin them.
    4. A back four with no midfield screen once the CMs jump.
Phase 2 overview board: Force Inside, their 4-4-2 press shape, cover shadows and the spaces it gives
Phase overview: their press, the cover shadows (hatched), the lanes it takes away (×) and the spaces it gives (volt).

Six solutions

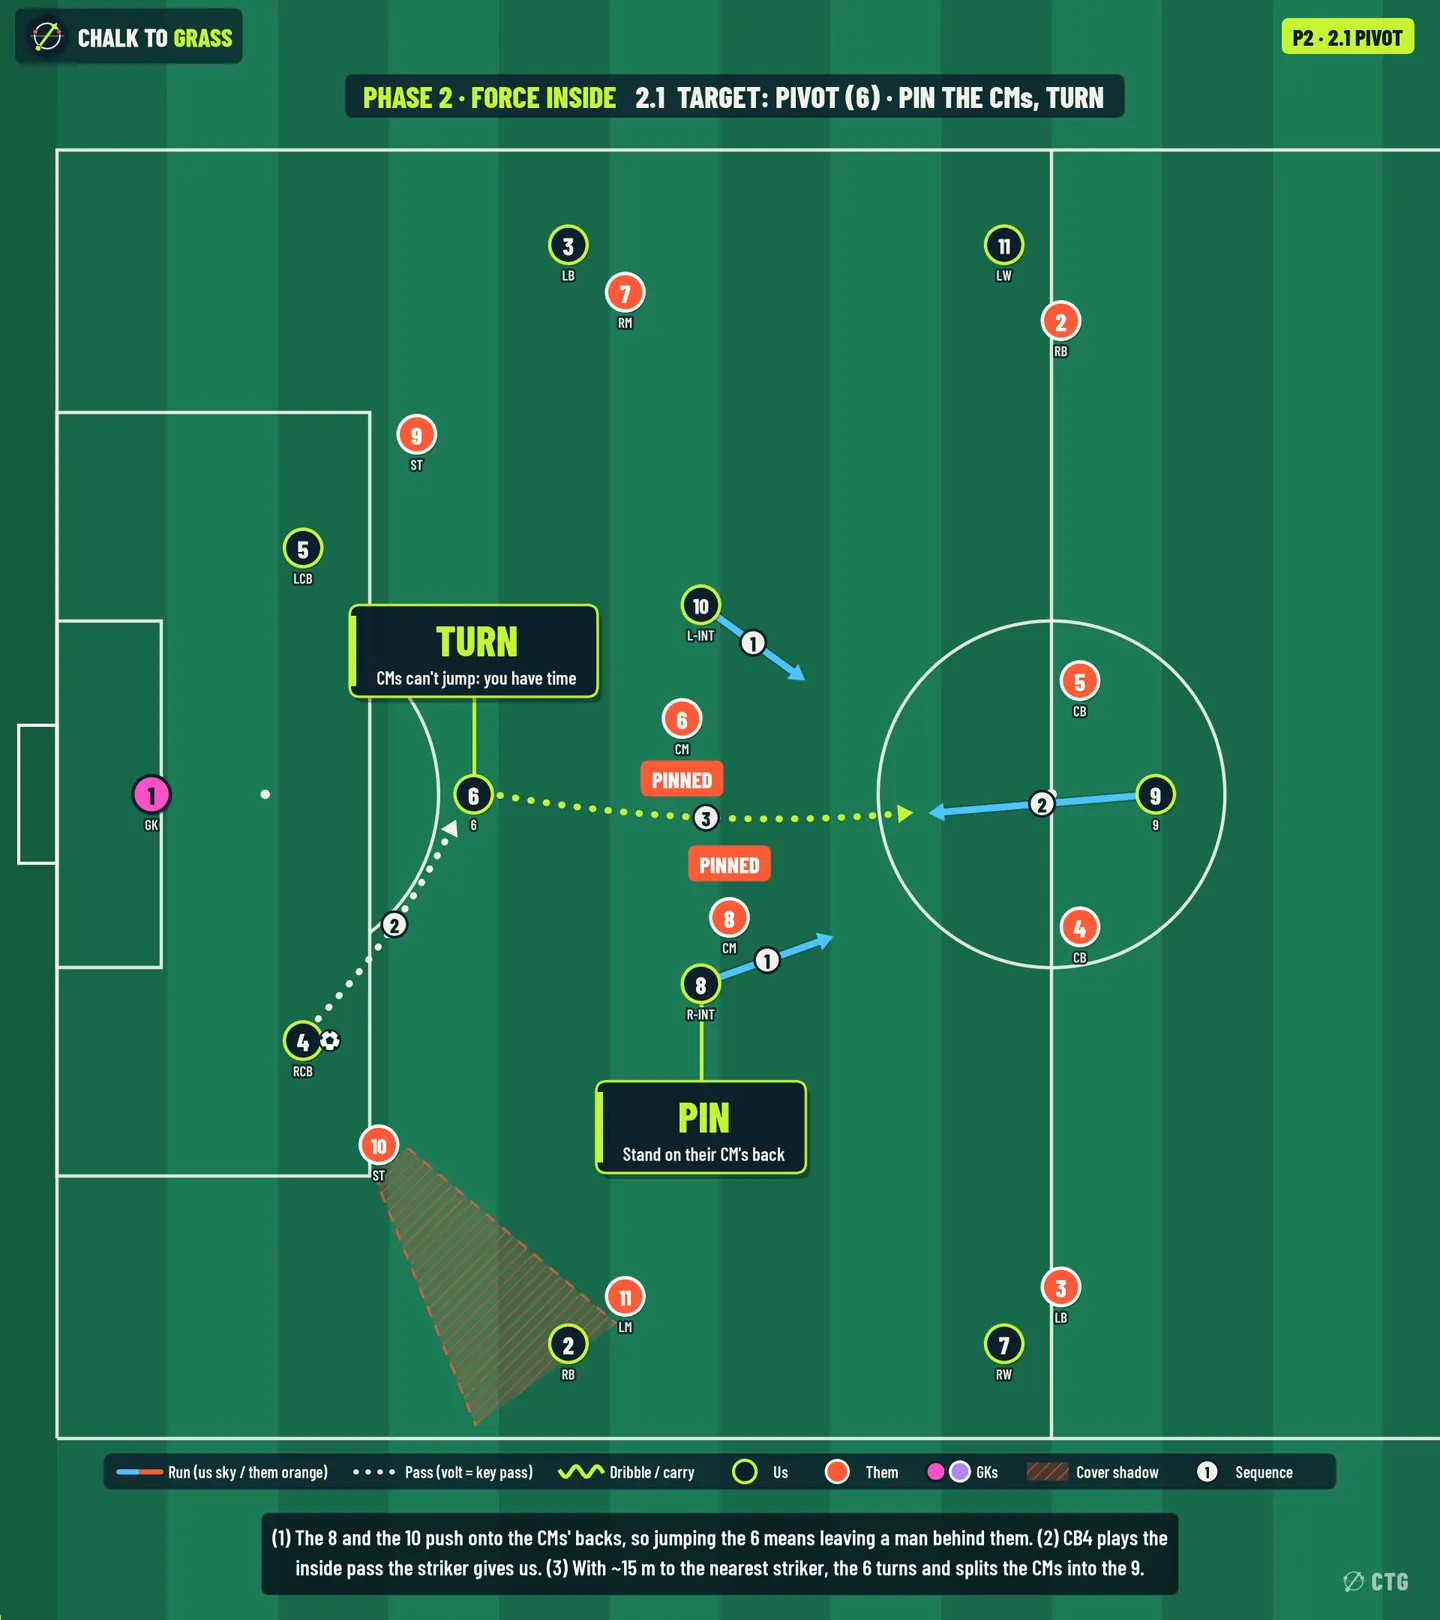
Board 2.1: Pivot, Pin & turn

2.1 · Target: Pivot

Pin & turn

Movement
① The 8 and the 10 push onto the CMs' backs (8 to 41,26.5, 10 to 39.5,40), so jumping the 6 means leaving a man behind. ② The 9 drops toward the gap (46,33).
Ball path
② CB4 → 6 (the inside lane they gift). ③ The 6 turns and splits the CMs into the 9 (24 m, 4.5 m clear).
Cue (for the 6)
CMs look over their shoulder or take a step back = they're pinned, so turn. If a CM jumps anyway, his man is free behind him (→ 2.5).
Why it works
the trap only works if the CMs can jump. Pinned, they're stuck, and the nearest striker is about 19 m from the 6.
Risk
Low–medium.
Their adjustment → our answer
a striker drops onto the 6 → that leaves the CB free → 2.6.
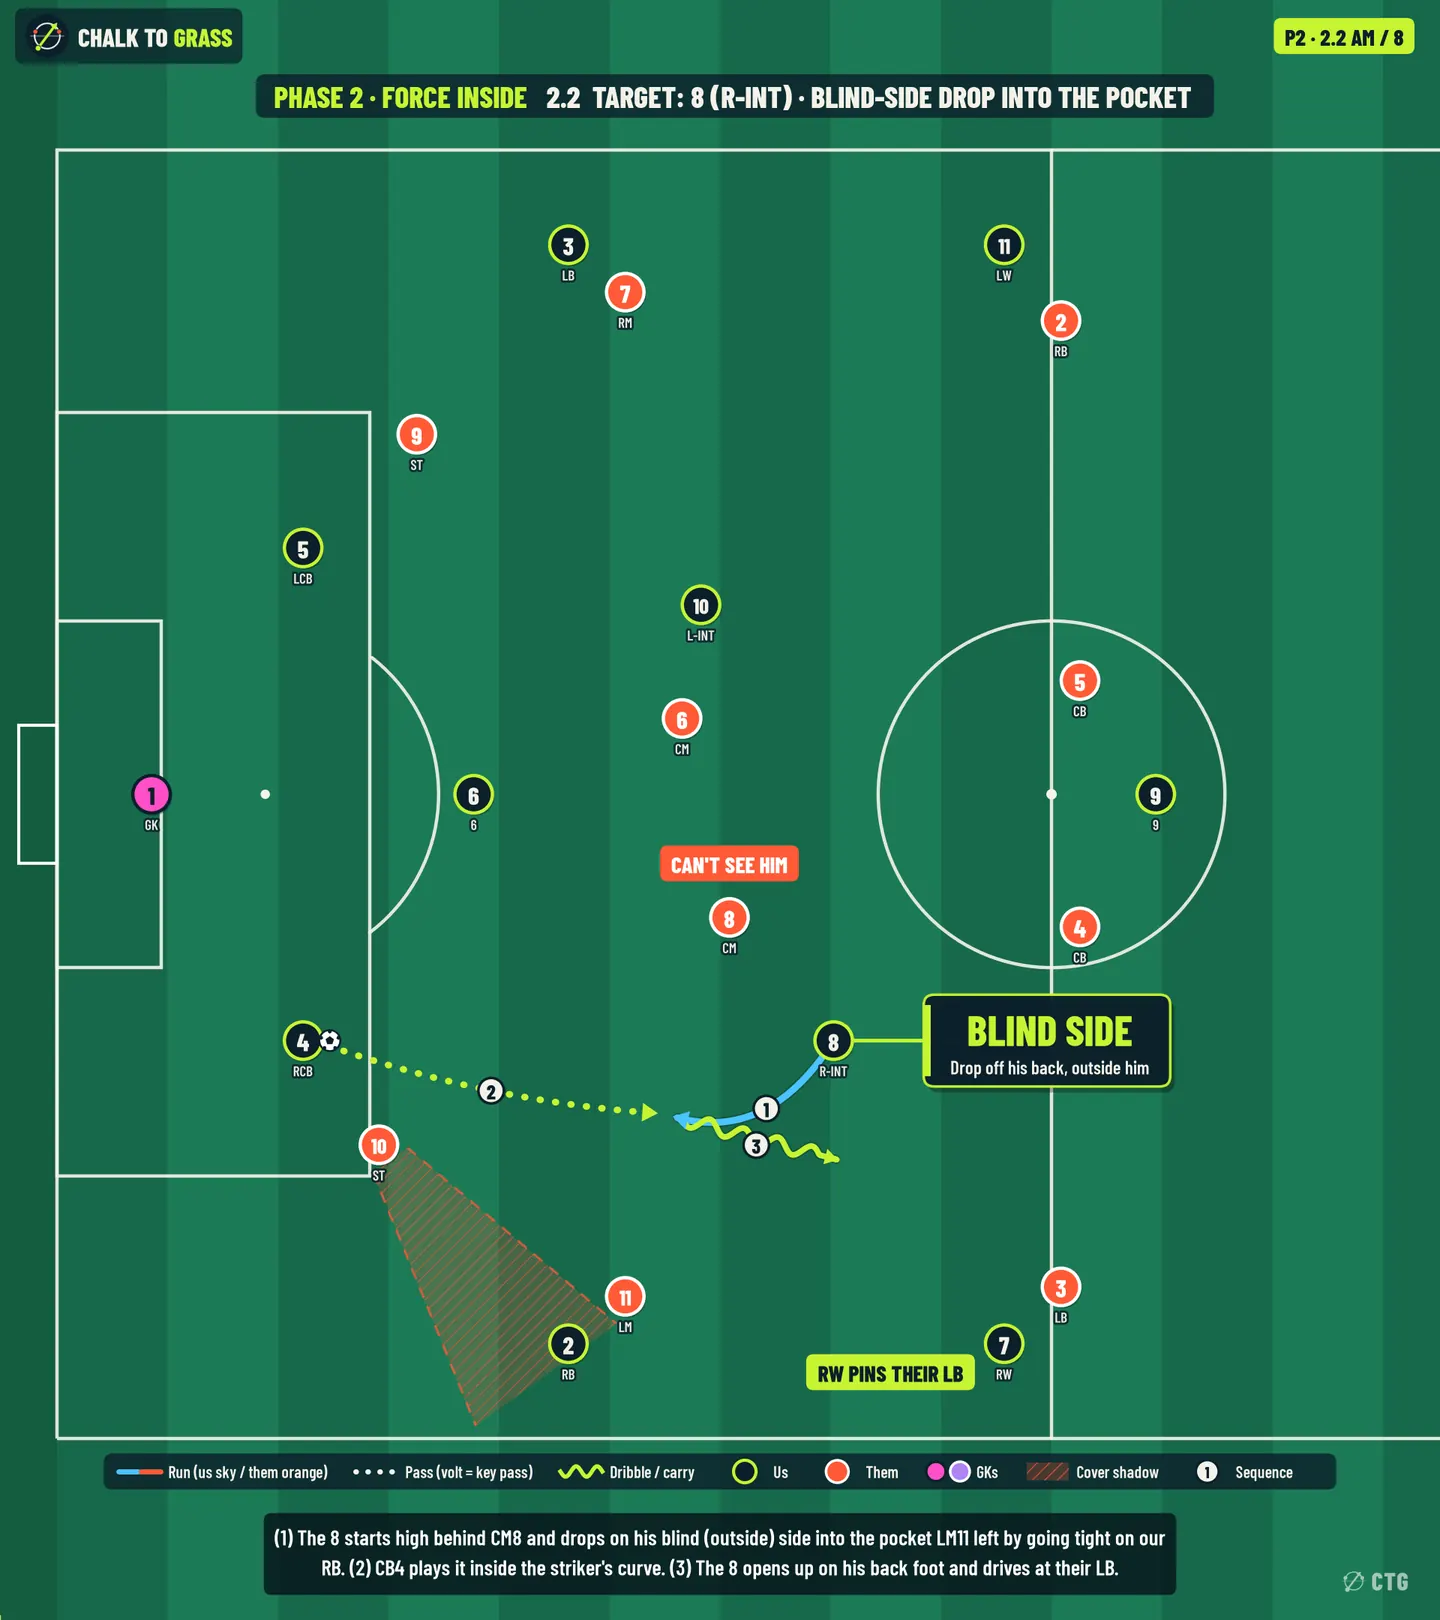
Board 2.2: AM / 8, Blind-side drop into the pocket

2.2 · Target: AM / 8

Blind-side drop into the pocket

Movement
① The 8 starts high, behind CM8's shoulder (41,21), and drops on his blind (outside) side into the pocket LM11 left by going tight on our RB (to 32.5,17).
Ball path
② CB4 → 8 (20 m, inside ST10's curve, 4.6 m clear). ③ The 8 opens up on his back foot and drives at LB3.
Cue (for the 8)
CM8 is watching the ball = he can't see you, so drop. LM11 is tight on our RB = the pocket exists.
Why it works
a force-inside press pulls the wide mid outside and the CM inside, which opens a gap between them that neither one owns.
Risk
Low. The RW stays wide to pin LB3.
Their adjustment → our answer
CM8 follows the drop → the 6 is free (2.1). LB3 steps up → the RW goes in behind.
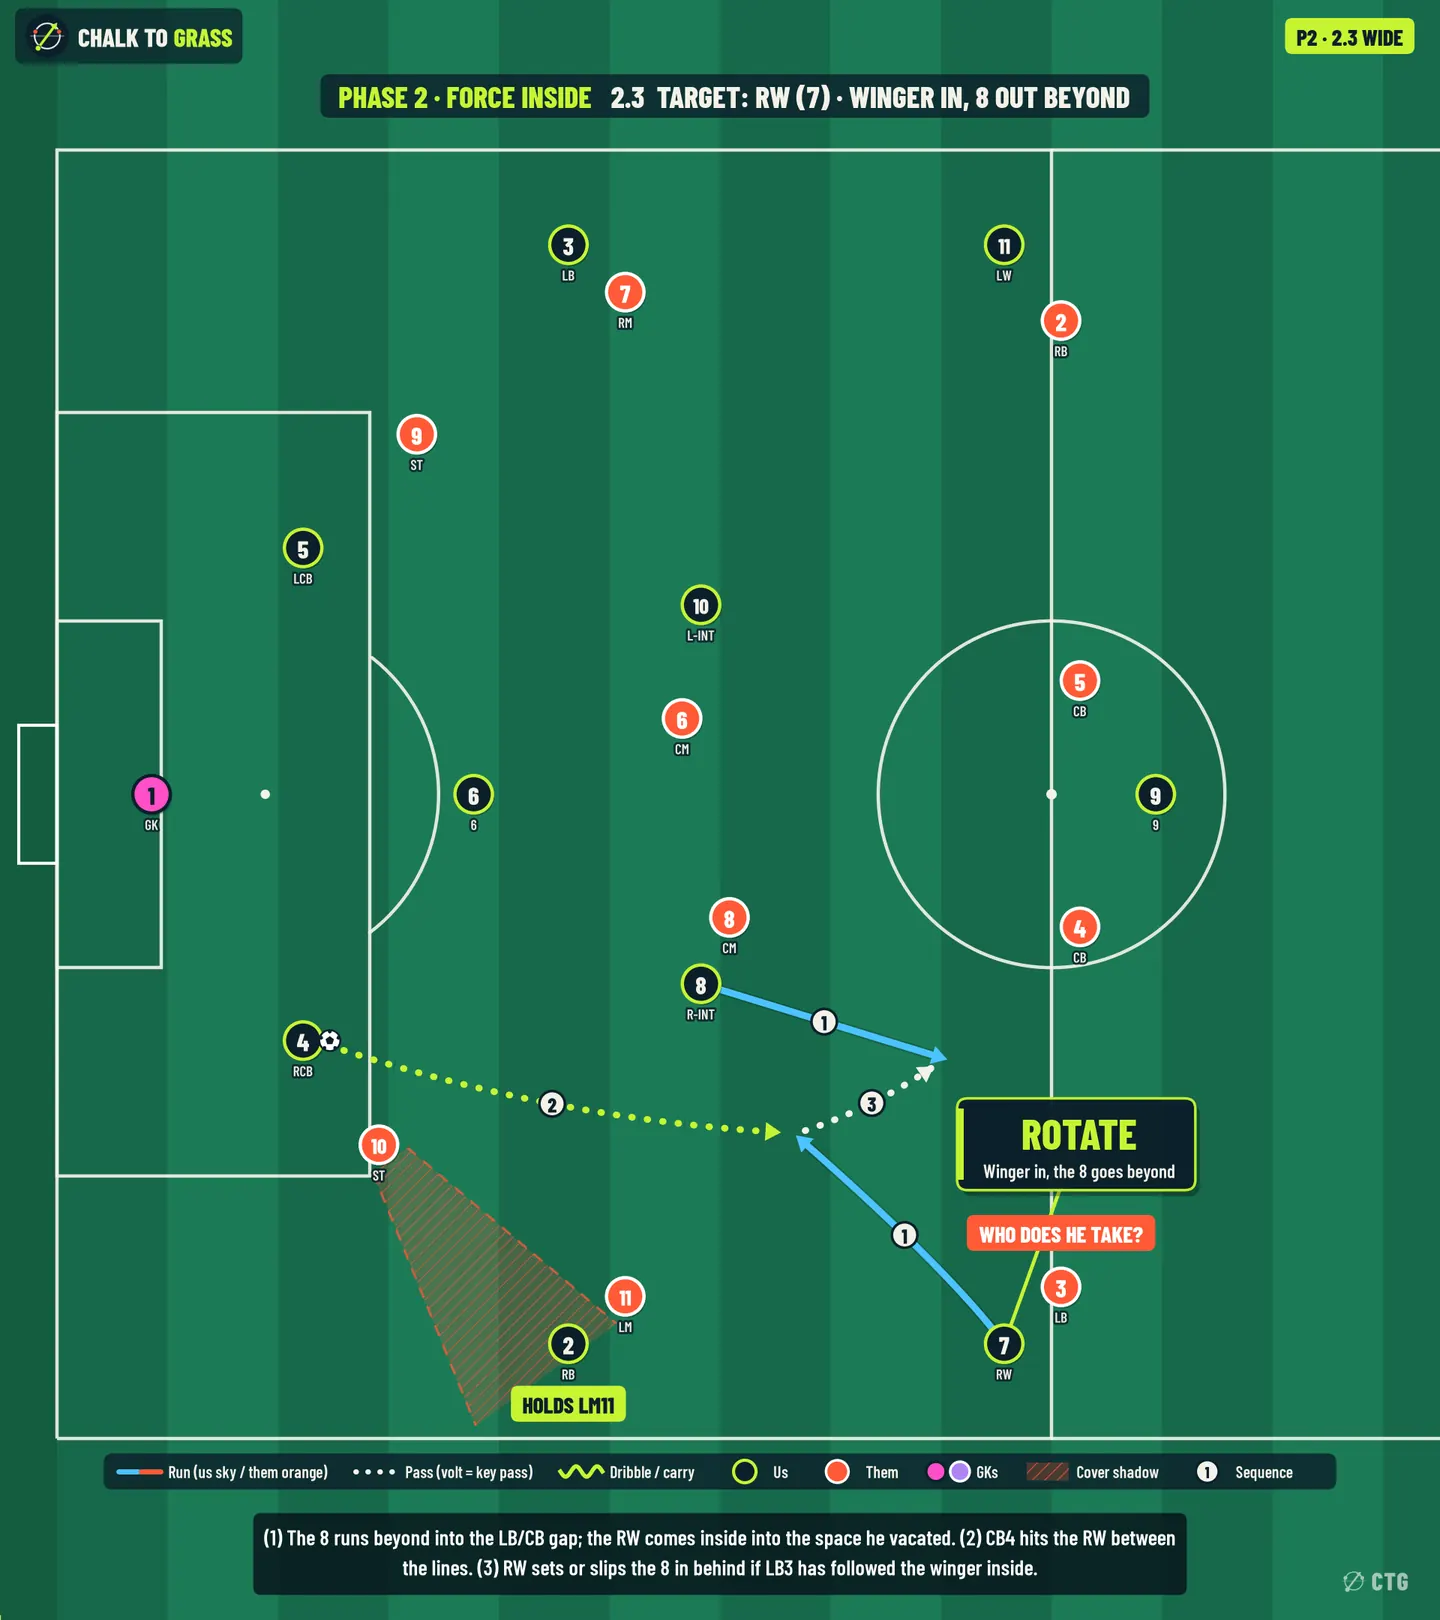
Board 2.3: Winger, Winger in, 8 out beyond

2.3 · Target: Winger

Winger in, 8 out beyond

Movement
① The 8 runs beyond into the gap between their LB3 and CB4 (to 47,20). The RW comes inside into the space he vacated (to 39,16). The RB holds LM11 wide.
Ball path
② CB4 → RW between the lines (26 m). ③ The RW sets or slips the 8 in behind.
Cue (for the RW)
if LB3 follows you inside, the 8 is behind him. If LB3 stays, turn.
Why it works
the rotation gives LB3 two runners and one decision. CM8 is too narrow to cover.
Risk
Low.
Their adjustment → our answer
their CB4 steps out on the 8 → the 9 is 1 v 1 with one CB → 1.5-style ball in behind.
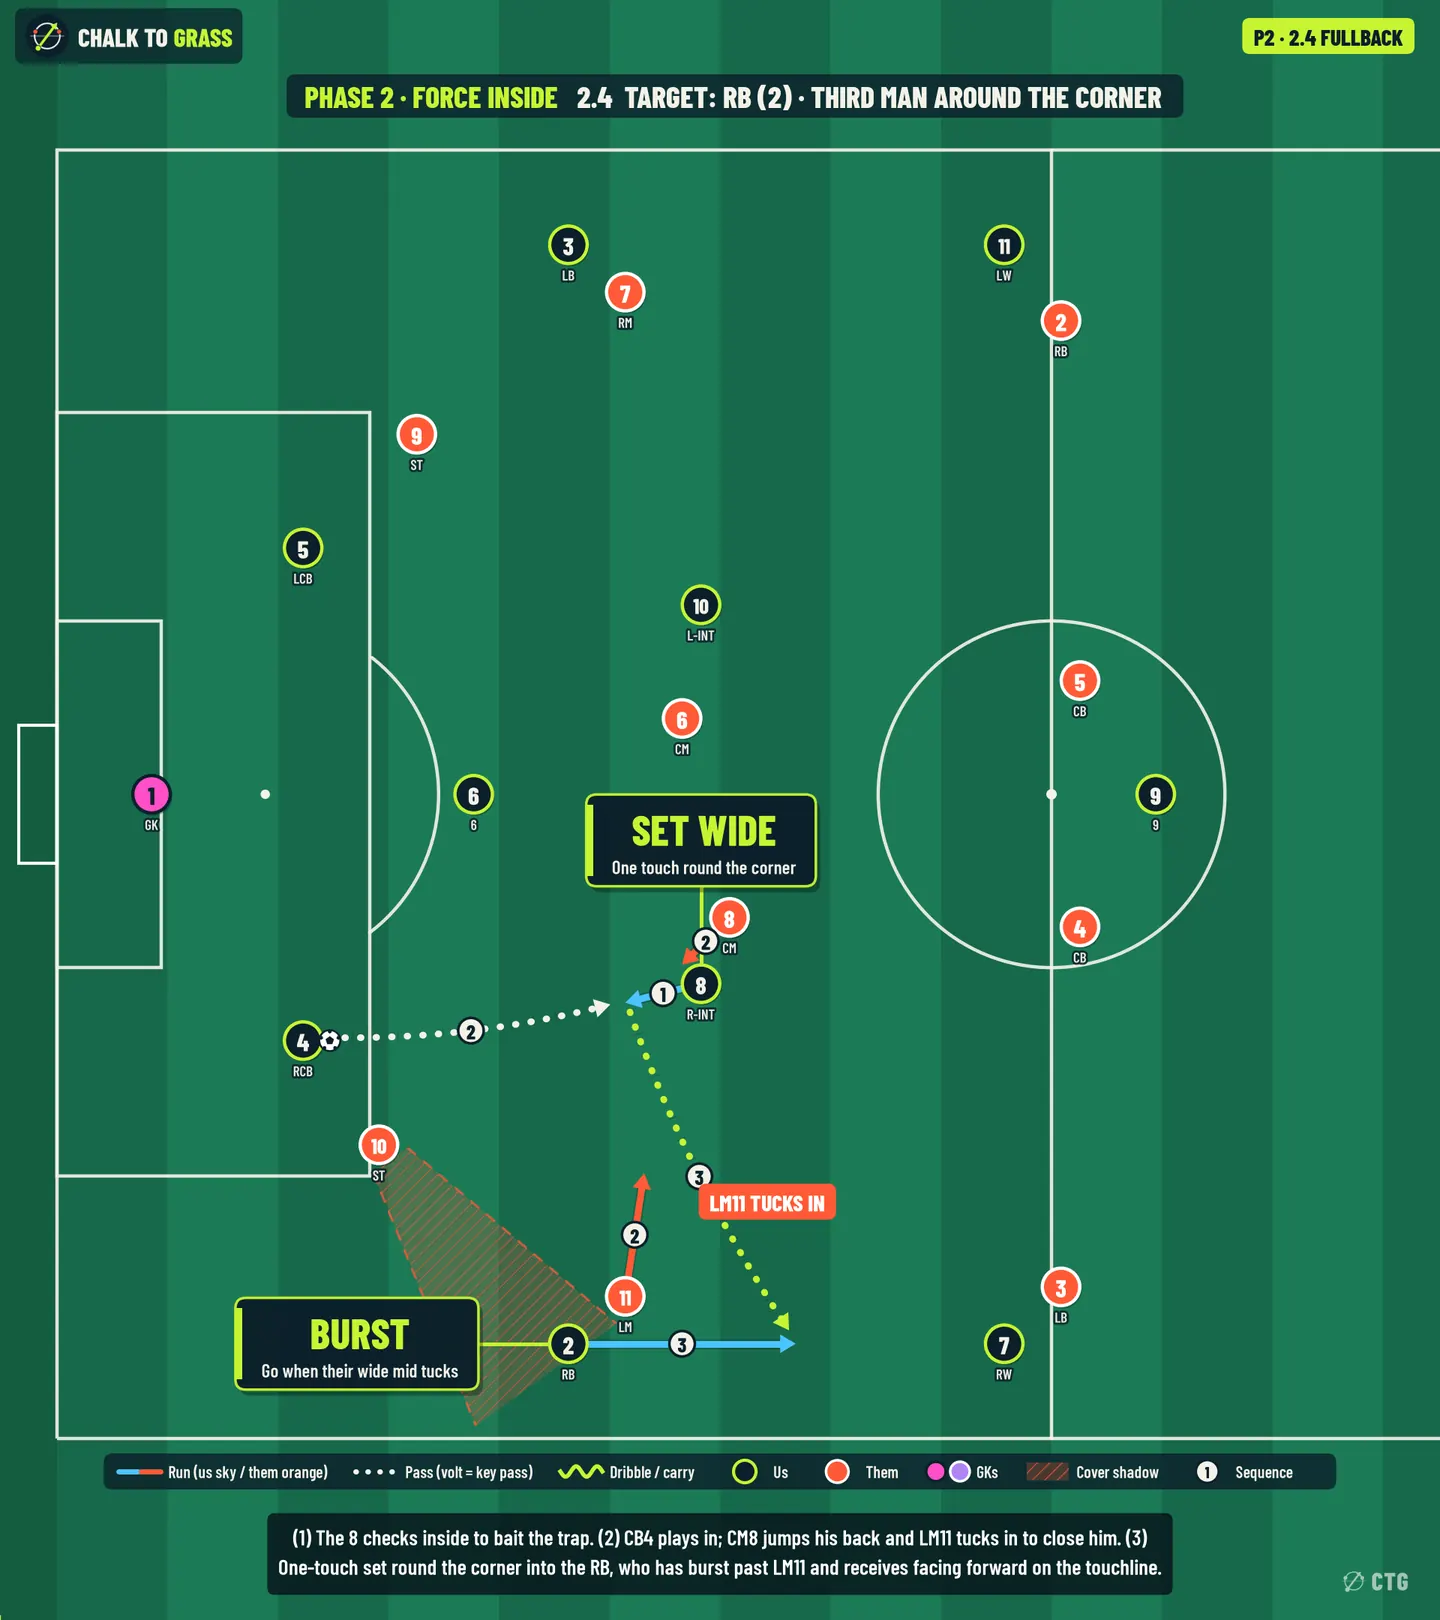
Board 2.4: Fullback, Third man around the corner

2.4 · Target: Fullback

Third man around the corner

Movement
① The 8 checks inside to bait the trap (to 30,23). ② On the pass, CM8 jumps his back and LM11 tucks in to close him. ③ The RB bursts past LM11 up the line (to 39,5).
Ball path
② CB4 → 8. ③ The 8 sets one touch round the corner to the RB (20 m, 3.1 m clear of LM11), who receives facing forward on the touchline.
Cue (for the RB)
LM11's head turns inside = go. For the 8: pressure on your back = set, don't turn.
Why it works
we use their trigger. The trap collapses inward, so the outside is empty.
Risk
Medium. The set has to beat LM11's recovery.
Their adjustment → our answer
LM11 stays tight on the RB → the 8 is only 1 v 1 with CM8 → the 6 offers the bounce (2.5).
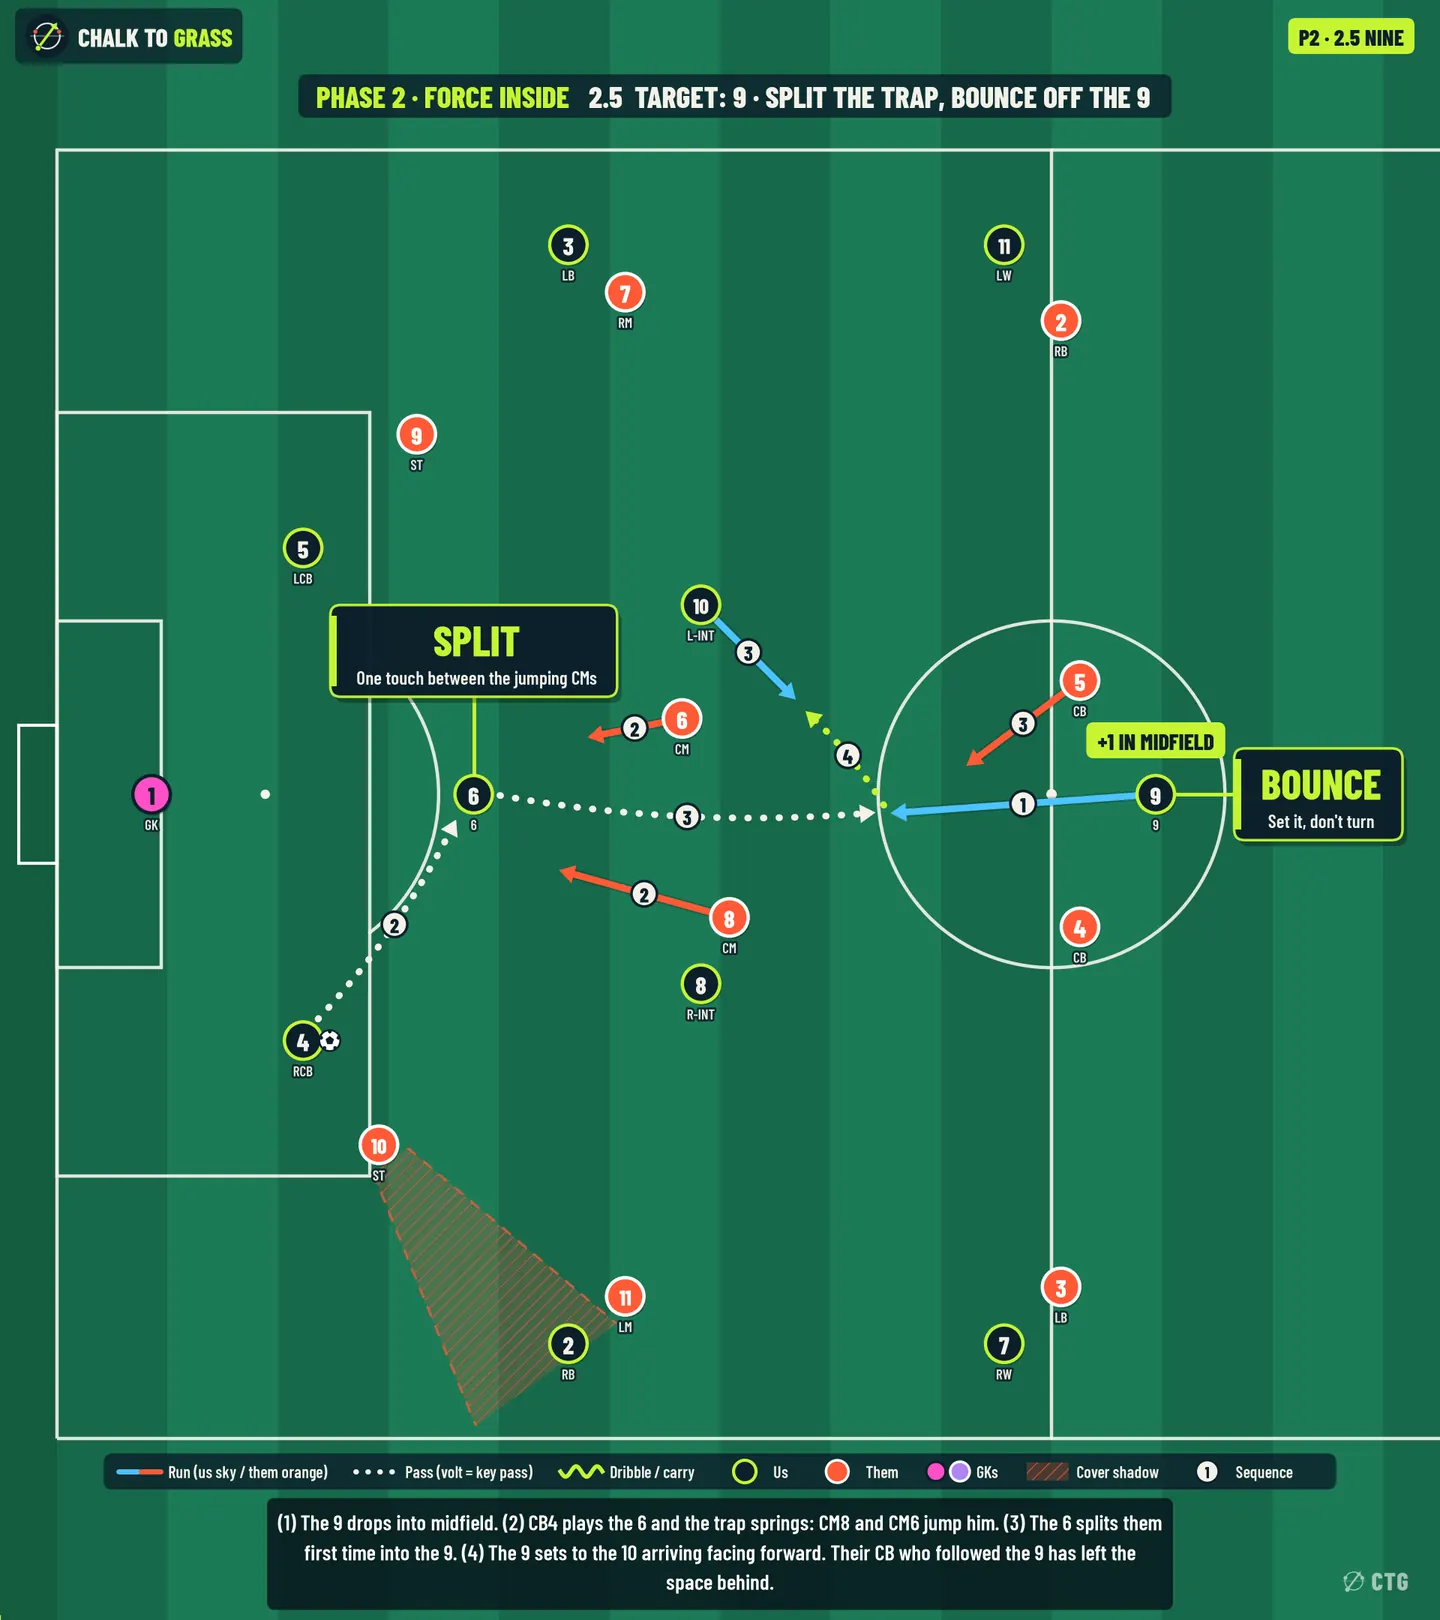
Board 2.5: The 9, Split the trap, bounce off the 9

2.5 · Target: The 9

Split the trap, bounce off the 9

Movement
① The 9 drops into midfield (to 44,33). ② CB4 plays the 6 and the trap springs: CM8 and CM6 jump him. ③ Their CB5 follows the 9.
Ball path
③ The 6 splits the two jumping CMs first time into the 9 (22 m, 3.3 m clear). ④ The 9 sets to the 10 arriving facing forward (to 39,39).
Cue (for the 6)
both CMs are coming = the gap between them is the lane. One touch.
Why it works
when both CMs jump, there is no midfield behind them. The 9 is the extra man, and a CB who follows him leaves space for the LW.
Risk
Medium–high (a one-touch pass through two jumping players).
Their adjustment → our answer
one CM holds as cover → the 6 has more time, so play 2.1.
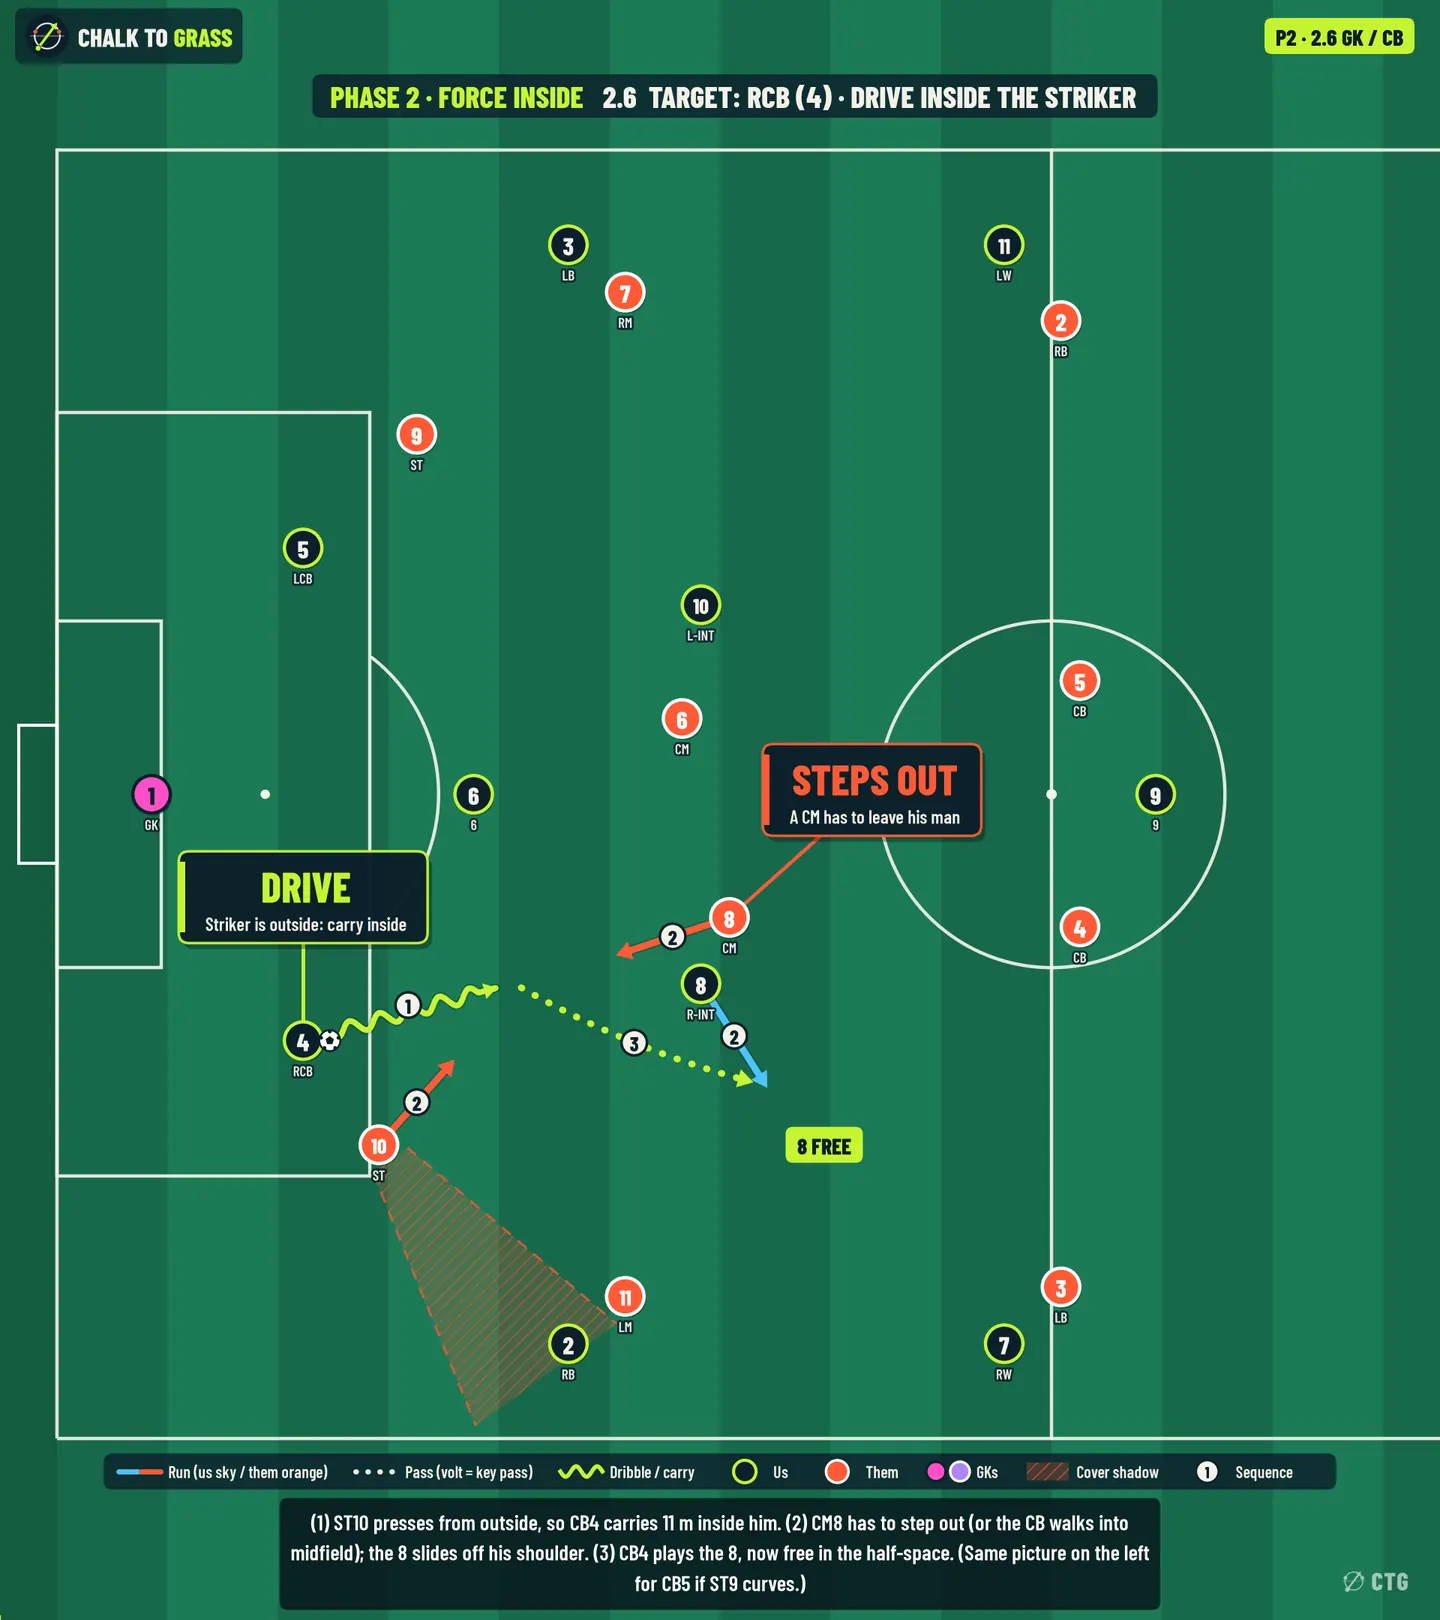
Board 2.6: GK / CB, Drive inside the striker

2.6 · Target: GK / CB

Drive inside the striker

Movement
① ST10 presses from outside, so CB4 carries 11 m inside him (to 24,24). ② CM8 has to step out, or the CB walks into midfield. The 8 slides off his shoulder (to 37.5,18.5).
Ball path
③ CB4 → 8, now free in the half-space (15 m).
Cue (for CB4)
striker on your outside shoulder = the inside carry is open. Carry until a midfielder steps, then release his man.
Why it works
the press assumes we'll pass inside to the trap. A carrying CB is an extra midfielder they didn't plan for.
Risk
Medium (losing it while carrying is a counter through the middle). The 6 must stay behind the ball.
Their adjustment → our answer
ST10 curves inside to stop the carry → the RB lane opens again (the overview's ×'s disappear).

Decision table · Force Inside

Read the cue, pick the solution.

You see…On the ballPlaySolution
CMs pinned by the 8 and 10CB4 → 66 turns, splits them into the 92.1
LM11 tight on our RB, CM8 watching the ballCB48 drops blind-side into the pocket2.2
LB3 has to pick up two runnersCB4RW in, 8 out beyond2.3
CM8 and LM11 collapse on the 8CB4 → 88 sets round the corner to the RB2.4
Both CMs jump the 66First time through the gap into the 92.5
Striker on your outside shoulderCB4Carry inside until a midfielder steps2.6

Younger groups · ground-only

U13–15: 2.1, 2.2, 2.4, 2.6 (2.3 and 2.5 need sharp one-touch play, so add them once 2.1 is reliable). U10–12: 2.1 and 2.6 (pin and turn; CB carry inside).

Phase 3 of 4 · Draft preview

Force Outside

Show the FB, trap on the touchline.

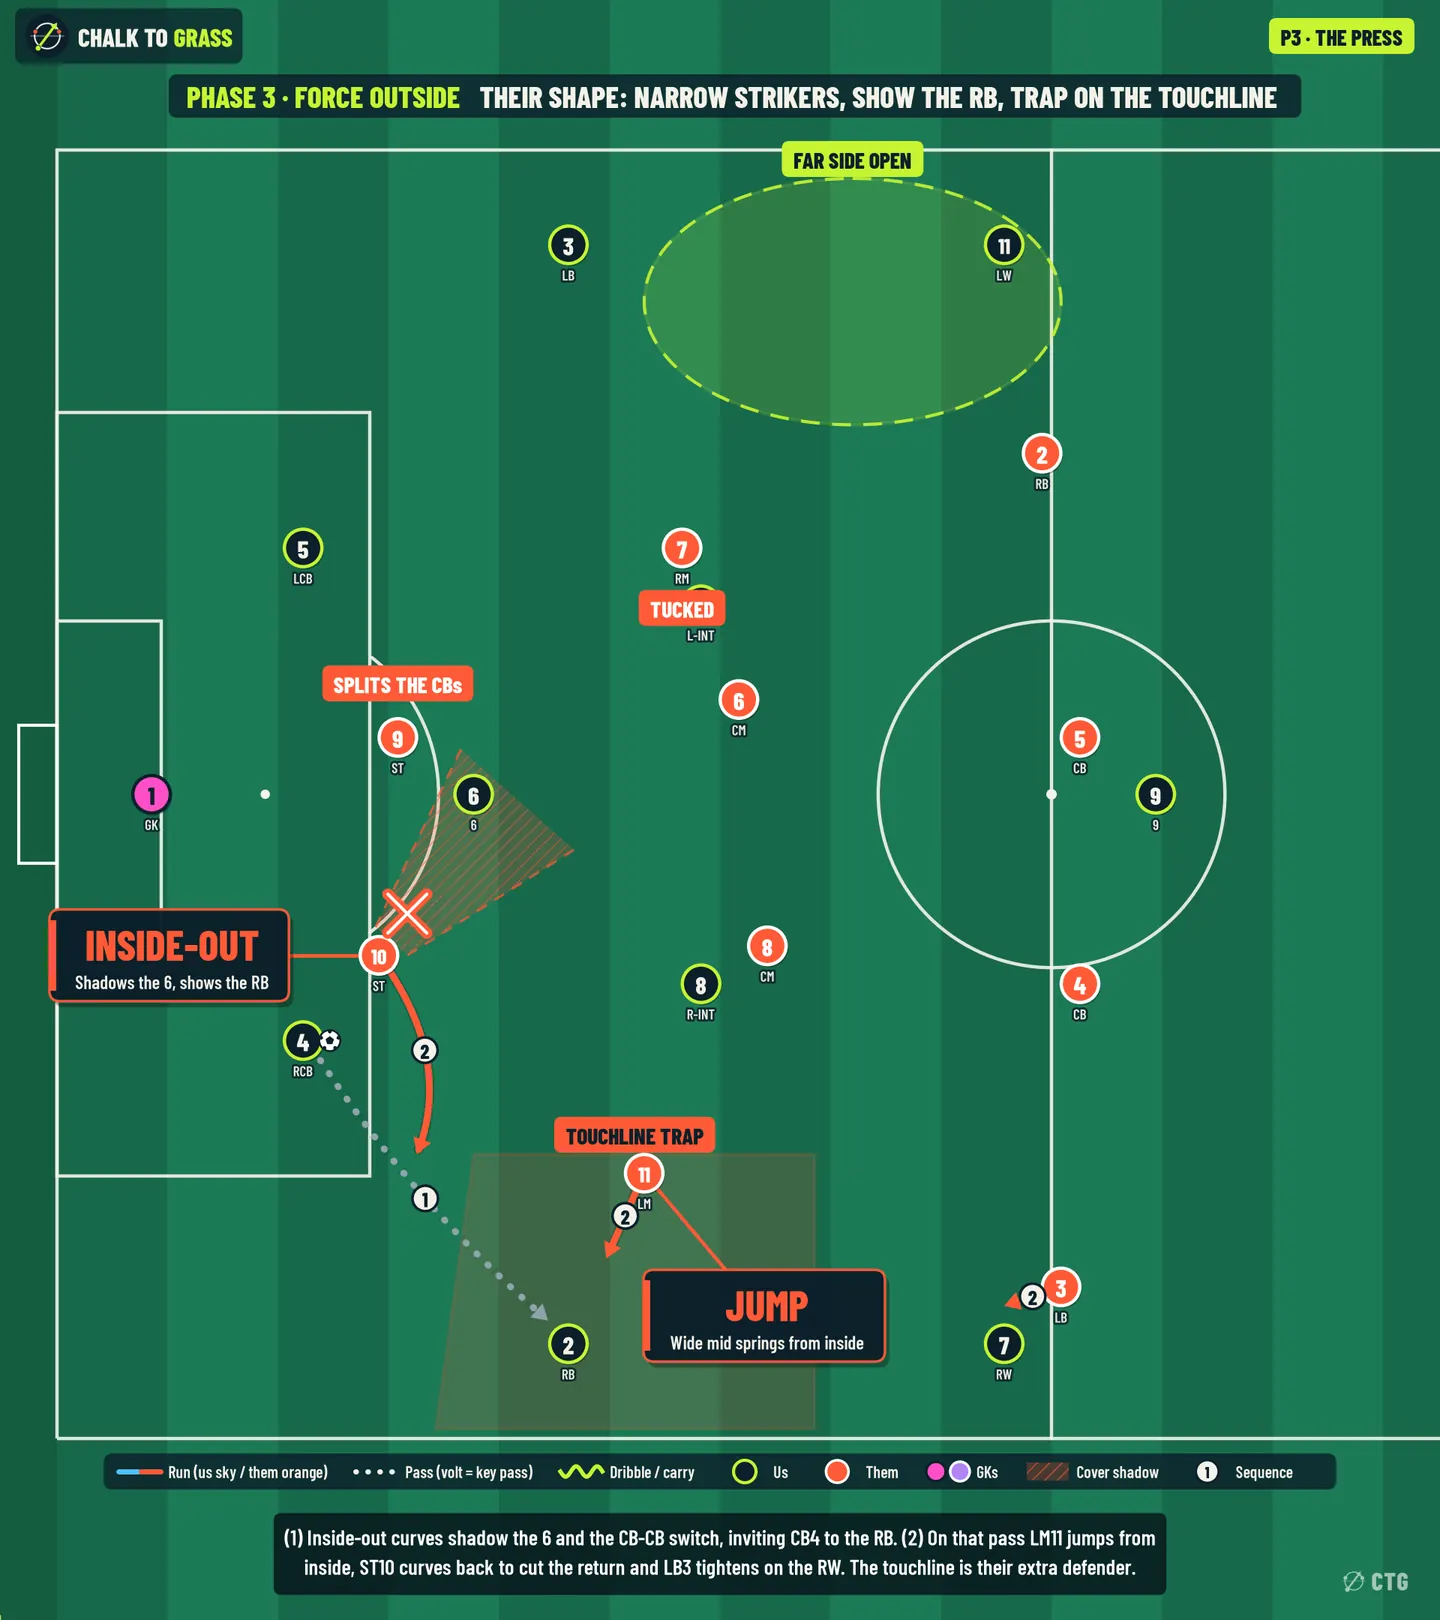
Their press

  • Shape. The strikers stay narrow. ST10 presses CB4 inside-out (shadowing the 6) and ST9 splits the CBs (he can jump CB5 on any switch). LM11 waits inside in a half-position, and the whole block shifts toward the ball: RM7 tucks to ~y = 47 and their RB2 tucks in too.
  • Triggers. The pass to our RB. As it travels, LM11 jumps him from inside, ST10 curves back to cut the return to CB4 (and the GK lane behind it), LB3 tightens on our RW, and CM8 locks onto our 8. The touchline is their extra defender.
  • Cover shadows. From CB4: ST10 shadows CB4→6. Once the ball reaches the RB: ST10 shadows RB→CB4, and LM11 shadows RB→inside (toward our 8).
  • Takes away. The centre, the switch along the back line, and the return pass once the FB has it.
  • Gives.
    1. The far side (their block has over-shifted: our LB has 16 m to RM7).
    2. The space LM11 leaves when he jumps.
    3. Behind LB3 when he steps to our RW.
    4. A moment before the trap springs, when the vertical lane down the right half-space is open.
    5. CB4's carry: their trigger is a pass, so don't give it to them.
Phase 3 overview board: Force Outside, their 4-4-2 press shape, cover shadows and the spaces it gives
Phase overview: their press, the cover shadows (hatched), the lanes it takes away (×) and the spaces it gives (volt).

Six solutions

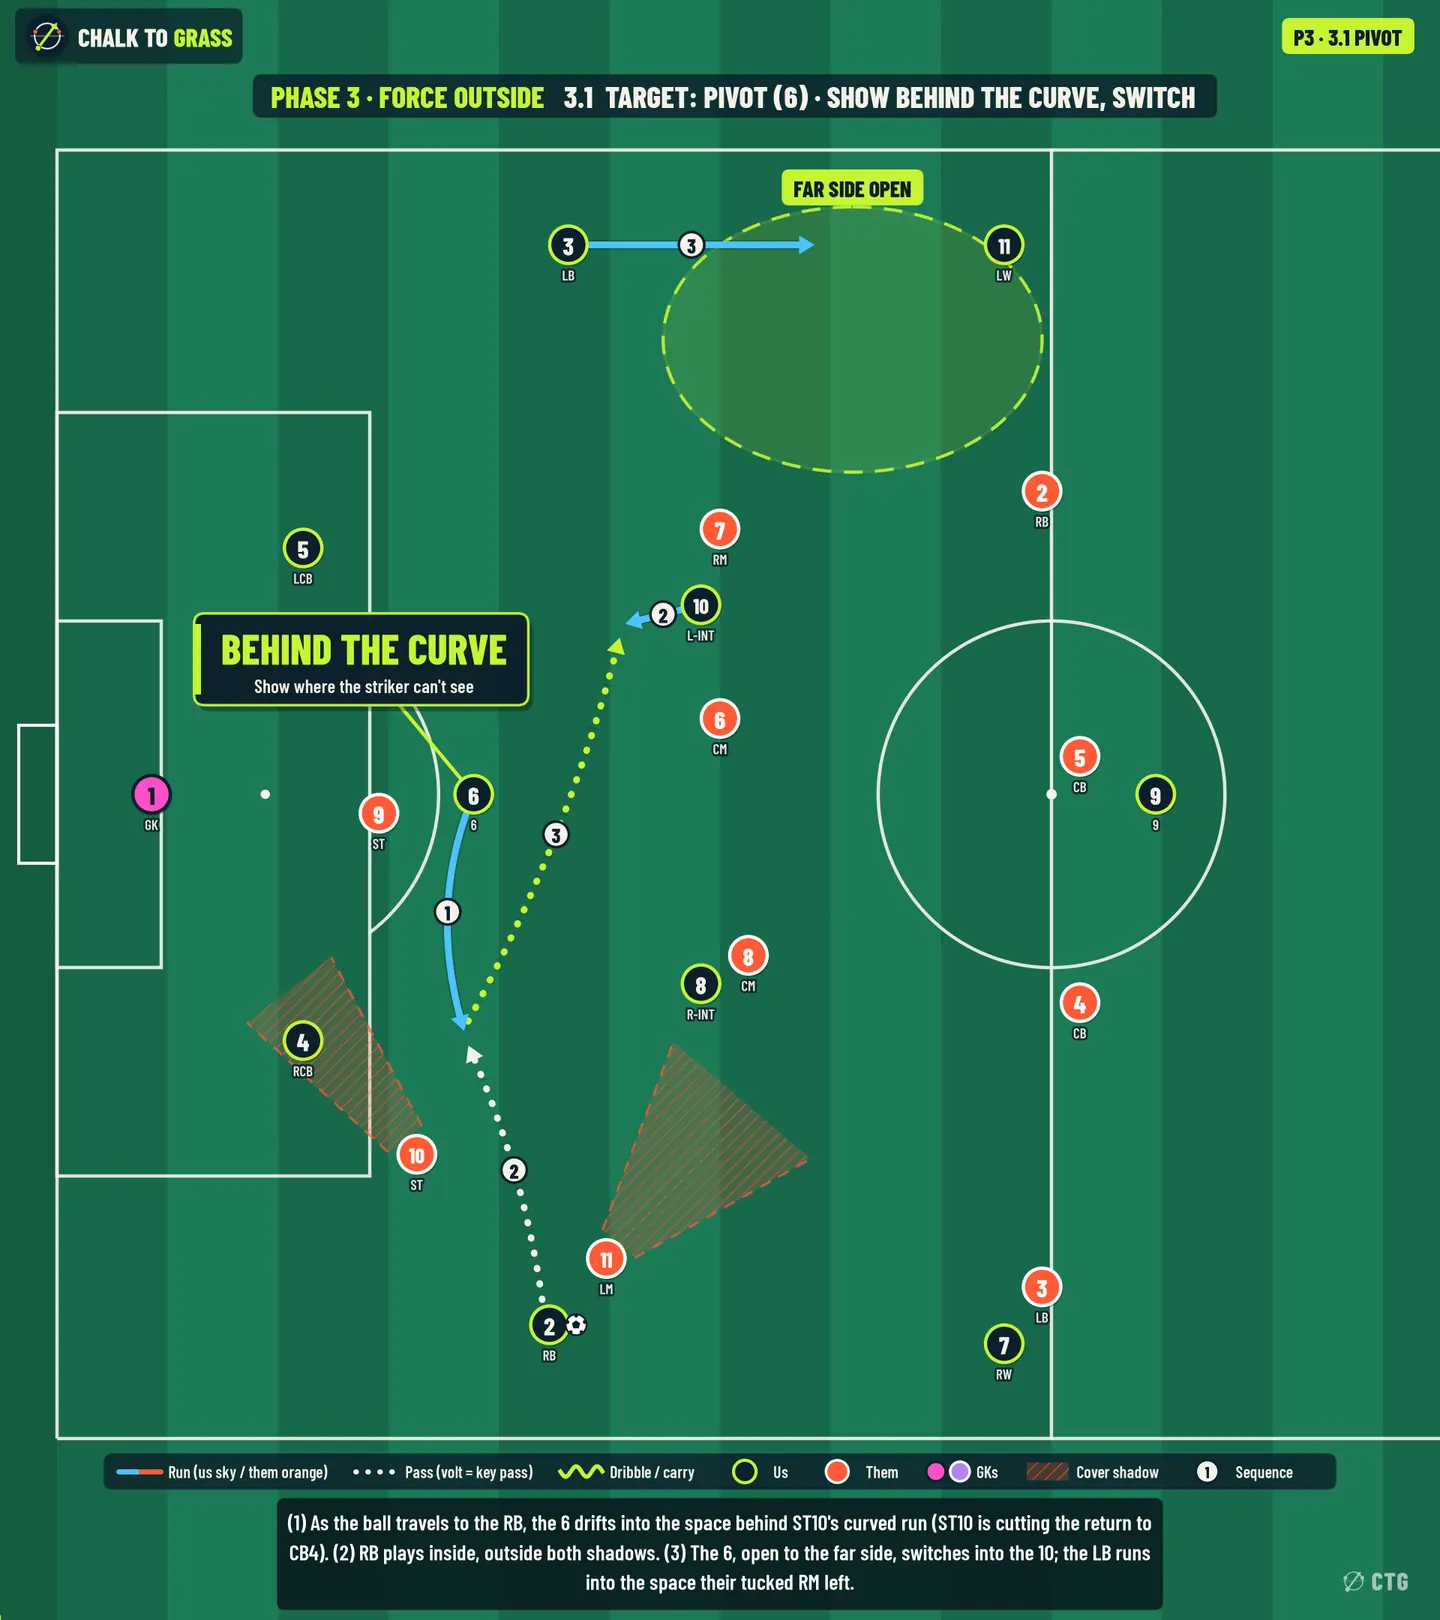
Board 3.1: Pivot, Show behind the curve, switch

3.1 · Target: Pivot

Show behind the curve, switch

Movement
① As the ball travels to the RB, ST10 curves back to cut the RB→CB4 return. The 6 drifts into the space behind that curved run (22,34 → 21.5,21.5). ② The 10 drops slightly to show (to 30,43).
Ball path
② RB → 6 inside, outside both shadows (16 m, 3.9 m clear). ③ The 6, open to the far side, switches into the 10 (23 m). ③ The LB runs into the space RM7 left by tucking in.
Cue (for the 6)
ST10's back is to you = he can't see you, so show. For the RB: play it on your first touch, before LM11 closes.
Why it works
a curved run that blocks one lane always uncovers the space behind it. The far side is open because the whole block has shifted.
Risk
Medium.
Their adjustment → our answer
ST9 (sitting between our CBs) tracks the 6 back → CB5 is free, so the 6 sets it to CB5 for the same switch.
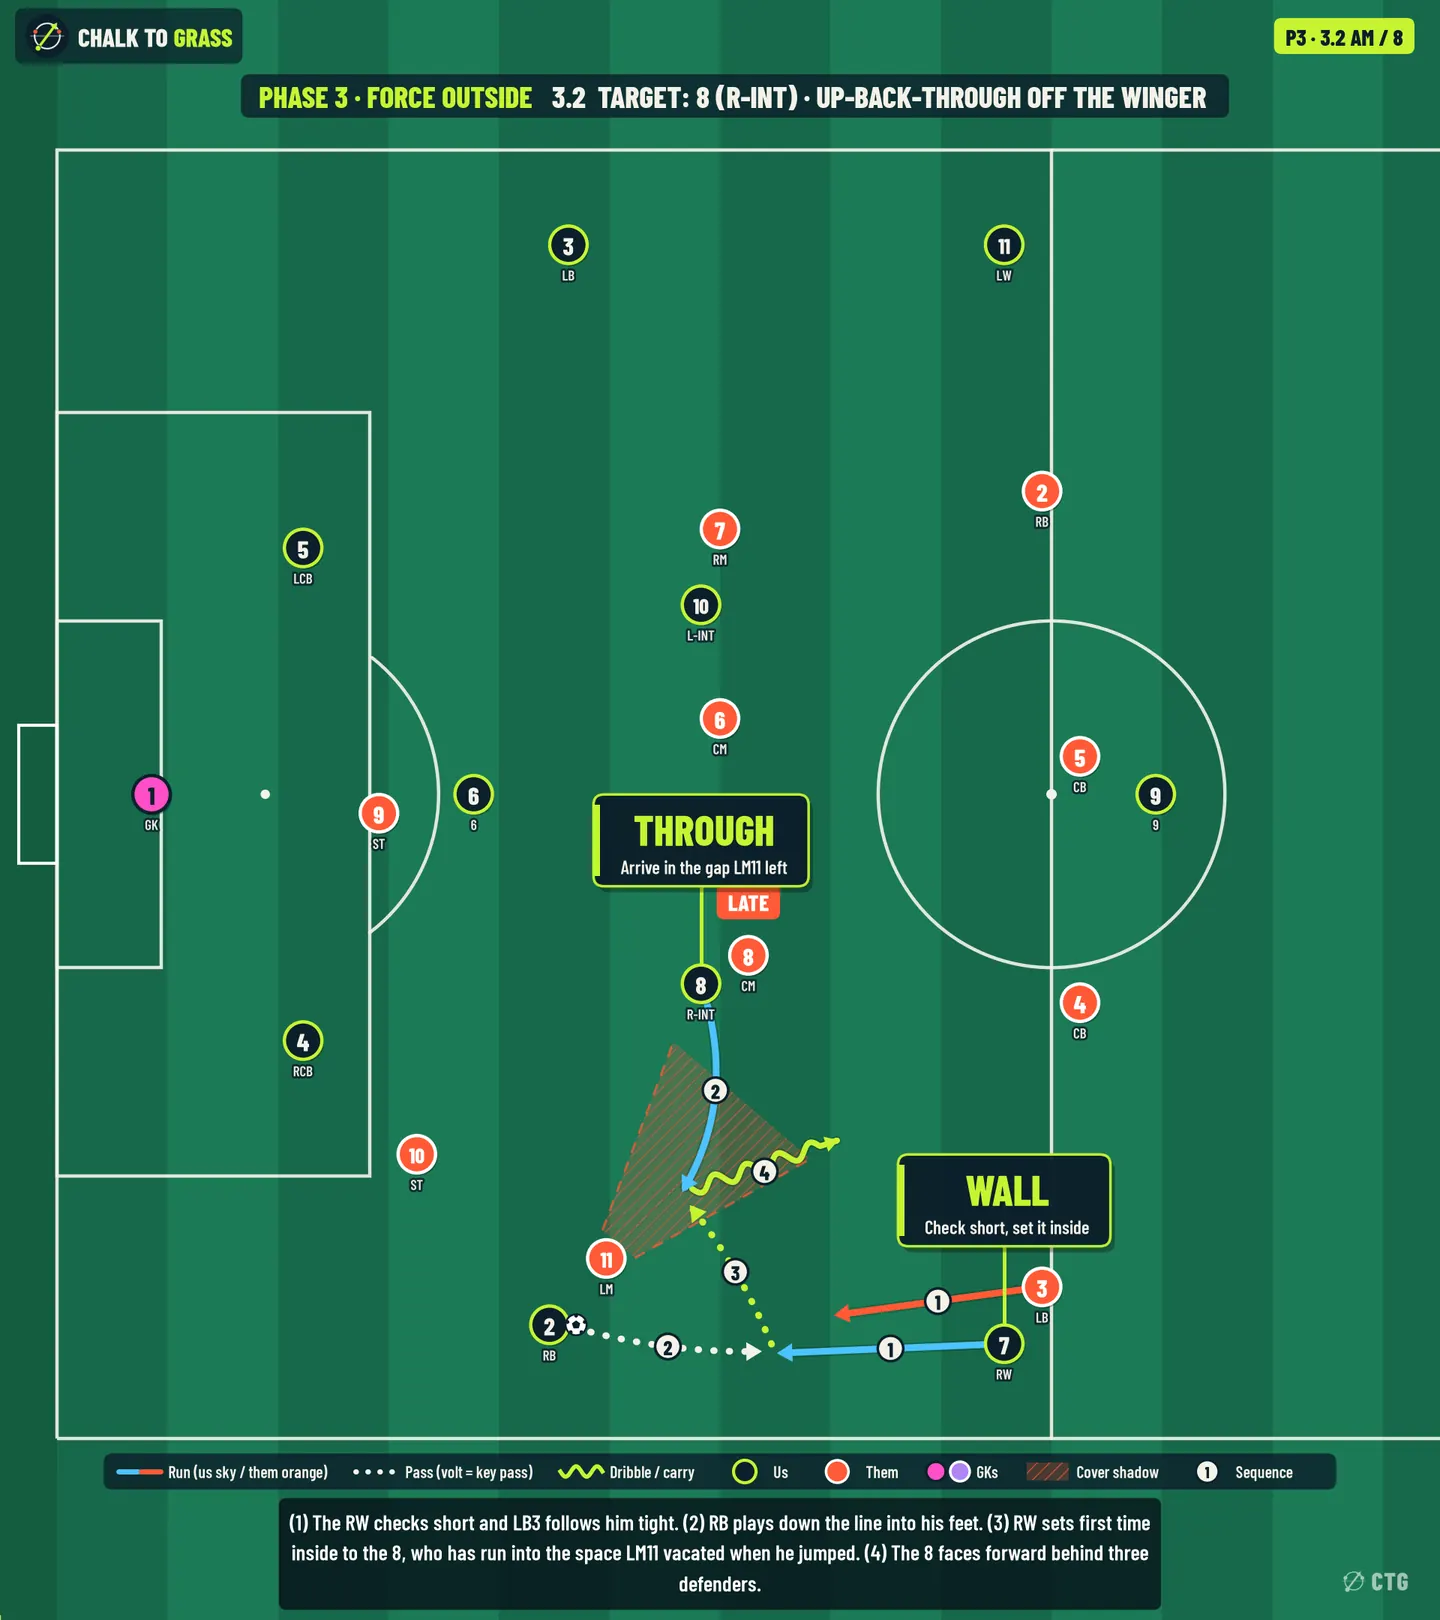
Board 3.2: AM / 8, Up-back-through off the winger

3.2 · Target: AM / 8

Up-back-through off the winger

Movement
① The RW checks short (to 38,4.5) and LB3 follows him tight. ② The 8 runs into the space LM11 vacated when he jumped (to 33,13).
Ball path
② RB → RW to feet (12 m). ③ The RW sets first time inside to the 8 (10 m). ④ The 8 faces forward behind three defenders.
Cue (for the 8)
LM11 jumps the RB = your gap is open now. For the RW: LB3 tight = set, don't turn.
Why it works
the touchline trap needs LM11 and CM8 to close inside, and CM8 is still on his way (tagged LATE).
Risk
Low–medium.
Their adjustment → our answer
CM8 follows the 8 → the space between him and CM6 opens for the 6 (3.1), or LB3 drops off → the RW turns.
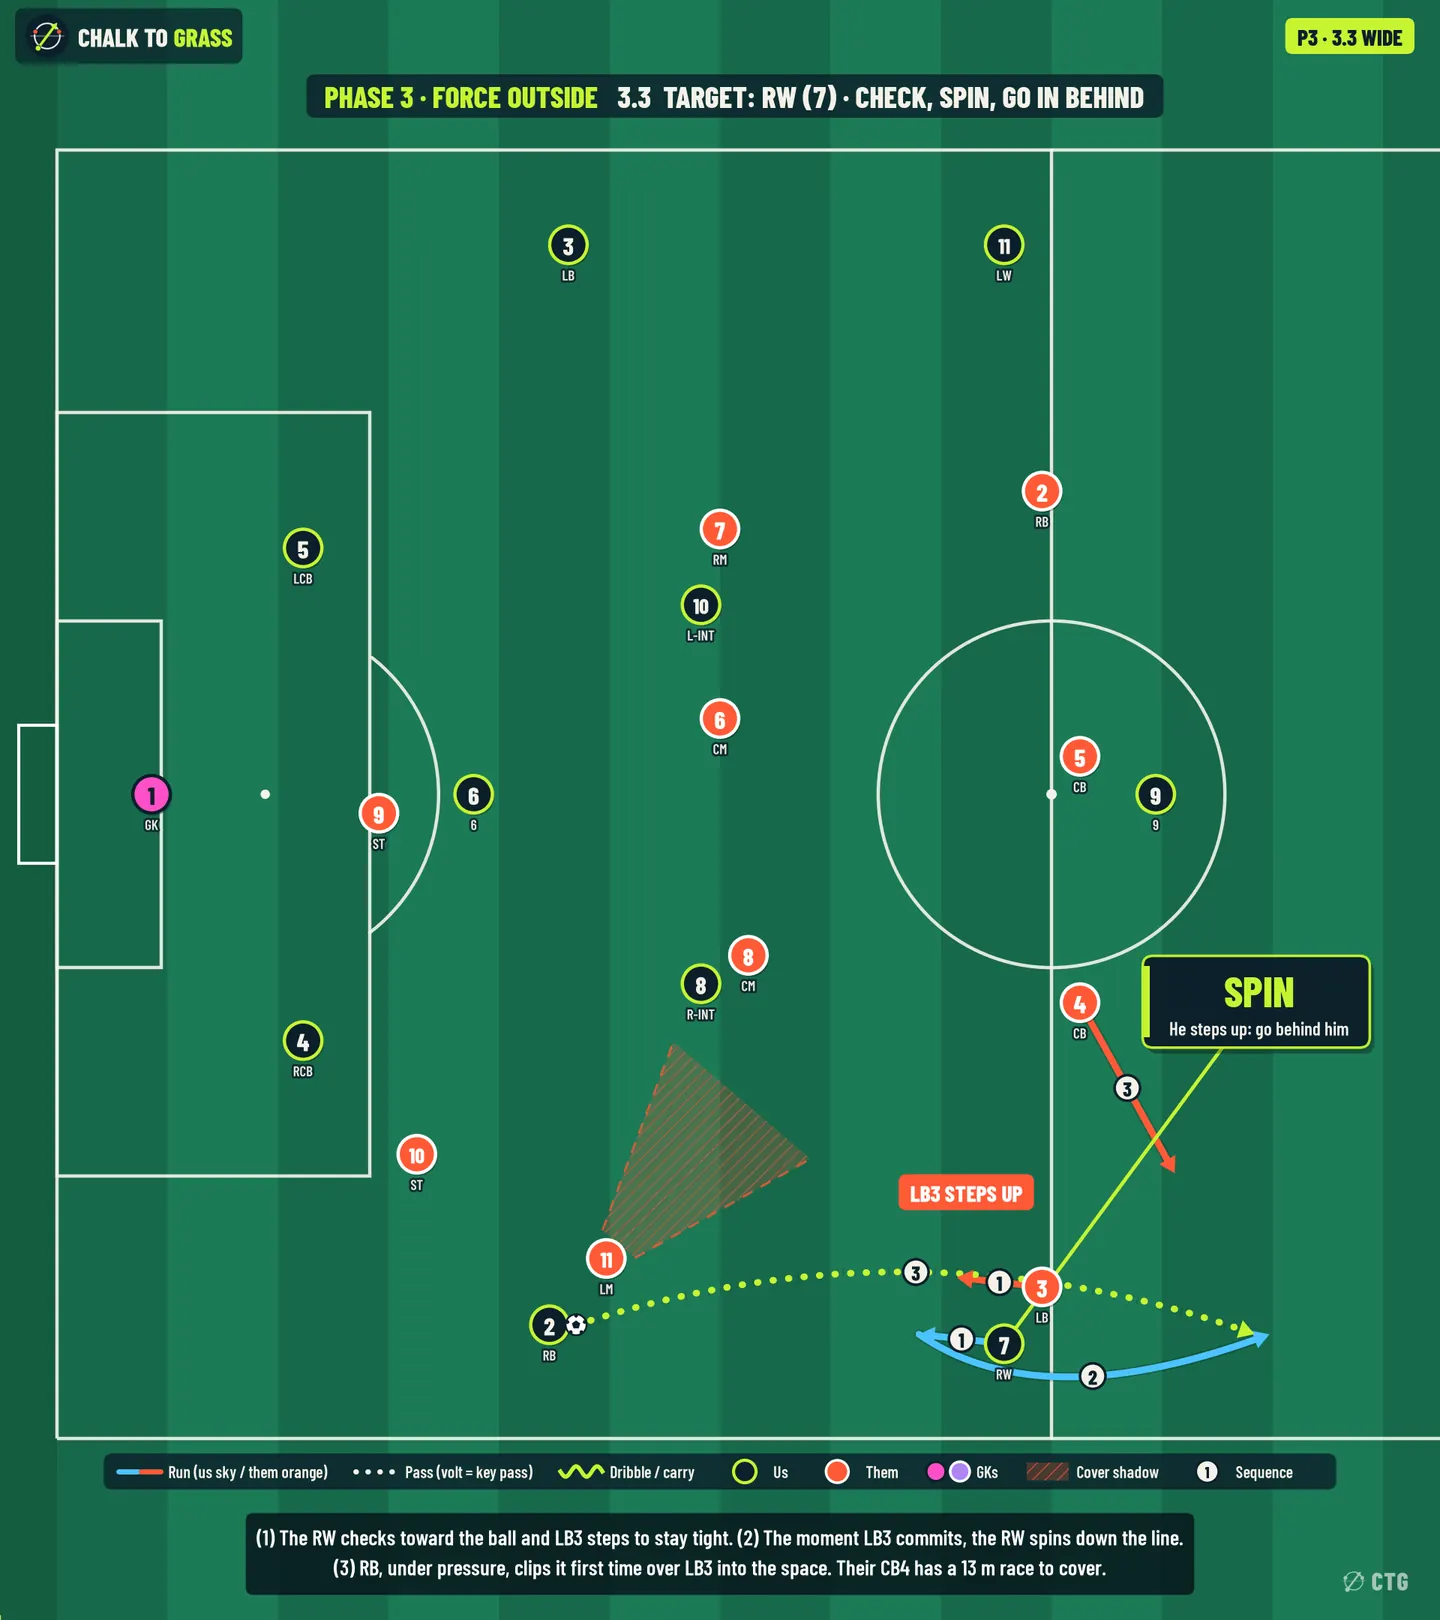
Board 3.3: Winger, Check, spin, go in behind

3.3 · Target: Winger

Check, spin, go in behind

Movement
① The RW checks toward the ball and LB3 steps to stay tight. ② The moment LB3 commits, the RW spins down the line (to 64,5.5).
Ball path
③ The RB, under pressure, clips it first time over LB3 into the space (≈38 m, lofted). Their CB4 has a 13 m race to cover.
Cue (for the RW)
LB3's step = spin. For the RB: a first-time clip, because by the second touch LM11 is on you.
Why it works
the trap only works if LB3 squeezes high. That leaves no cover behind him unless their CB slides across.
Risk
Medium (a lofted pass under pressure).
Their adjustment → our answer
LB3 holds deeper → the RW can receive to feet (3.2).
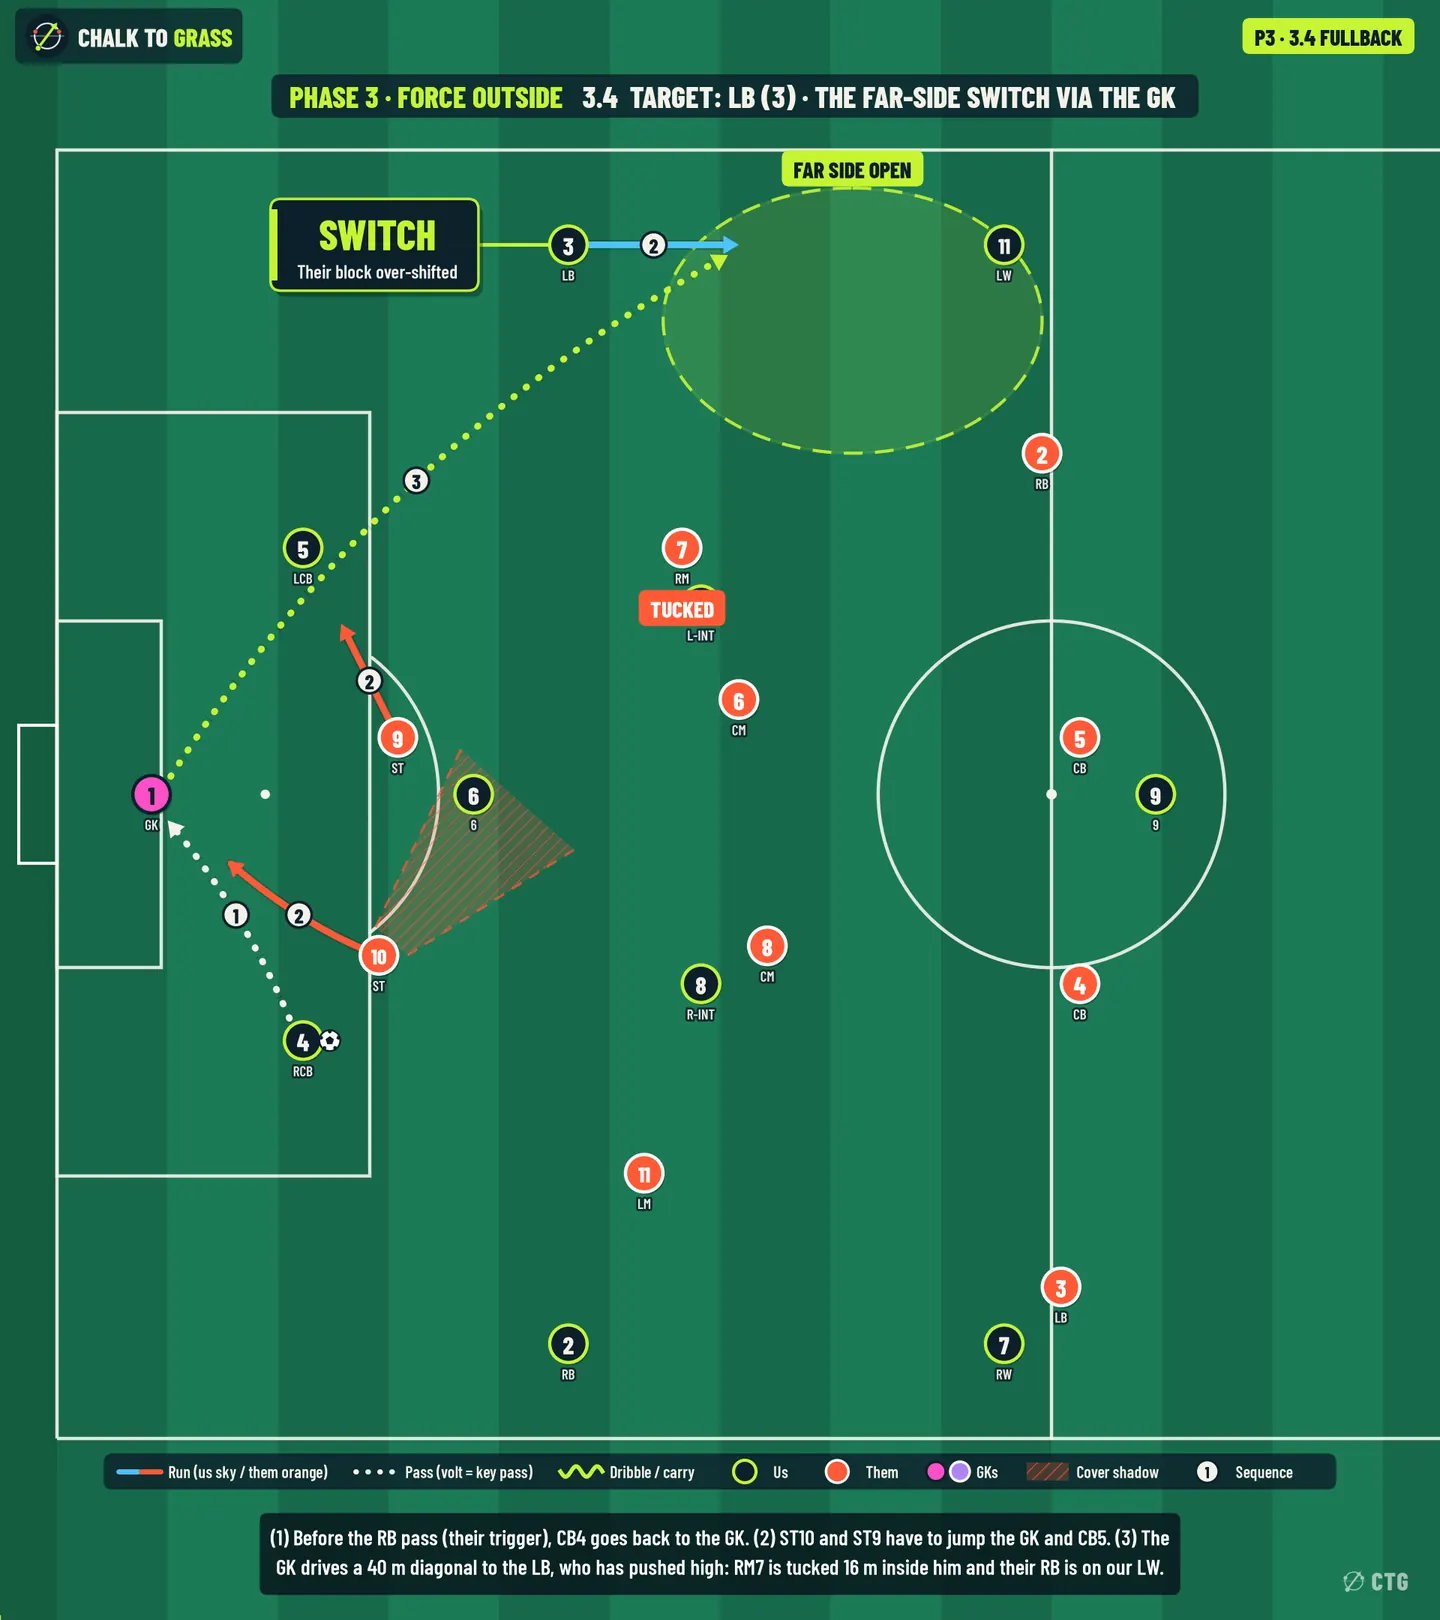
Board 3.4: Fullback (far), The far-side switch via the GK

3.4 · Target: Fullback (far)

The far-side switch via the GK

Movement
① Before the RB pass (their trigger), CB4 goes back to the GK (15 m, 5.8 m clear). ② ST10 and ST9 have to jump the GK and CB5. The LB pushes high (to 36,63).
Ball path
③ The GK drives a 40 m diagonal to the LB. RM7 is tucked about 16 m inside him, and their RB is on our LW.
Cue (for the GK)
both strikers jump = the far side is empty. Drive it, don't float it.
Why it works
a force-outside press over-shifts to the ball side, so the whole far third is uncovered.
Risk
Medium (it depends on the GK's range). For U13–15, the GK → CB5 → LB route on the ground does the same job.
Their adjustment → our answer
RM7 stays wide → the 10 is free inside him, so CB5 or the 6 find him.
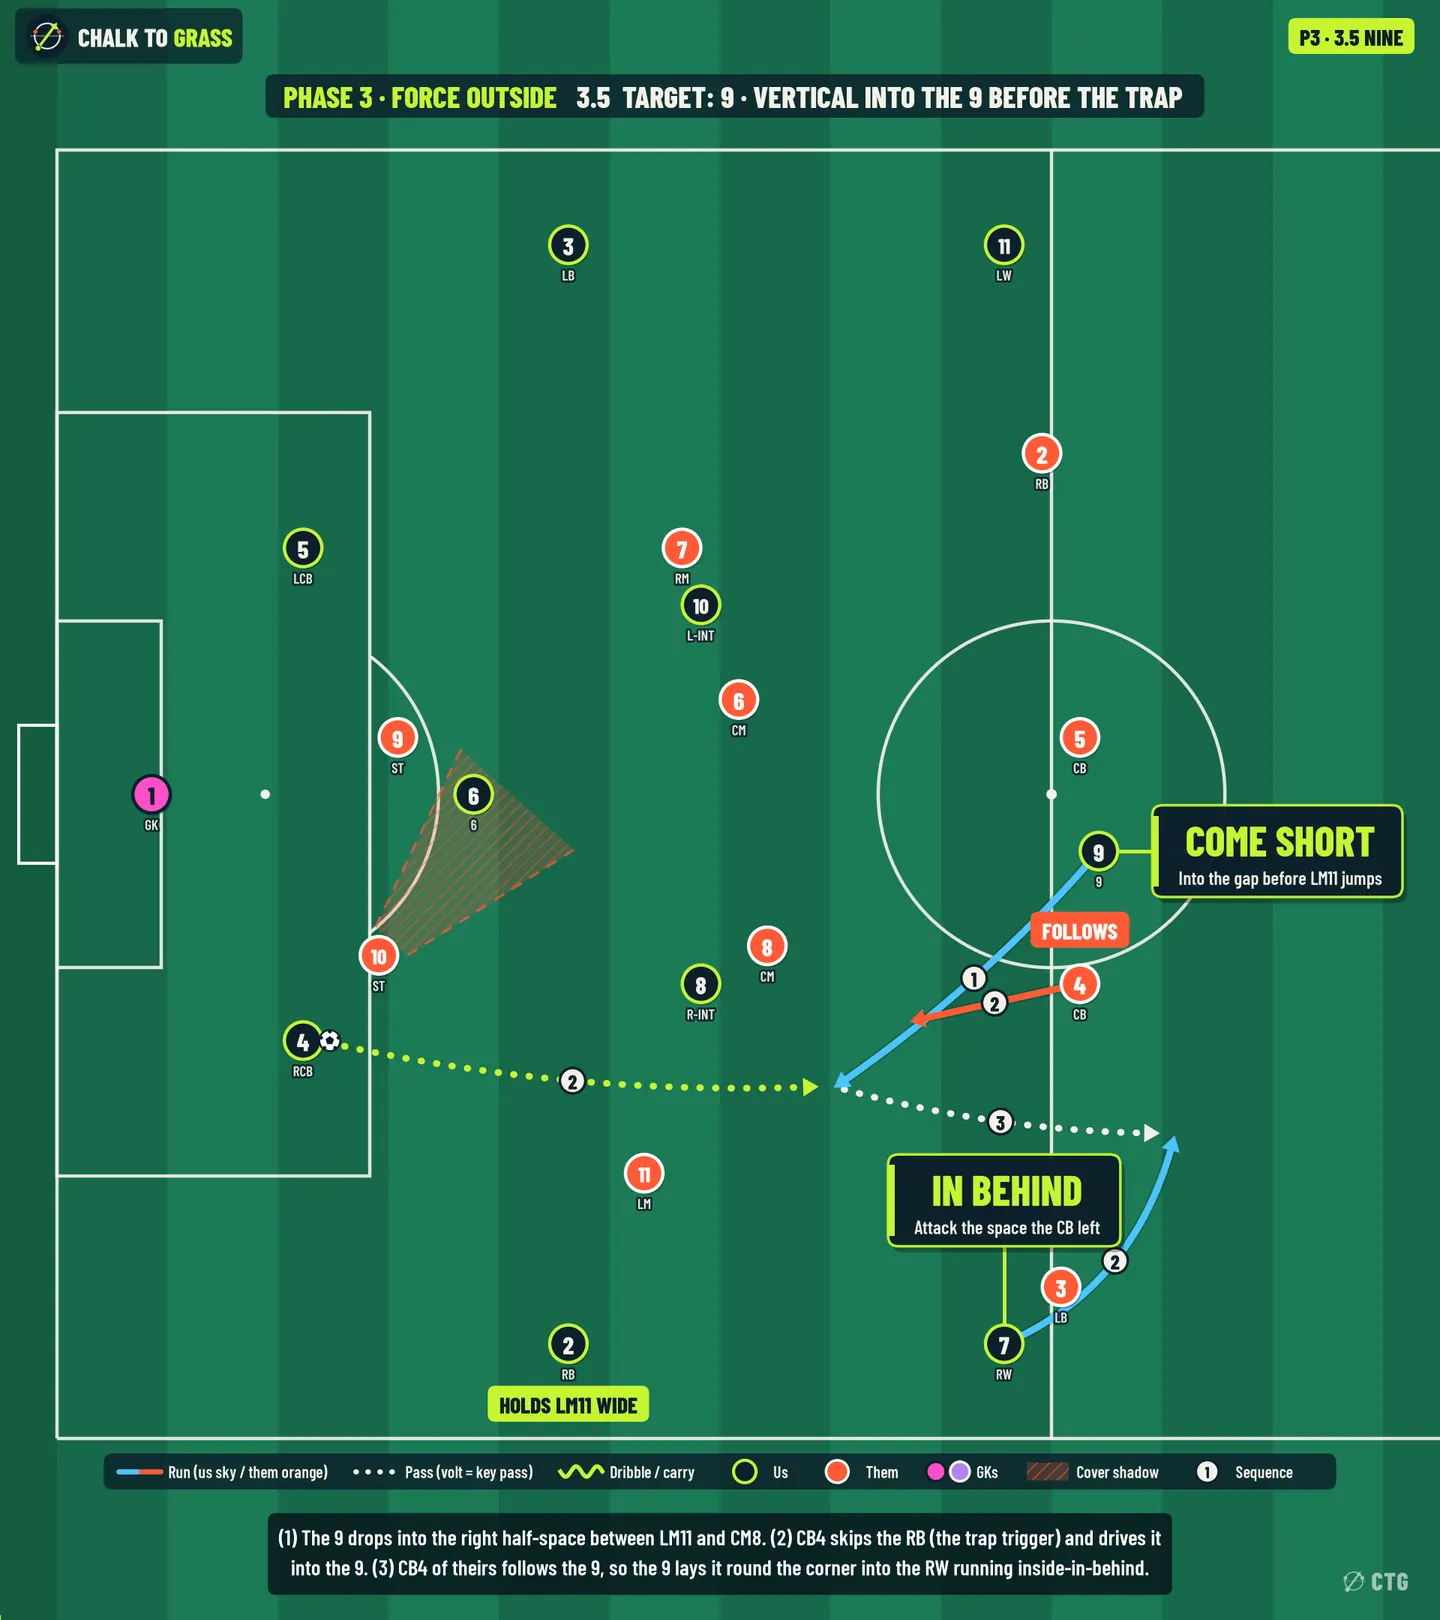
Board 3.5: The 9, Vertical into the 9 before the trap

3.5 · Target: The 9

Vertical into the 9 before the trap

Movement
① The 9 drops into the right half-space between LM11 and CM8 (to 41,18.5). The RB holds LM11 wide. ② Their CB4 follows the 9. The RW runs inside-in-behind (to 59,16).
Ball path
② CB4 skips the RB (the trigger) and drives a 28 m pass into the 9 (4.8 m clear). ③ The 9 lays it round the corner into the RW's run (18 m).
Cue (for CB4)
LM11 is still deciding whether to jump = the vertical lane is open. Look for the 9's double movement.
Why it works
the trap is sprung by the FB pass. Before it, LM11 is caught between the RB and the half-space.
Risk
Medium.
Their adjustment → our answer
LM11 stays inside → the RB is free with time to play 3.2 / 3.3.
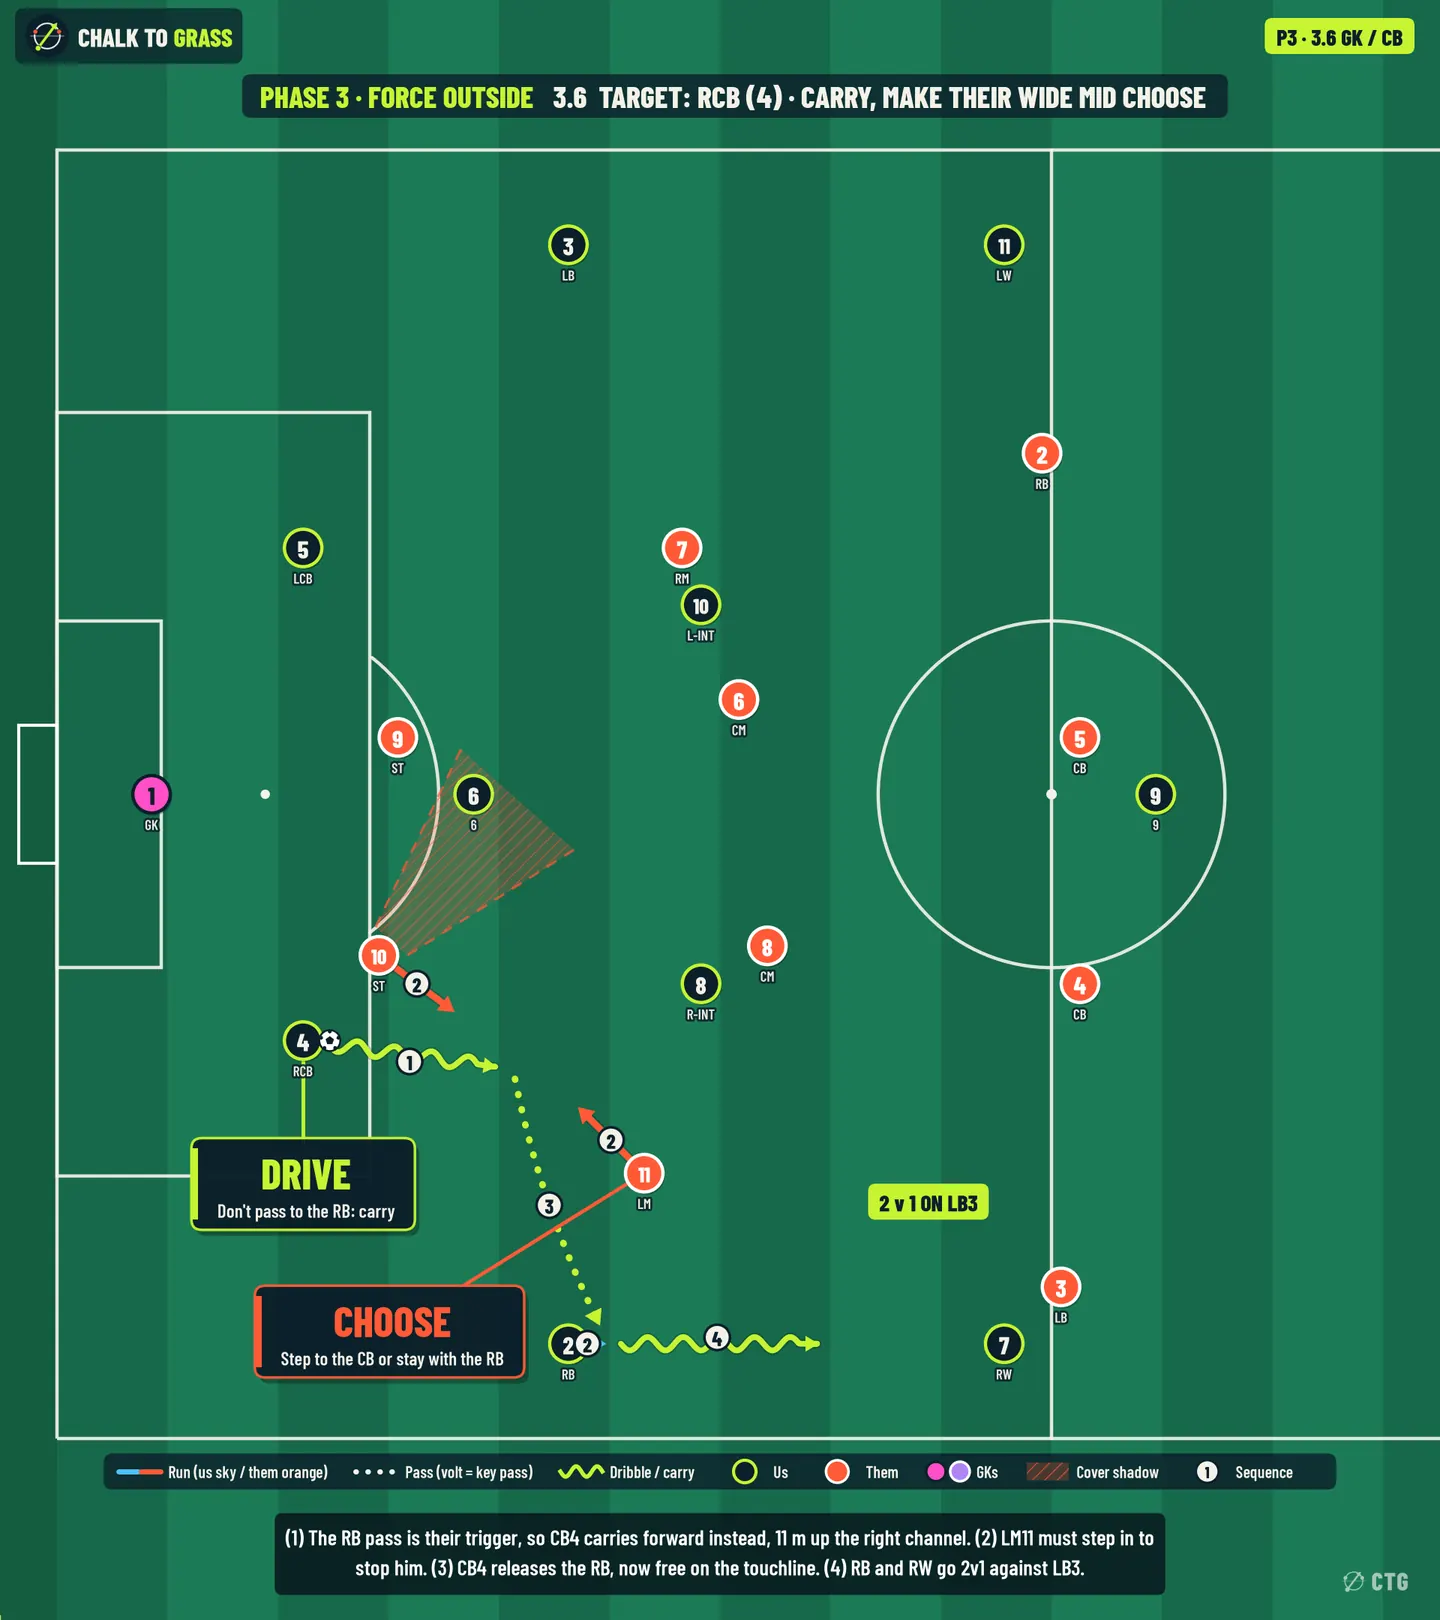
Board 3.6: GK / CB, Carry, make their wide mid choose

3.6 · Target: GK / CB

Carry, make their wide mid choose

Movement
① The RB pass is their trigger, so CB4 carries 11 m up the right channel instead (to 24,19.5). ② LM11 must step in to stop him, and ST10 chases from inside.
Ball path
③ CB4 releases the RB, now free on the touchline (15 m, 2.7 m clear: the tightest lane in the analysis). ④ The RB carries and goes 2 v 1 with the RW against LB3.
Cue (for CB4)
LM11's first step toward you = release. Weight it into the RB's run, ahead of him.
Why it works
they built the trap around a pass. A carry gives LM11 two jobs.
Risk
Medium. The release lane is tight, so it needs a well-timed, firm pass.
Their adjustment → our answer
LM11 holds his position → CB4 keeps carrying and finds the 9 dropping (3.5) or the 8.

Decision table · Force Outside

Read the cue, pick the solution.

You see…On the ballPlaySolution
ST10 curves back to cut the returnRB6 behind the curve, then switch3.1
LM11 jumps the RB, LB3 tight on the RWRB → RWSet inside to the 83.2
LB3 steps up to the RWRBFirst-time clip down the line3.3
Both strikers ready to jump on the RB passCB4 → GK40 m drive to the far LB (U13–15: on the ground via CB5)3.4
LM11 caught between RB and half-spaceCB4Vertical into the 9, round the corner3.5
They're waiting for the RB passCB4Carry; release the RB when LM11 steps3.6

Younger groups · ground-only

U13–15: 3.1, 3.2, 3.5, 3.6, plus 3.4 played on the ground (GK → CB5 → LB) instead of the 40 m drive. Skip the clipped 3.3. U10–12: 3.6 and 3.2 (carry instead of passing; up-back-through off the winger).

Phase 4 of 4 · Draft preview

Lock-On

2 v 2 on the CBs + CM on the 6.

This is the picture in Episode 01 (PRO-0001).

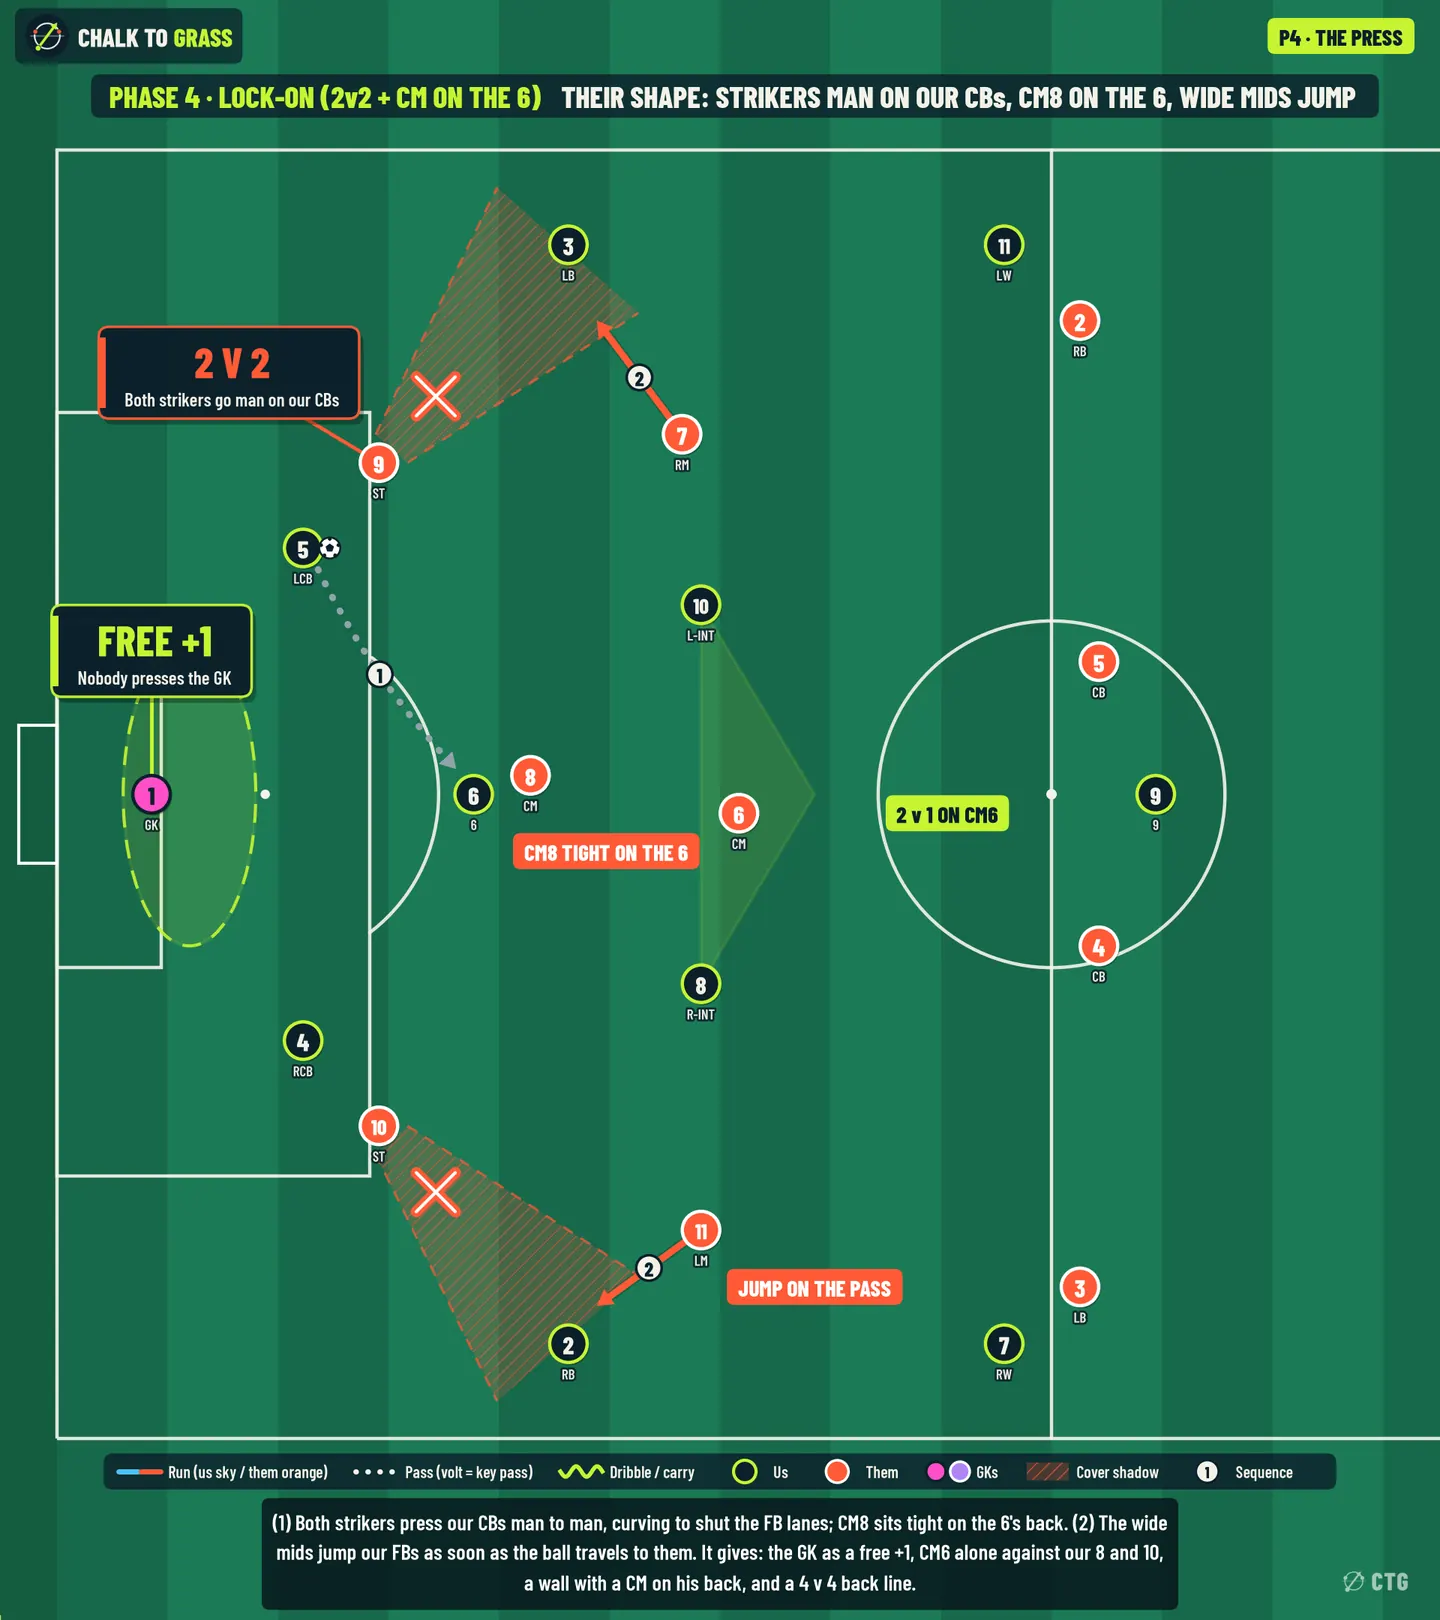
Their press

  • Shape. ST9 and ST10 go man to man on our CBs, starting on the outside shoulder and pressing outside-in, so their curves shadow the CB→FB lanes. CM8 steps up tight on our 6's back (1–2 m, goal-side). CM6 is left alone in midfield between our 8 and 10. The wide mids (LM11, RM7) hold half-positions about 17 m from our FBs, ready to jump them. Their back four is 4 v 4 (our 9, RW, LW + whichever interior runs).
  • Triggers. A pass into a CB → his striker closes him at full speed. A pass into the 6 → CM8 jumps his back to stop the turn. A pass to a FB → the wide mid jumps from inside. A pass back to the GK → a striker may leave his CB to press the GK (curving to block that CB).
  • Cover shadows. From CB5: ST9 shadows CB5→LB3. From CB4: ST10 shadows CB4→RB2. The 6 is not shadowed but marked.
  • Takes away. Time for the CBs, the CB→FB lane, and the 6 turning.
  • Gives.
    1. The GK as a free +1: nobody presses him, so he can find anyone the press has left (4.4, 4.6).
    2. 2 v 1 on CM6: our 8 and 10 against one CM (4.1, 4.6).
    3. A wall with a CM on his back: the 6 sets it first time and the third man arrives facing forward (4.2, Episode 01).
    4. The hole in front of their back four: CM8 has gone high, so only CM6 screens it (4.5).
    5. The space a jumping wide mid leaves (4.3), and 4 v 4 at the back (4.5).
Phase 4 overview board: Lock-On, their 4-4-2 press shape, cover shadows and the spaces it gives
Phase overview: their press, the cover shadows (hatched), the lanes it takes away (×) and the spaces it gives (volt).

Six solutions

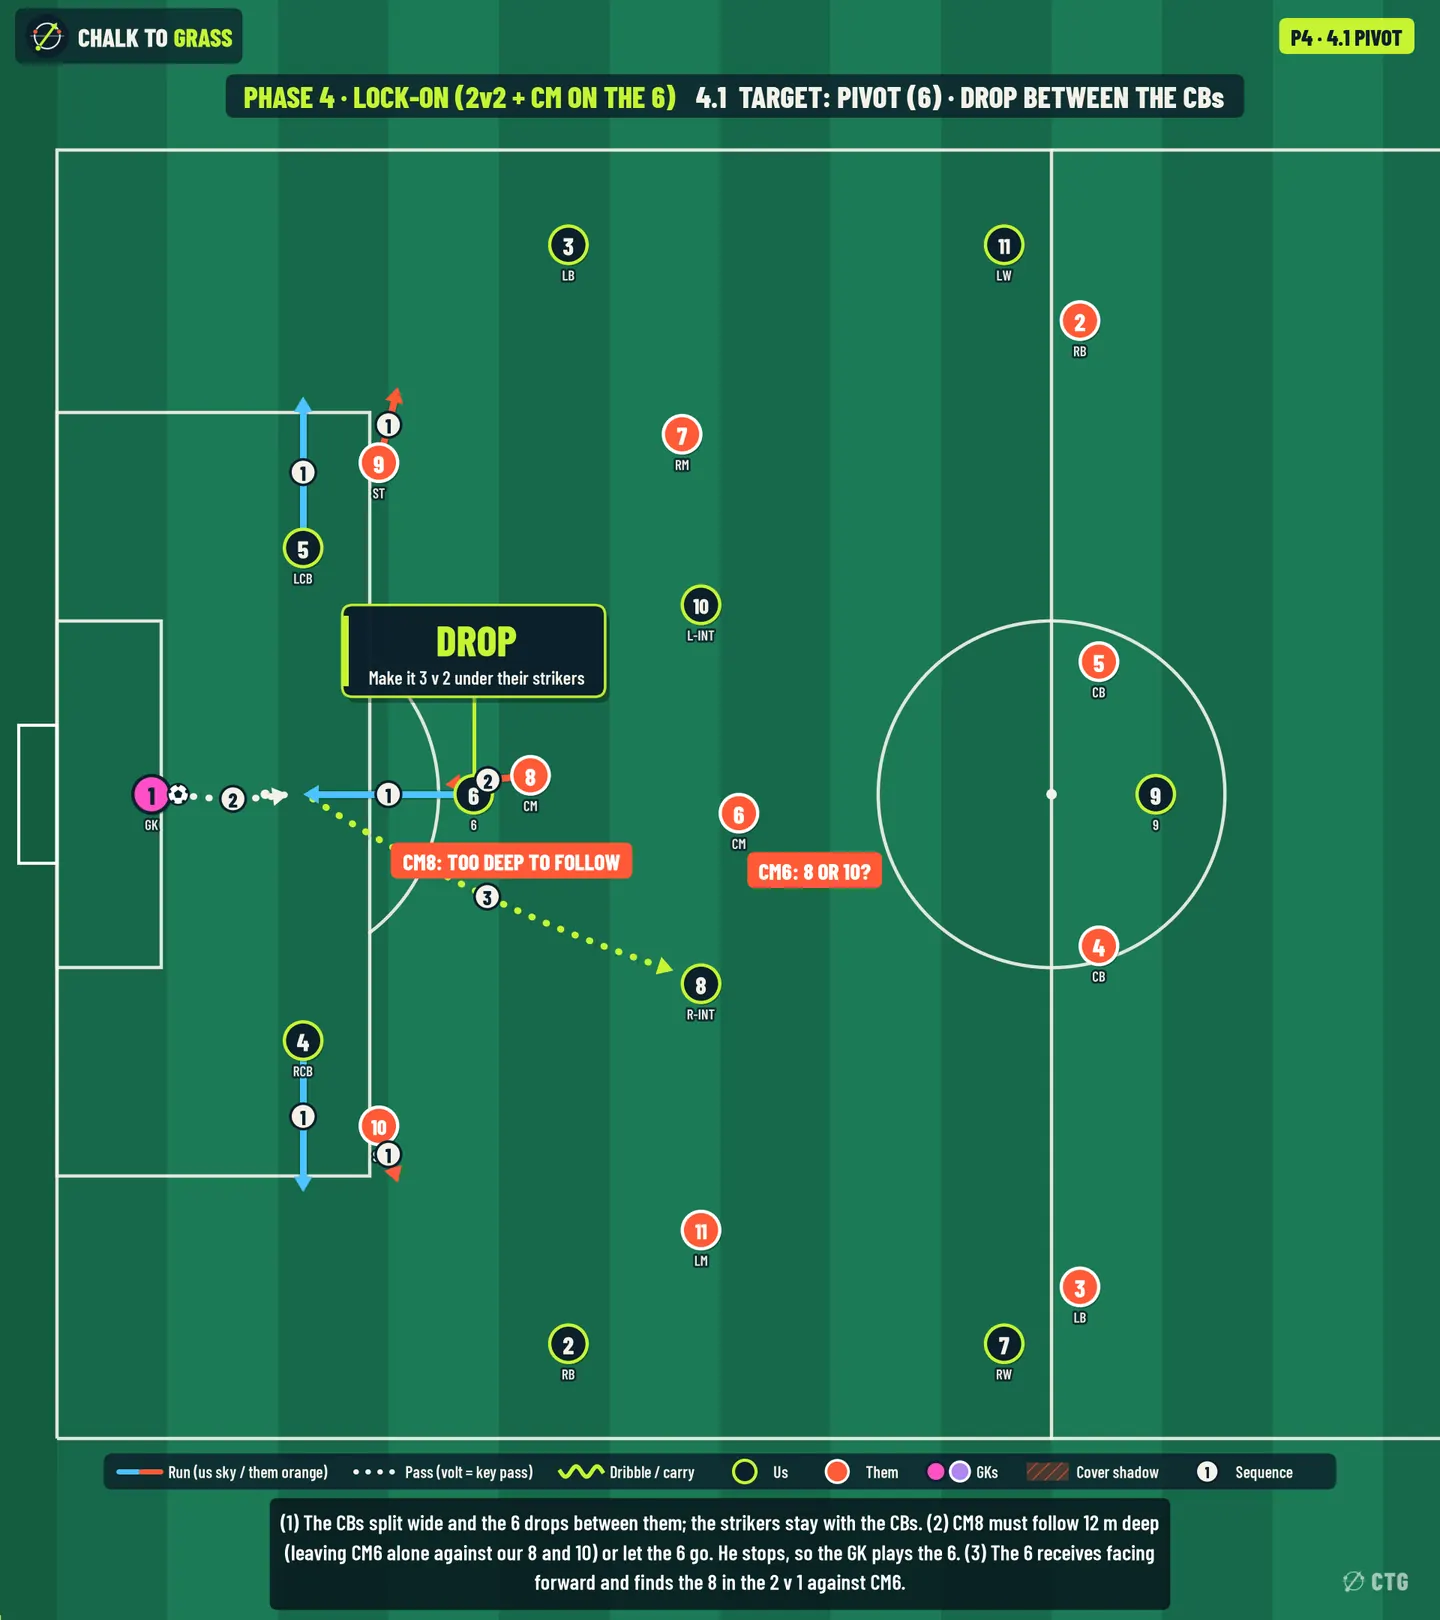
Board 4.1: Pivot, Drop between the CBs

4.1 · Target: Pivot

Drop between the CBs

Movement
① The CBs split to the corners of the box (13,13 and 13,55), and the strikers follow them. The 6 drops between them (22,34 → 13,34). ② CM8 has to choose: follow the 6 12 m deep (and leave CM6 alone against our 8 and 10) or let him go. He stops halfway (tagged LATE / TOO DEEP TO FOLLOW).
Ball path
② GK → 6 (8 m, unpressed). ③ The 6, facing forward, plays the 8 in the 2 v 1 against CM6 (23 m, 3.7 m clear of CM8).
Cue (for the 6)
your marker stops following = you're free, so face forward. For the 8 and 10: CM6 can only take one of you, so the other shows.
Why it works
a man-marking press only works if the markers follow. Following the 6 that deep pulls CM8 out of midfield altogether, and not following makes it 3 v 2 under the strikers.
Risk
Low–medium. Everything happens at the edge of our box, so the GK's pass must be firm and the 6 must take his first touch forward.
Their adjustment → our answer
CM8 follows all the way → the 8 and 10 are 2 v 1 on CM6, so the GK plays over the line (4.6). A striker leaves his CB to press the 6 → that CB is free (GK → CB, who carries).
Younger groups
the best first pattern for U10–15 (ground passes of 8–23 m).
Board 4.2: AM / 8, Third man through the wall (Episode 01)

4.2 · Target: AM / 8

Third man through the wall (Episode 01)

This is Episode 01 (PRO-0001). Solution 1.2 is the same mechanism against the Screen & Switch press.

Watch it in Episode 01 →

Movement
① CB5 carries 4.5 m to bait ST9 (to 17,45). The 6 shows to the ball (to 22,39.5) and CM8 follows tight on his back (to 25,41). ② As CB5 passes, the 8 starts his inside run (34,24 → 28,32), before the ball reaches the 6.
Ball path
② CB5 → 6 (7 m, firm, to the front foot). ③ The 6 sets first time into the 8's path (10 m, 3.3 m clear of CM8). ④ The 8 drives forward at CM6 (to 33,28.5), facing forward with both strikers and CM8 behind the ball.
Cue (for the 6)
CM on your back = wall, don't turn. For the 8: "the ball is going into the 6 = go now", and run before it arrives. For CB5: pass firm to the 6's front foot so he can play first time.
Why it works
CM8 is committed to the 6 and the strikers are committed to the CBs, so one set takes three players out of the game. That's the "3 OUT OF THE GAME" tag on the board.
Risk
Low–medium. A soft first pass, or the 8 running too early (CM6 simply steps across), kills it.
Their adjustment → our answer
CM8 stays off the 6 to guard the set → the 6 turns (4.1 logic). CM6 steps across to the 8 → the 10 is free on the far side.
Younger groups
U13–15 yes (SES-0001 trains it). For U10–12 make it a 2-touch set.
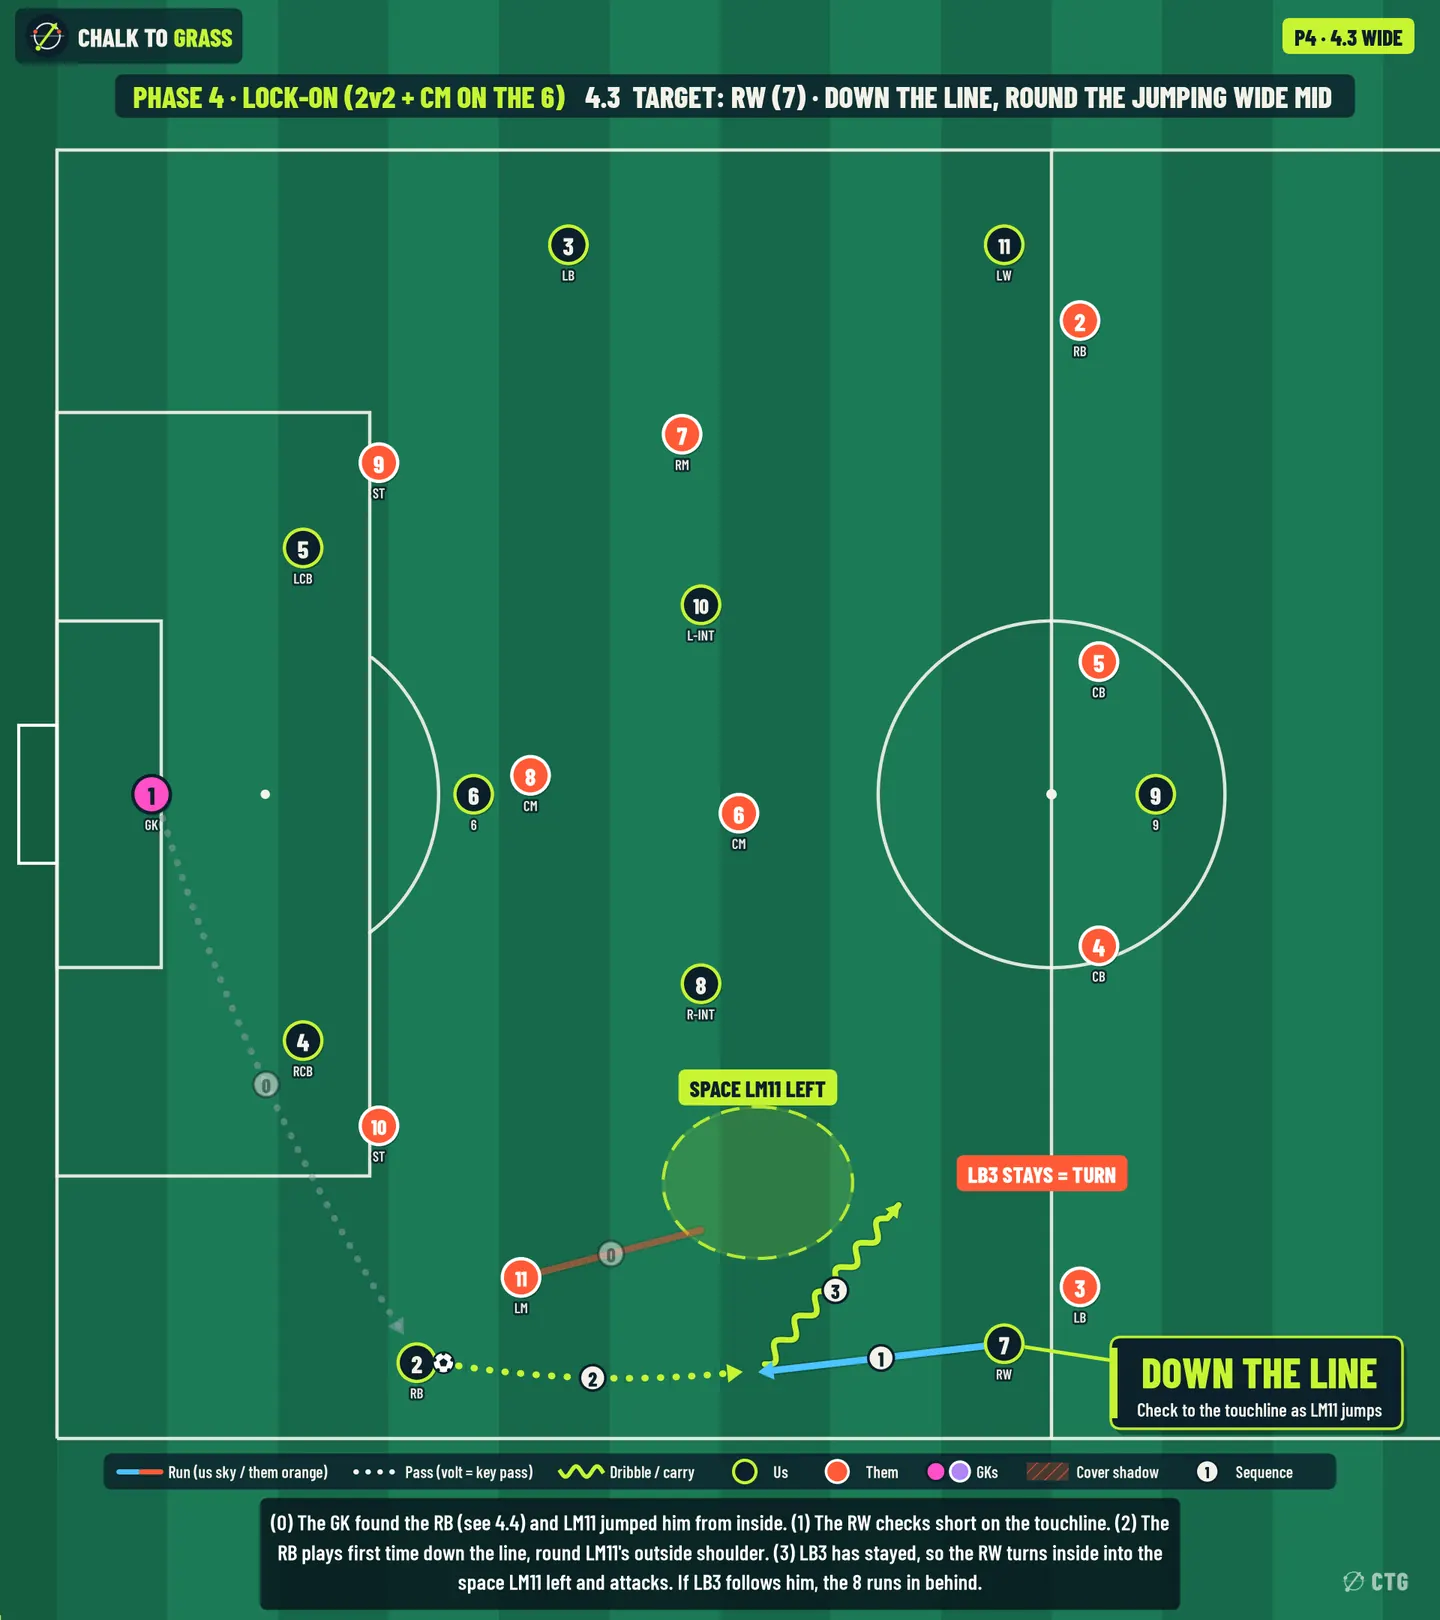
Board 4.3: Winger, Round the jumping wide mid

4.3 · Target: Winger

Round the jumping wide mid

Movement
⓪ The GK has found the RB (as in 4.4) and LM11 jumps him from inside (34,11 → 24.5,8.5). ① The RW checks short on the touchline (50,5 → 37,3.5).
Ball path
② The RB plays first time down the line, round LM11's outside shoulder (18 m, 4.7 m clear). ③ The RW turns inside into the space LM11 left and drives (to 45,13).
Cue (for the RW)
LM11's first step toward the RB = check now. LB3 stays deep = turn; LB3 follows you = set it inside to the 8, who runs in behind.
Why it works
the wide mid's jump is their trigger, but it leaves the space behind him empty, and the touchline pass beats him before he can turn.
Risk
Low–medium. The RW receives on the touchline with LB3 close, so it relies on a firm, first-time pass.
Their adjustment → our answer
LM11 holds instead of jumping → the RB has time and space to carry (4.4).
Younger groups
U13–15 yes. For U10–12, let the RB take a touch first.
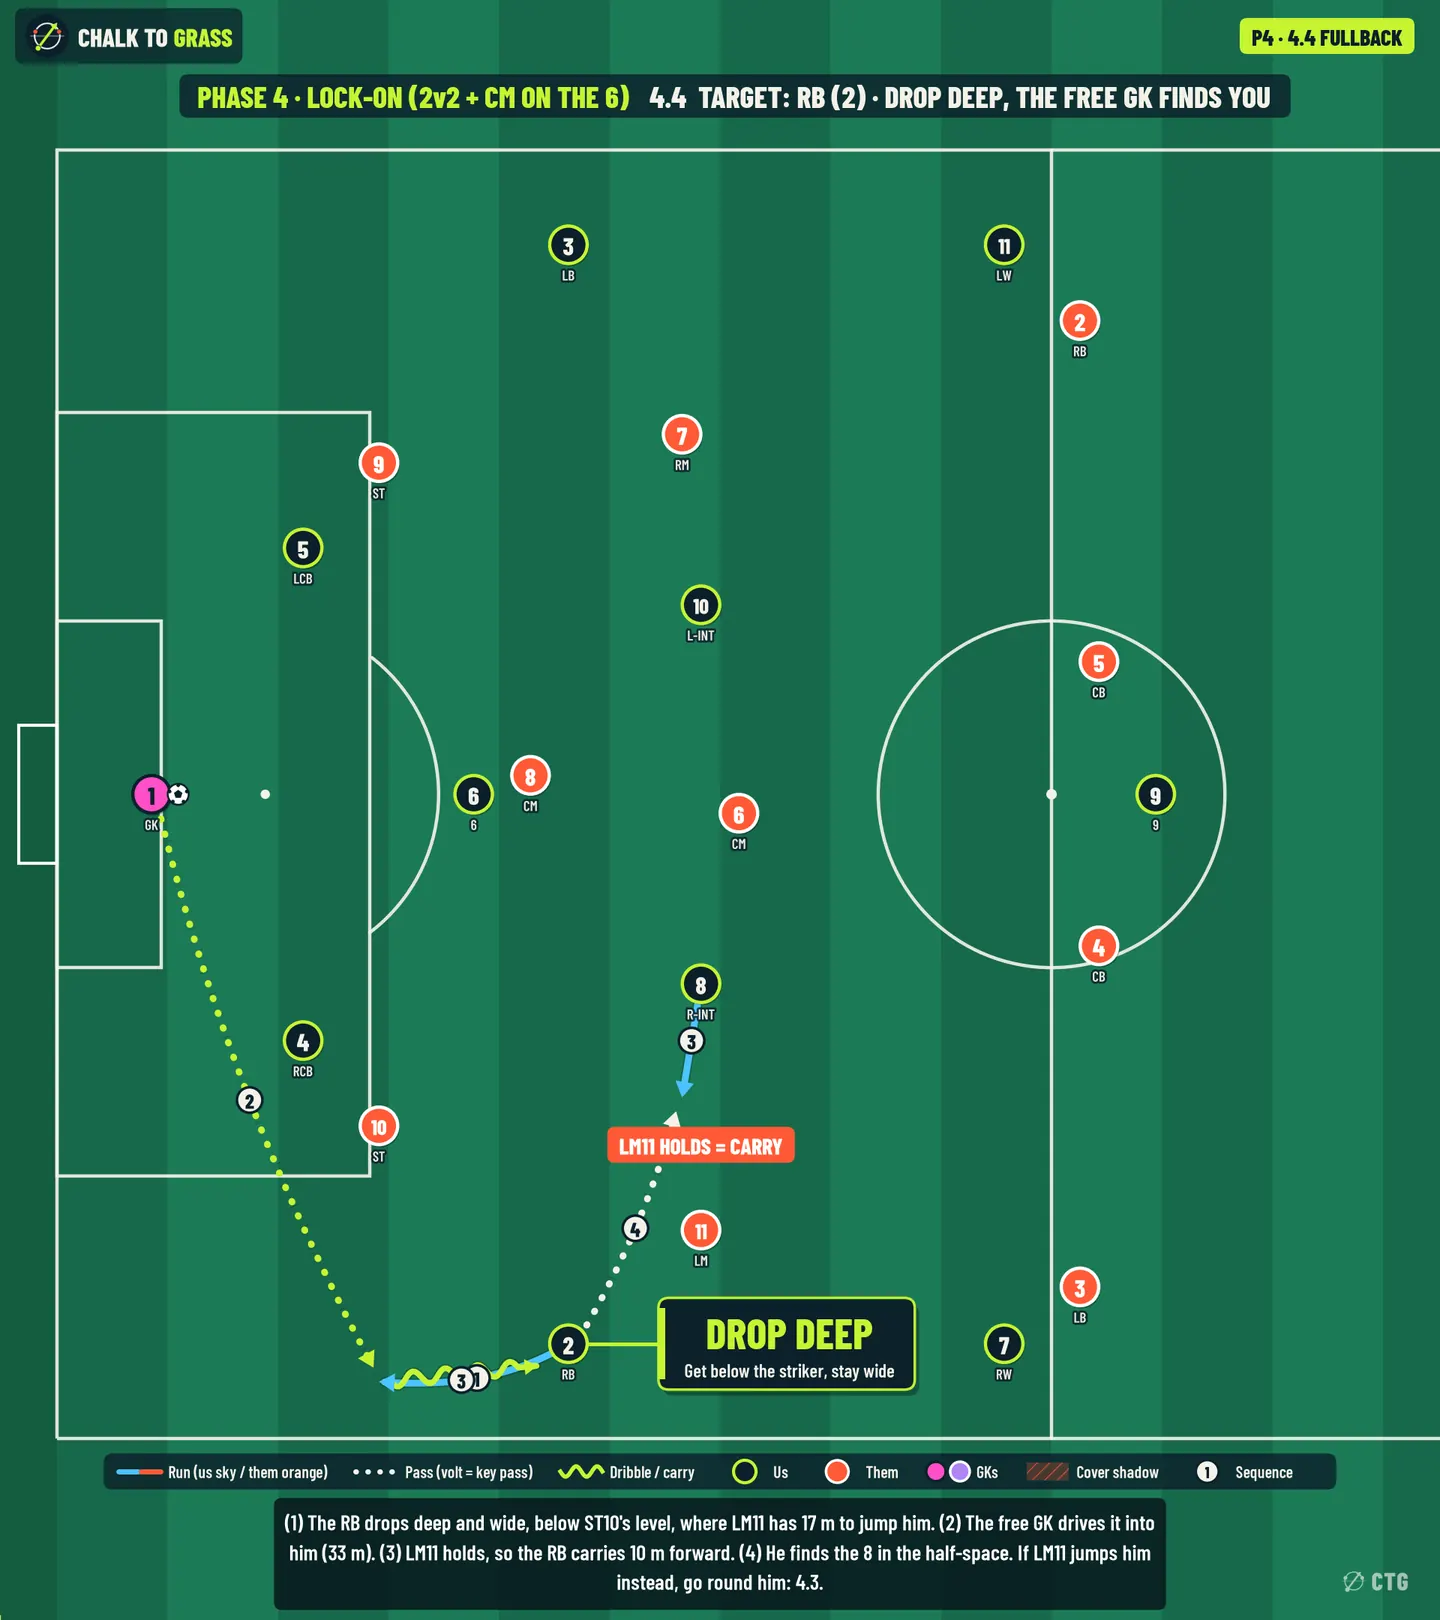
Board 4.4: Fullback, Drop deep, the free GK finds you

4.4 · Target: Fullback

Drop deep, the free GK finds you

Movement
① The RB drops deep and wide (27,5 → 17,3), below ST10's level. Now LM11 has about 17 m to cover if he wants to jump him.
Ball path
② The unpressed GK drives it into him (33 m, 4.9 m clear of ST10). ③ LM11 holds, so the RB carries 10 m (to 27,4). The 8 drifts into the half-space (to 33,18). ④ RB → 8 (15 m, 3.7 m clear of LM11).
Cue (for the RB)
ST10 is on CB4 and nobody's on the GK = drop and show. LM11 holds = carry; LM11 jumps = round him (4.3).
Why it works
the press is man-to-man in the first line, so the GK and a deep FB make 2 v 1 against nobody. The wide mid has to jump a long way, which takes him out of the game whichever way he chooses.
Risk
Low. The GK pass is long, but it goes along the touchline away from goal.
Their adjustment → our answer
LM11 jumps early → 4.3. ST10 leaves CB4 to cut the GK lane → GK → CB4 (now free), who carries.
Younger groups
U10–15 yes. For U10–12 shorten it (the RB drops to the corner of the box).
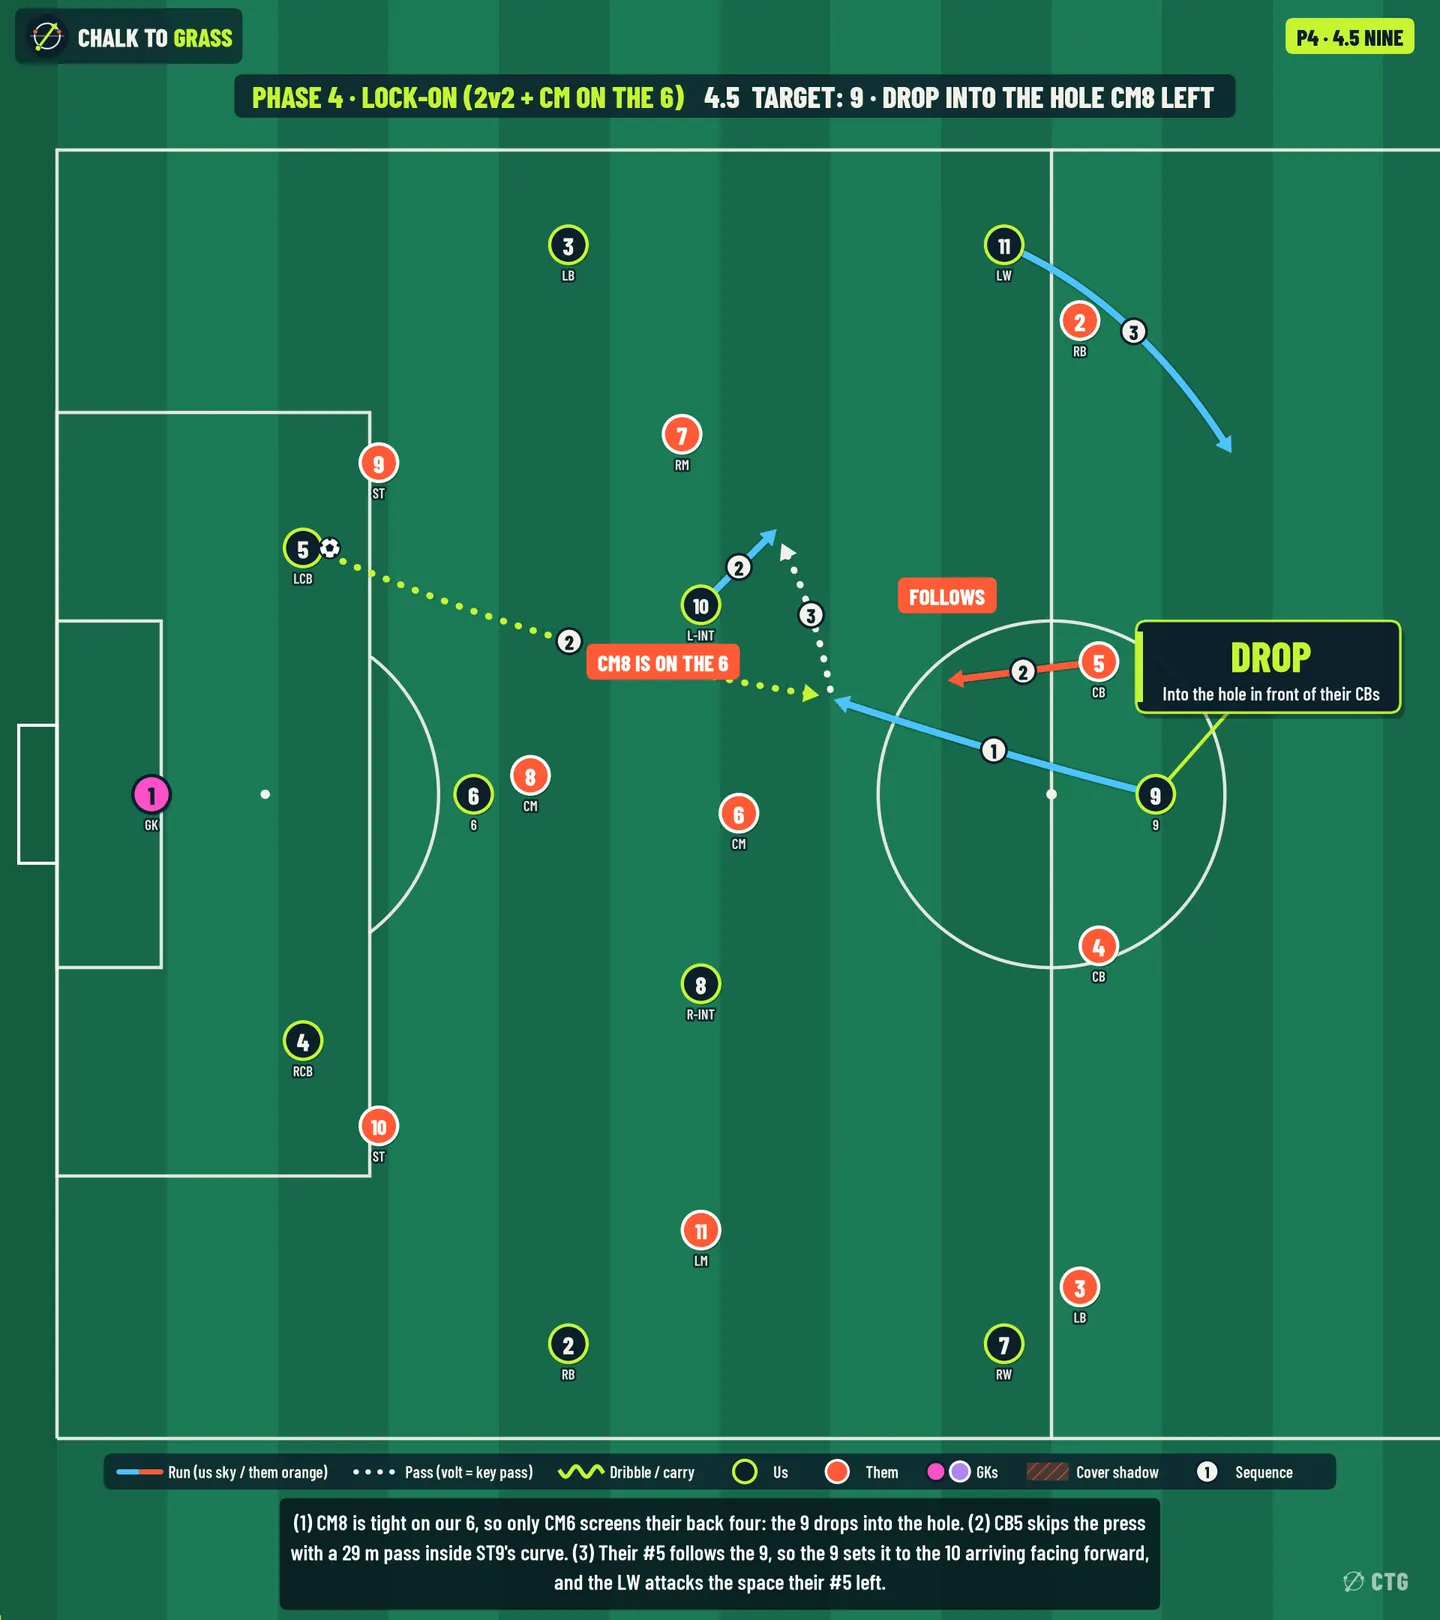
Board 4.5: The 9, Drop into the hole CM8 left

4.5 · Target: The 9

Drop into the hole CM8 left

Movement
① CM8 is high on our 6, so only CM6 screens their back four. The 9 drops into the hole (58,34 → 41,39 via 50,36). ② Their #5 follows him (to 47,40). The 10 moves up off CM6's shoulder (to 38,48).
Ball path
② CB5 skips the press: a 29 m driven pass inside ST9's curve into the 9 (5.4 m clear). ③ The 9 sets to the 10 arriving facing forward (9 m). The LW attacks the space their #5 left (to 62,52).
Cue (for CB5)
your striker is on your outside shoulder = the inside vertical lane is open. For the 9: your CB follows = set and spin; he stays = turn.
Why it works
pushing CM8 onto the 6 leaves one screener in front of four defenders, and a CB who follows the 9 opens a gap for the LW.
Risk
Medium. A 29 m pass through the lines; if it's cut out, their CM6 counters against an open midfield.
Their adjustment → our answer
CM6 drops to screen the 9 → the 8 and 10 are free in front of him (4.6, 4.1).
Younger groups
U13–15 with a shorter pass (the 9 drops further). Skip it for U10–12.
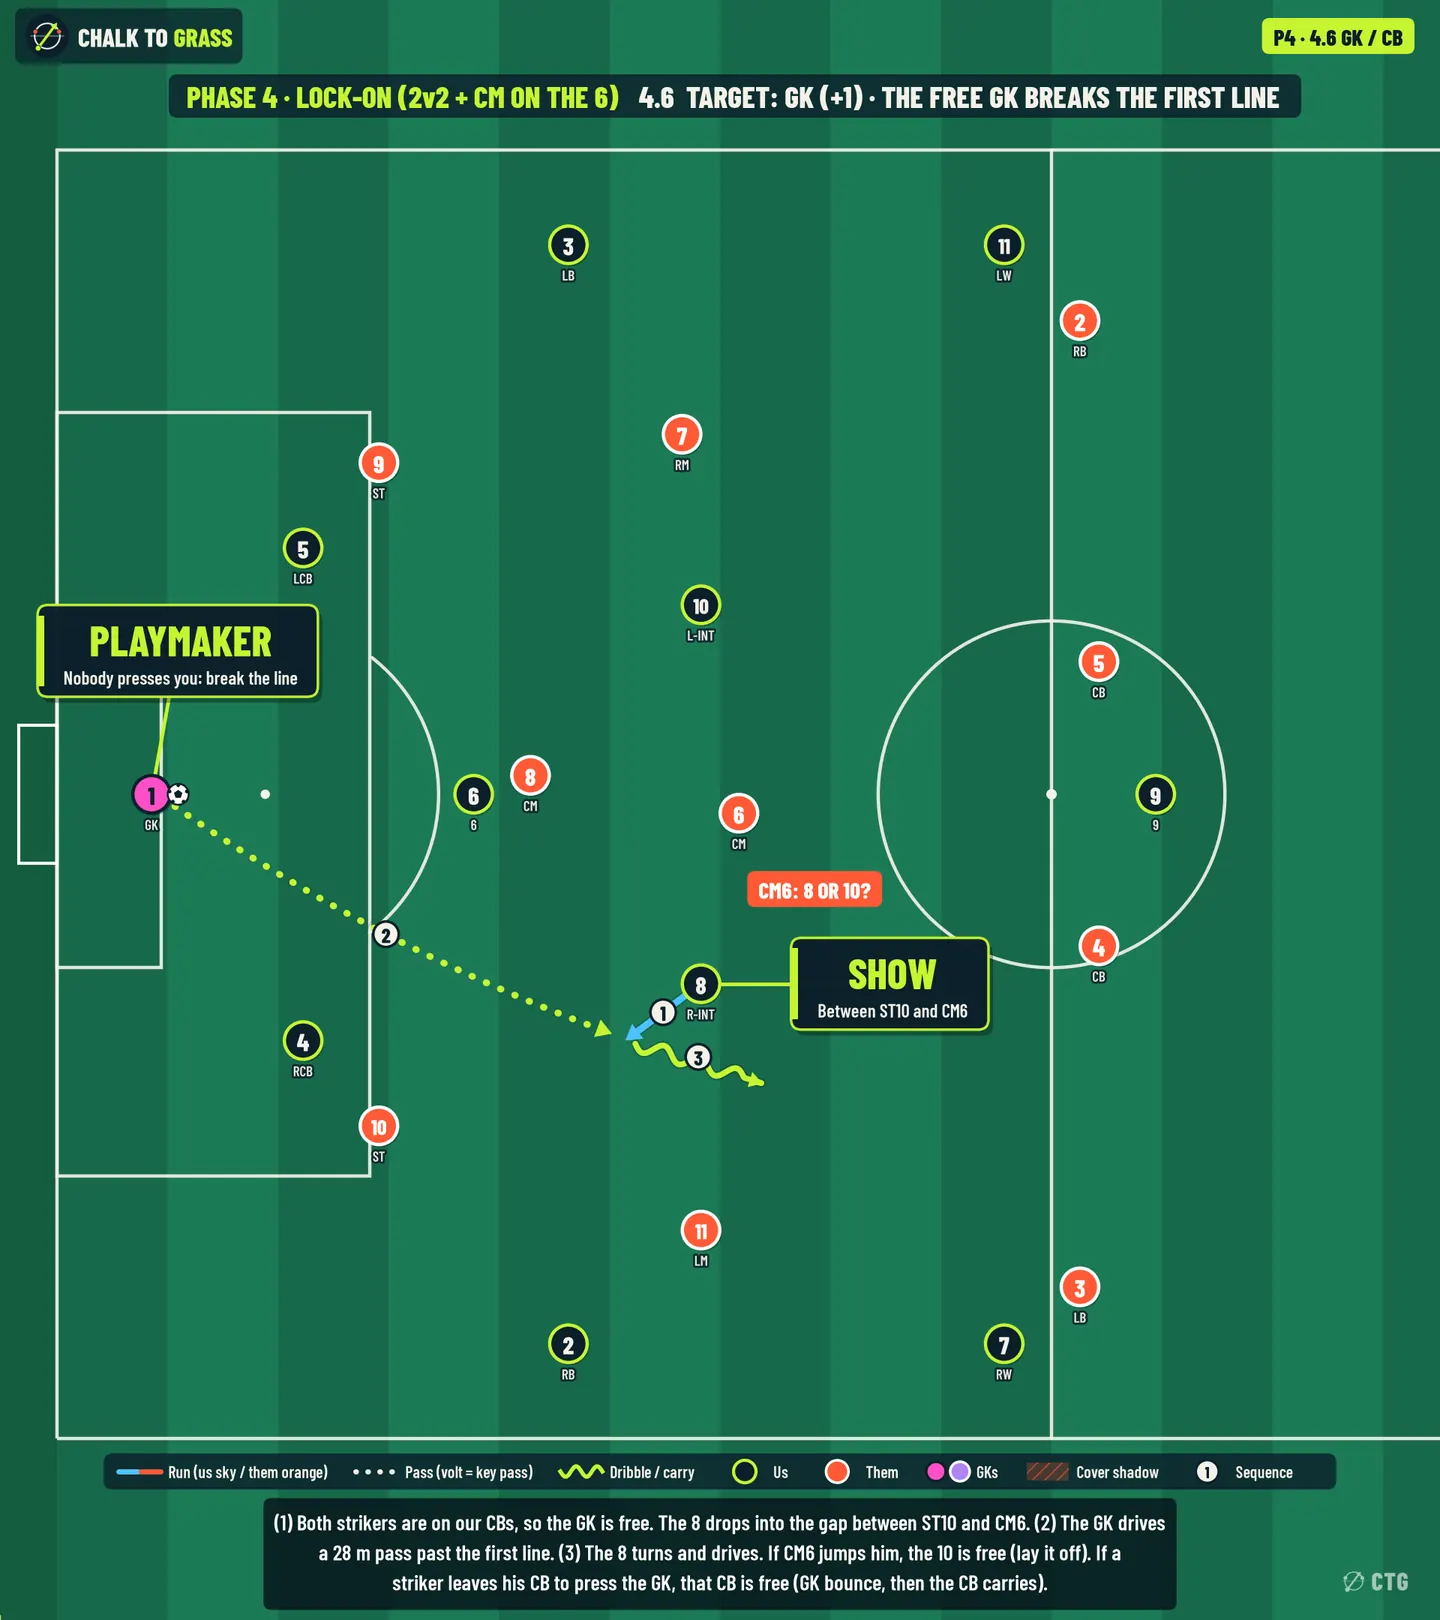
Board 4.6: GK / CB, The free GK breaks the first line

4.6 · Target: GK / CB

The free GK breaks the first line

Movement
① Both strikers are on our CBs, so the GK is free. The 8 drops into the gap between ST10 and CM6 (34,24 → 30,21).
Ball path
② The GK drives a 28 m pass past the first line into the 8 (10 m clear of ST10). ③ The 8 turns and drives (to 38,18.5).
Cue (for the GK)
nobody presses you = look past the first line first. CM6 jumps the 8 = play the 10 (or the 8 lays it off to him). A striker leaves his CB to press you = bounce to that CB, who carries forward.
Why it works
the man-to-man press makes it 3 v 3 in the first line by ignoring the GK. A GK who can drive 28 m on the ground is a free extra midfielder.
Risk
Medium. It depends on the GK's range and on the 8 receiving half-turned. If it's cut out, it's cut out 30 m from goal.
Their adjustment → our answer
a striker starts on the GK → his CB is free (GK → CB → carry, beating his 1 v 1 striker by running past him). CM6 sits deeper → the 8 receives with even more time.
Younger groups
only with a GK who can drive it on the ground. Otherwise GK → CB, and the CB carries past his striker.

Decision table · Lock-On

Read the cue, pick the solution.

You see…On the ballPlaySolution
CM8 tight on the 6, strikers on the CBsGKCBs split, 6 drops between them; GK → 64.1
CM8 on the 6's back as the ball goes inCB5 → 6One-touch set to the 8's run4.2
LM11 jumps our RB from insideRBFirst time down the line to the RW4.3
Nobody on the GK, LM11 holdingGKDrive it to the RB dropped deep; he carries4.4
Only CM6 screens their back fourCB5Vertical into the 9; 9 sets the 104.5
Nobody on the GK, 8 free between ST10 and CM6GK28 m pass past the first line4.6
A striker leaves his CB to press the GKGKBounce to that CB, who carries4.6 (branch)

Younger groups · ground-only

U13–15: 4.1, 4.2, 4.4, 4.3, 4.5. Use 4.6 only with a GK who can drive 28 m on the ground; otherwise the GK plays the CB, who beats his striker by carrying past him. U10–12: 4.1 and 4.4 (6 drops between the CBs; FB drops deep for the GK).

Player on the ball

Decision trees

CB with the ball (scan order: nearest striker → the 6's marker → wide mid → their CMs).

  • Where is the nearest striker coming from?
  • From outside (Phase 2) → carry inside (2.6), or play the 6 if the CMs are pinned (2.1).
  • From inside (Phase 3) → don't feed the trap. Pick one: the 9 vertical (3.5), carry (3.6), or back to the GK for the switch (3.4).
  • Straight at you while the other striker sits on the 6 (Phase 1) → switch to the other CB or the GK (1.6) and use the window.
  • Both strikers on our CBs and a CM on the 6 (Phase 4) → the GK is the free man: GK → 6 dropped between the CBs (4.1), GK → deep FB (4.4), or a firm pass into the 6 for the third man (4.2).
  • Who left? A CM stepped → his man (the 8 or 10) is free (1.2 / 2.5 / 4.2). The wide mid stepped → behind him (1.3 / 3.2). LB3 stepped → in behind (3.3).
  • Nothing on and pressure inside 3 m? → GK (the +1), or direct to the 9 (1.5).

The 6 (scan before the ball arrives):

  • Shadowed by a striker → move out of it, toward the side the other striker isn't coming from (1.1).
  • Pressure on your back → wall: set to the third man (1.2 / 2.5 / 4.2).
  • Marked tight before the ball comes (Phase 4) → drop between the CBs and drag your marker (4.1), or show, then set first time (4.2).
  • CMs pinned and nobody within 5 m → turn (2.1).
  • Ball on our RB with ST10 curving back → show behind his curve (3.1).

Cues

Say it in five words

  • Read the striker's curve
  • Use the window, not the second touch
  • Step out of the shadow
  • Pressure on your back: set it
  • Pin, then turn
  • Their trigger is a pass: carry
  • Go when your man leaves
  • Win the far side
  • Nobody on the GK? He's our playmaker
  • Marked? Drop and drag him

Common mistakes

  • The 6 stands still in the screener's shadow and asks for it. He's never free.
  • The CB passes into the FB in Phase 3 because it "looks open", which is exactly the trap.
  • The third man runs before the wall is pressed, so his defender simply follows.
  • In Phase 4 the GK takes the safe pass to a marked CB instead of looking past the first line, which hands them their 3 v 3.

Your system, your age group

Formation adaptations and younger groups

  • Back three (3-4-3 / 3-4-2-1): 3 CBs v 2 strikers is already 3 v 2 (4 v 2 with the GK), so Phase 1's switch press barely works against it. Opponents usually answer with a wide mid jumping a wide CB (a 3 v 3), which makes Phase 3 the common one. Re-key the matrix:
    • 4 = wing-back: the far-side switch is easier, with natural width.
    • 6 = wide CB carry into the half-space. This is the best single solution vs a 4-4-2.
    • 1 = the double pivot: one shows, one drops.
    • 2 = the two 10s in the half-spaces (2.2 and 3.2 become the main patterns).
  • Double pivot (4-2-3-1 / 4-4-2 box): two 6s v one screening striker makes 1.1 automatic. One pivot drops between or beside the CBs (salida lavolpiana) to make a 3 v 2 and push the FBs high. The 10 takes the "AM" solutions, and the wingers stay wide to keep their FBs honest. Watch rest defence when both 6s drop: keep one at the edge of the circle.
  • Younger groups: each phase above lists its ground-only options. Summary: U13–15: everything except the clipped balls (1.5, 3.3) and the 40 m GK drive (3.4 goes GK → CB5 → LB on the ground). 4.6 only with a GK who can drive it. U10–12 (7v7/9v9 build-out line): 1.1, 1.6, 2.1, 2.6, 3.2, 3.6, 4.1, 4.4, all on the ground. Phase 4 is the most common press at this age (kids love man-marking), so teach 4.1 and 4.4 first.