 Chalk to Grass
Track 02 · Formation vs formation
Formation vs formation.
Shape against shape. Where the spare player is, who has to step, and how to find the free man, in 11v11, 9v9 and 7v7.

- 11v114-3-3 vs a 4-4-2 press
- 11v114-2-3-1 vs a 4-3-3
- 9v93-2-3 vs 3-3-2
- 7v72-3-1 vs 3-2-1
What's inside
In this track
What's out now and what's coming next. Everything uses the same board language: solid = run, dotted = pass, wavy = dribble.
4-3-3 vs a 4-4-2 press
Their two strikers go 2v2 on our centre-backs. The pivot and the eights decide who is free. Covered in PRO-0001.
4-2-3-1 vs a 4-3-3
Double pivot against a single six: where the overload appears and how to keep it.
3-2-3 vs 3-3-2
The 9v9 build-out with a back three, a two-man midfield and the build-out line.
2-3-1 vs 3-2-1
Small-sided shapes for U9–U12: angles, spacing and the free player.
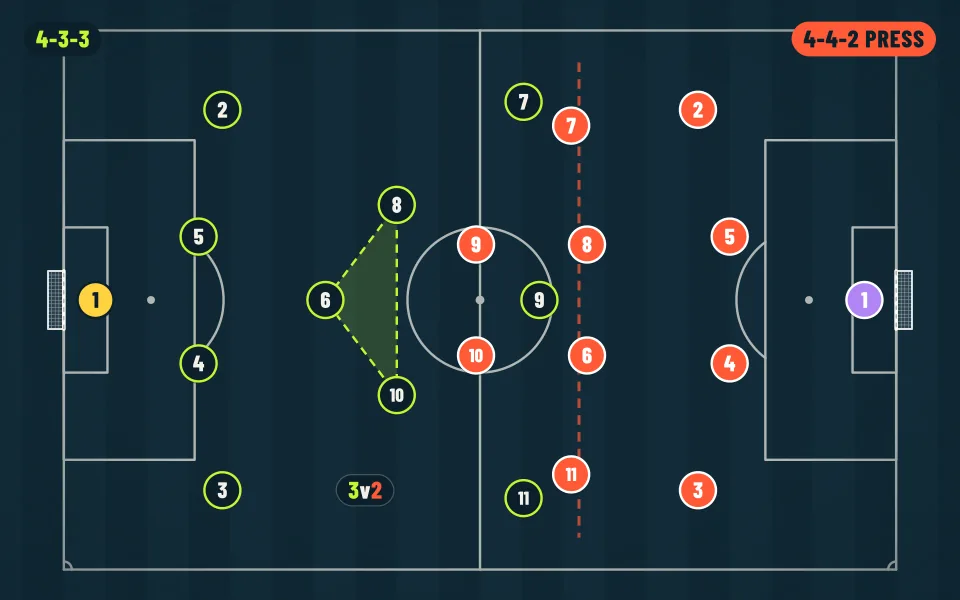
Sample · 4-3-3 vs 4-4-2 press
Find the spare player
A 4-4-2 press puts two strikers on two centre-backs. That leaves our six and both eights against their two central midfielders: a 3v2 in the middle, if we can get the ball there.
- Count first: two on two at the back means the keeper is the spare man
- Make the triangle: six and eights never stand in a flat line
- Bait, then play through: the third-man run is how the 3v2 becomes real
Waitlist
Get the formation guides first
Not built yet. Join the list and you'll hear first, with early-list pricing at launch.
Packs and memberships check out on our Stan Store.
Visit the Stan Store →Go deeper
Packs for this track
Checkout runs on our Stan Store at stan.store/chalk2grass. Products open at launch.